Chapter 18 · Mixing & Processing
Pro Tools: Mixing
“I try to get everything to work in the service of the song, and sometimes that's a process of subtraction.”
—Tom Lord-Alge, Sound on Sound, April 2000
By the end of this chapter, you will be able to:
- Configure a Pro Tools mixing template by routing audio tracks through sub-AUX groups and main AUX groups to the Master Fader
- Compare the New York, LA, London, and Nashville regional mixing schools, identify the five arrangement elements, and explain what each major genre prioritizes in a mix
- Apply frequency carving to assign every mix element its own spectral zone, stereo position, and depth so no two elements compete for the same space
- Describe the bottom-up build order—kick and bass first, full drum kit routed through four sub-buses, then instruments, then vocals—and explain why this sequence establishes a stable frequency and energy foundation
- Set up a seven-stage pro vocal chain in sequence: HPF and subtractive EQ, a fast FET-style compressor, a slow opto-style compressor, additive EQ, saturation, de-esser, and effect sends
- Select the appropriate Pro Tools automation mode—Off, Read, Touch, Latch, Touch/Latch, or Write—for a given task, and execute word-by-word vocal rides that define the final dynamic shape of the mix
- Apply saturation to individual tracks to add body without raising peak levels, to buses for analog console glue, and across the full session using Pro Tools HEAT
- Route drum and vocal buses through parallel compression and configure M/S processing on the mix bus to control width and glue independently
- Bounce a stereo mix to LUFS target, verify it with a mono check, export stems to spec, and distinguish Dolby Atmos bed and object delivery formats
- Explain how listeners experience Atmos content through binaural rendering and Apple Personalized Spatial Audio, and audition a binaural fold-down to evaluate spatial translation
- Strap a mix-bus compressor at the start of a session and mix into 1 to 2 dB of gain reduction, and apply headphone-mixing strategies that compensate for the absence of speaker crosstalk
The Art of Mixing
suggest a correctionThis is the chapter the whole book has been building toward. The sample rate and bit depth you set in Chapter 4. The microphone you chose in Chapter 5 and the technique you placed it with in Chapter 6. The room you treated in Chapter 7. The cables you wired in Chapter 8 and the equipment you understood in Chapter 9. The instruments you learned in Chapter 10 and the Pro Tools template you built in Chapter 11. The vocal you tracked in Chapter 12, the production you arranged in Chapter 13, the comps and edits you assembled in Chapter 14. The EQ you sculpted in Chapter 15, the compression and dynamics you tuned in Chapter 16, the reverbs and delays you placed in Chapter 17. All of it. Every decision you have made over every chapter that came before collapses into the stereo file you are about to bounce.
You have spent weeks crafting the perfect beat, revising lyrics, coordinating schedules with the right artist. Days recording, editing, and fine-tuning every detail. And then it happens—at 3 AM, headphones on, the room dead quiet, you pull up the faders and everything locks into place. The kick sits under the bass. The vocal floats above the instruments without fighting them. The reverb tail on the snare fades into the delay on the last word of the chorus. The mix you have been hearing in your head since day one is finally coming out of the speakers. That feeling—when dozens of separate tracks merge into one living, breathing record—is one of the greatest moments you will experience in the studio.
Mixing is the balance of volume, tone, spatial positioning, and depth. Bobby Owsinski's shorthand for the same picture: a great mix is “tall, deep, and wide”—tall in frequency from sub-bass to air, deep from front to back, wide across the stereo field (Owsinski, 2022). Your goal is to take a collection of separate tracks and musically sum them into a finished mixdown—most often stereo, increasingly spatial. By the time you open this session, basic levels are set, tracks are routed to their AUX groups, and your foundational EQ, dynamics, and effects are in place. The hard work of building the song is largely done. What is left is the integration—the sum of every small decision that turns a session into a record.
Let me be honest with you. After more than twenty years of mixing, every record is still its own problem. No recipe. No fixed amount of time. No shortcut, no magic preset, no plugin chain turns a competent mix into a great one. Some mixes take an afternoon, some take a week. Some I print, send out for feedback, and pull back open for another pass. I check on monitors. I check on headphones. I listen in the car. I listen on a phone speaker. I let it sit overnight and come back with fresh ears. I send drafts to people I trust and listen carefully for what they hear that I missed.
If I could distill all of that into one sentence, here it is: do not cut corners. Treat every step as important as the next. The mix is the sum of every small decision you make over hours, days, sometimes weeks—and it is that sum, not any individual move, that makes a great record.
Mixing is the art of balance—not the balance of a single fader push or a single EQ cut, but the balance of every choice you make against every other choice you make. Volume against tone. Tone against space. Space against time. Kick against bass. Lead vocal against the room around it. The whole mix against the song you set out to make. Every great record you have ever loved was the sum of a thousand small balances held in tension by an engineer who refused to cut corners.
That is the work.
Where Mixes Come From: The Regional Schools
Before the 1990s, you could often tell where a record was mixed just by listening. Engineers learned by apprenticing in particular rooms, techniques passed from mentor to assistant inside each city's studios, and each scene developed a recognizable sound. Bobby Owsinski's The Mixing Engineer's Handbook documents the taxonomy (Owsinski, 2022), and it is worth knowing both as history and as working vocabulary—when a client asks for “that New York drum sound,” this is what they mean.
The New York style is built on compression—rhythm-section elements compressed, bussed, and often re-compressed on the way to the mix. Its signature move survives as the New York compression trick: send the drums (sometimes with the bass) to a parallel bus, compress that bus hard, boost the highs and lows of the compressed signal, and blend it back in under the dry tracks. The result is punchy, aggressive, in-your-face—the rhythm section feels like it is being pushed through the speakers. Chapter 16 taught the parallel-compression mechanics; this is the school that made them famous.
The LA style is the opposite instinct: capture a musical event and augment it, rather than re-create it. Less compression, fewer layered effects, a more natural, relaxed presentation—think of the classic Doobie Brothers and Van Halen records of the '70s and '80s. The craft hides itself; the mix sounds like a great band in a great room.
The London style borrows New York's compression but adds dense layering: each instrument is placed in its own distinct sonic environment with its own effects treatment, and the arrangement itself becomes a mixing tool—elements enter and leave constantly, some purely for effect, some to reshape the song's dynamics section by section. It is a produced, theatrical sound, and it rewards the arrangement discipline coming up in the next section.
The Nashville style is defined by the lyric. Country is a storytelling format and the audience sings along, so the vocal rules the mix. In its most extreme era the vocal sat so far out front it nearly disconnected from the band; the modern Nashville sound has relaxed toward the natural LA presentation, but the priority never moved—Nashville mixers like Ed Seay frame it plainly: in pop and rock an occasional buried word is acceptable, in country it never is.
By the 1990s, A-list mixers were flying between cities and freelancing across scenes, and the schools blurred into the global hybrid practice this chapter teaches. But the vocabulary survives, and so do the techniques. When a mix feels polite and you want aggression, reach New York. When it feels overworked, reach LA. When the arrangement is the problem, London already solved it.
I have watched a new regional sound get built from the ground up. Early in my career I started working with Whosoever South, a collective out of Georgia, and we kept colliding two of these schools on purpose—they would send me real country instruments tracked down South, fiddle, banjo, pedal steel, and I would drop them onto hip-hop drums underneath a vocal mixed with Nashville discipline, every word out front. On paper it should not have worked, and at first it did not. But the harder we leaned into the contradiction—Southern storytelling riding a rhythm section pushed New York aggressive—the more it stopped sounding like two genres fighting and started sounding like one thing that was ours. The schools in this section are history; they are also still being written. If you hear two of them nobody has put together yet, that is not a mistake to avoid—it might be your sound.
Before You Build
suggest a correctionBy now your session is ready. You have a Pro Tools template (Chapter 11), tracked audio (Chapter 12), an arrangement (Chapter 13), edits and comps (Chapter 14), EQ on tracks (Chapter 15), dynamics (Chapter 16), and time-based effects (Chapter 17). Tracks are routed to their Main AUX Groups—Drums, Bass, Instruments, Lead Vox, BG Vox, FX—and your foundational processing is in place. This is not a re-teach. This is the verification pass before we open the faders. Two minutes of checks here saves hours of fighting plugins later.
Diagnose the Arrangement First
The biggest mixing problems are usually not mixing problems. Before you touch a fader, play the rough mix once with the session closed—no meters, no plugin windows—and ask the arrangement questions, because no amount of EQ rescues a song in which too many instruments fight for the same space at the same time.
The framework comes from Bobby Owsinski, and it reduces any arrangement to five elements. The foundation is the rhythm section—bass and drums, plus anything locked to their figure. The pad is any long sustaining tone: organ, synth pad, sustained strings. The rhythm is whatever plays in motion against the foundation—a shaker, a strummed acoustic, a percolating hi-hat loop. The lead is the vocal, lead instrument, or solo. The fills answer the lead in the spaces between its lines. Instruments playing the same figure count as one element: a doubled lead vocal with two harmonies is still one lead.
Two rules follow. Rule one: keep no more than four elements playing at once. Three often works better; five almost never works. When a section feels crowded, the fix is rarely EQ—it is muting something, and the mute button is the most underrated mixing tool in the session. Rule two: every element gets its own frequency space. When two instruments with the same bandwidth play in the same register at the same volume at the same time, the ear cannot decide which to follow and fatigues—this is why you almost never hear a lead vocal and a guitar solo simultaneously. The fixes, in order of preference: have them play at different times; move one to a different octave or register; or re-voice one so they fill different ranges. EQ carving (Chapter 15) is the last resort, not the first.
Then listen once more for tension and release. A great mix works like a great film—it builds, peaks, and breathes. If every section of the song is equally full, the chorus has nowhere to go. Strip the verses harder than feels safe and the chorus arrives like a wave. This is where automation (later in this chapter) earns its keep: elements entering and leaving is what keeps a four-minute record interesting at minute three.
Make these calls before the faders move, with the producer in the conversation if the producer is not you—arrangement edits are production decisions. Five minutes of muting at the top of a mix routinely does more than five hours of plugin work.
The hardest version of this lesson I ever learned was on a project called Down in the Woods, chasing a country-electronic hybrid. The early mixes had everything in them—layers of picked instruments, pads, percussion running the full length of the song—and every section sounded busy while none of it actually hit. The fix was not EQ and it was not a plugin. We started muting, and we kept muting, until what was left was hard bass and drums with only the song's signature parts coming in and out around them. That is the moment it finally connected. I have never forgotten it: when a record is not working and your hand is reaching for another processor, the answer is usually the mute button.
The Mixing Template, From Top to Bottom
This is the deep-dive Chapter 12 promised when it introduced Aux Inputs and the Master Fader, and the structural detail behind the session template you built in Chapter 11.
Master Fader (Stereo) — A track dedicated to your main output. The sum of every track in the session eventually goes through here. Use this to monitor total volume and place final master-bus effects.
Main AUX Groups (Stereo) — Groups like Drums, Bass, Instruments, Lead Vox, BG Vox, and FX. Plugins on these treat groups as a single instrument. All individual audio tracks and FX tracks route to these AUX Groups, which then route to the Master Fader.
Sub AUX Groups (Stereo) — AUX Groups can be broken down further—instruments split into Guitars, Keys, Strings; Lead Vocals split into Lead Verse, Lead Chorus, Lead Bridge. Audio tracks route to these, then to Main AUX Groups.
FX Tracks (Stereo) — AUX tracks holding time-based effects. Audio tracks send to FX tracks, which route to the FX Group AUX, then to the Master Fader.
Audio Tracks (Mono and Stereo) — The recorded data. Routes to the appropriate Sub or Main AUX Group, with sends out to FX tracks.
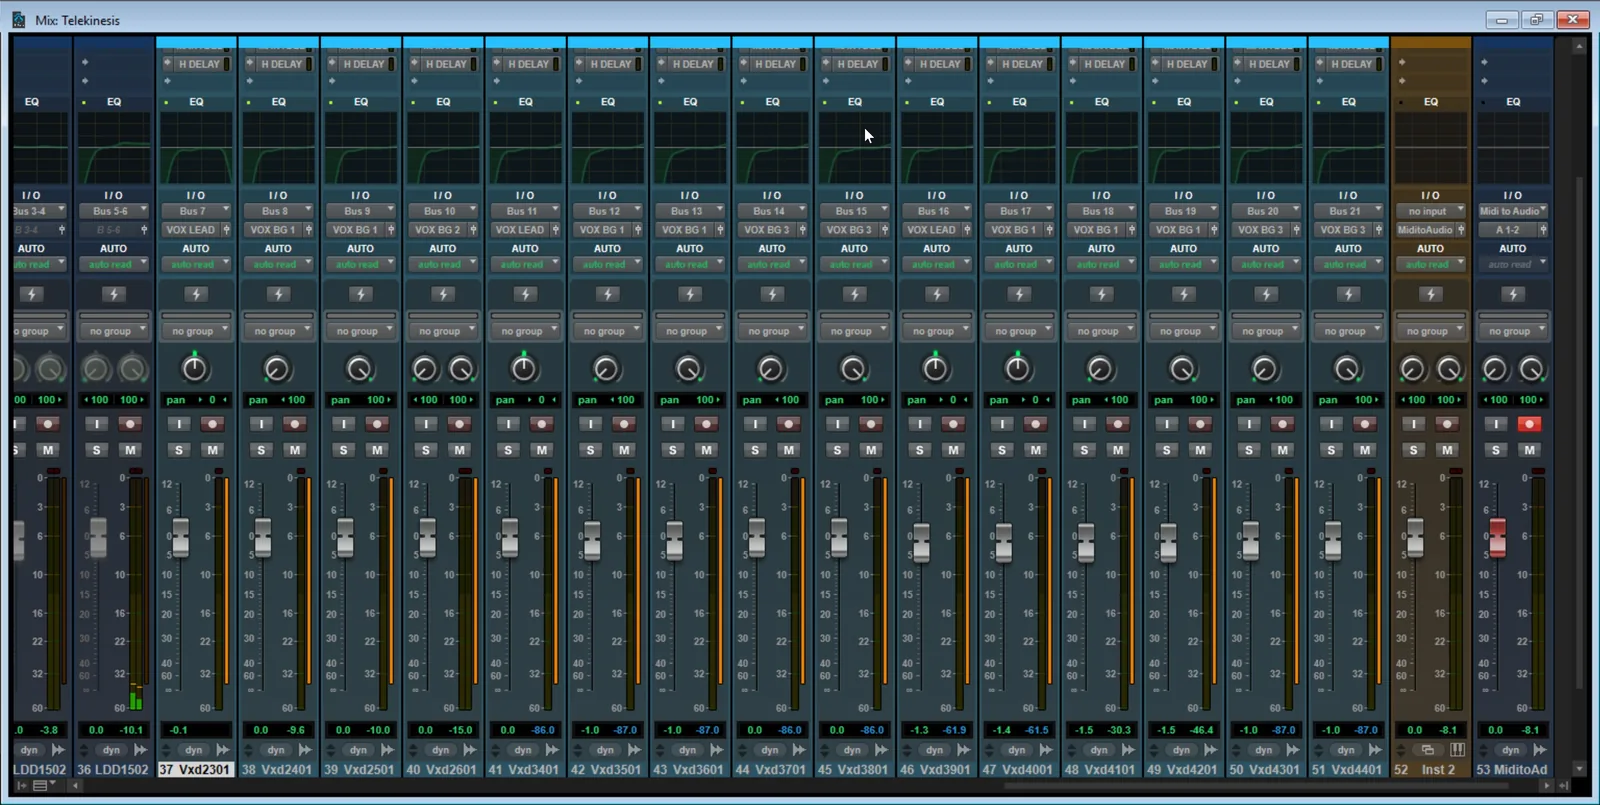
A quick terminology note: a bus is a routing path, while an AUX track is a track type that receives a bus signal so you can process or sum it. Engineers use the terms interchangeably, but they are not the same thing—a bus is a wire, an AUX is a destination.
Modern Pro Tools offers two organizational tools that make managing large sessions easier. Folder Tracks let you visually organize related tracks into collapsible groups—you can wrap your entire drum bus inside a single folder for clean navigation. Folder Tracks can either route audio (acting like AUX Groups) or simply organize visually. VCA Faders provide non-destructive group control over multiple tracks. Unlike an Edit/Mix group, a VCA gives you one master fader for the whole group—and in Pro Tools the slave faders move with it on screen, so you watch the change happen while their relative offsets and your automation stay intact. Both are powerful additions to the template structure described above.
Verify the Foundation, Set a Reference
Your foundational gain staging from Chapter 14, Step 5 is locked in. Through Chapters 15, 16, and 17 the EQ, dynamics, and effects chain has shaped your levels track by track—that is expected and intended; processed tracks no longer sit at the clip-gain target the way they did before any inserts. At mix time, what you are verifying is the result of that chain: nothing clipping its insert chain, nothing slamming the master, headroom to spare on the Master Fader. The Mix Levels Quick Reference table later in this chapter has the bus-level targets to ride toward.
Now set the one mix-time tool we have not set up yet—the reference track, a professionally mixed and mastered song in the same genre. The reference is not something to copy; it is a calibration tool that keeps your ears honest as the session drags on:
- Import the reference as a stereo audio track.
- Route the output directly to your monitor path, bypassing your Master Fader, mix-bus processing, and any group routing. The reference must hit your speakers untouched.
- Loudness-match the reference to your work-in-progress mix. A commercial master is 6–12 dB louder than your unmastered mix—if you do not pull it down, the louder track will always sound better.
- A/B every 30 minutes. Toggle the reference solo against your mix. Check tonal balance, low-end weight, vocal presence, stereo width.
- Mute and disable the reference track before you bounce. It is a tool, not part of the mix.
Last setup: calibrate your monitoring level. Mix at the calibrated reference Chapter 2 covered—85 dB SPL, a level high enough that the Fletcher–Munson contours grow more uniform (Everest & Pohlmann, 2015) (they never become truly flat, but the bass and treble stop fighting the mids the way they do at low volume). The same fader position should mean the same loudness in your ears every time you sit down. Mix at conversation volume and you will over-compensate the bass; mix at 100 dB and you will under-compensate it. Lock the level. (My own version of this story is in Chapter 2: I once mixed at 60 dB and had to redo the entire low end the moment I cranked it back up.)
Take a moment before you start moving faders to think about the song. What instruments are most important? What drives it? In contemporary music, the vocal is usually the selling point, but drums usually drive the song. Sonically visualize what the song could sound like with a great mix, then set out to build that.
Setting Up Analog Inserts (If You Mix Hybrid)
Chapter 9 covered the choice between hardware processors and plugins in depth. If you mix entirely in the box, skip this subsection. If you run analog hardware alongside Pro Tools, here is how to integrate it.
An analog insert lets you use your hardware exactly like a plugin: signal flows out a DA channel to your gear and returns through an AD channel back into Pro Tools, with Delay Compensation handling the round-trip latency automatically. The sound of analog EQ and compression is hard for digital versions to match, and a few hardware insert chains can give a track character that plugins struggle to replicate. Setting one up correctly takes a minute and saves hours of phase-aligned hand-wringing later:
- Define the insert path in I/O Setup. Open Setup arrow I/O and click the Insert tab. Pro Tools auto-populates the insert paths from your interface I/O—click Default if none appear—then double-click a path to rename it after your hardware (“1176 Insert,” “API 550A,” “SSL Bus Comp”), confirming its output channels feed your hardware and its input channels return from it. Click Apply or OK. The new insert path is now selectable from any track's insert slot.
- Make sure Delay Compensation is on (Options arrow Delay Compensation—it is on by default in Pro Tools 11 and later; the old Short/Long/Maximum selector is gone). This automatically time-aligns inserted hardware with the rest of the mix.
- Raise your playback buffer to 1024 samples or higher to give the converter round-trip enough headroom.
- Assign the insert. On the target track, click an insert slot, choose I/O (not Plugin), and select your named insert path from the dropdown.
- Calibrate level. Send a −18 dBFS tone out, set unity at the gear, then verify the return reads −18 dBFS in Pro Tools. If gain structure is off here, every track that touches the gear will be off too.
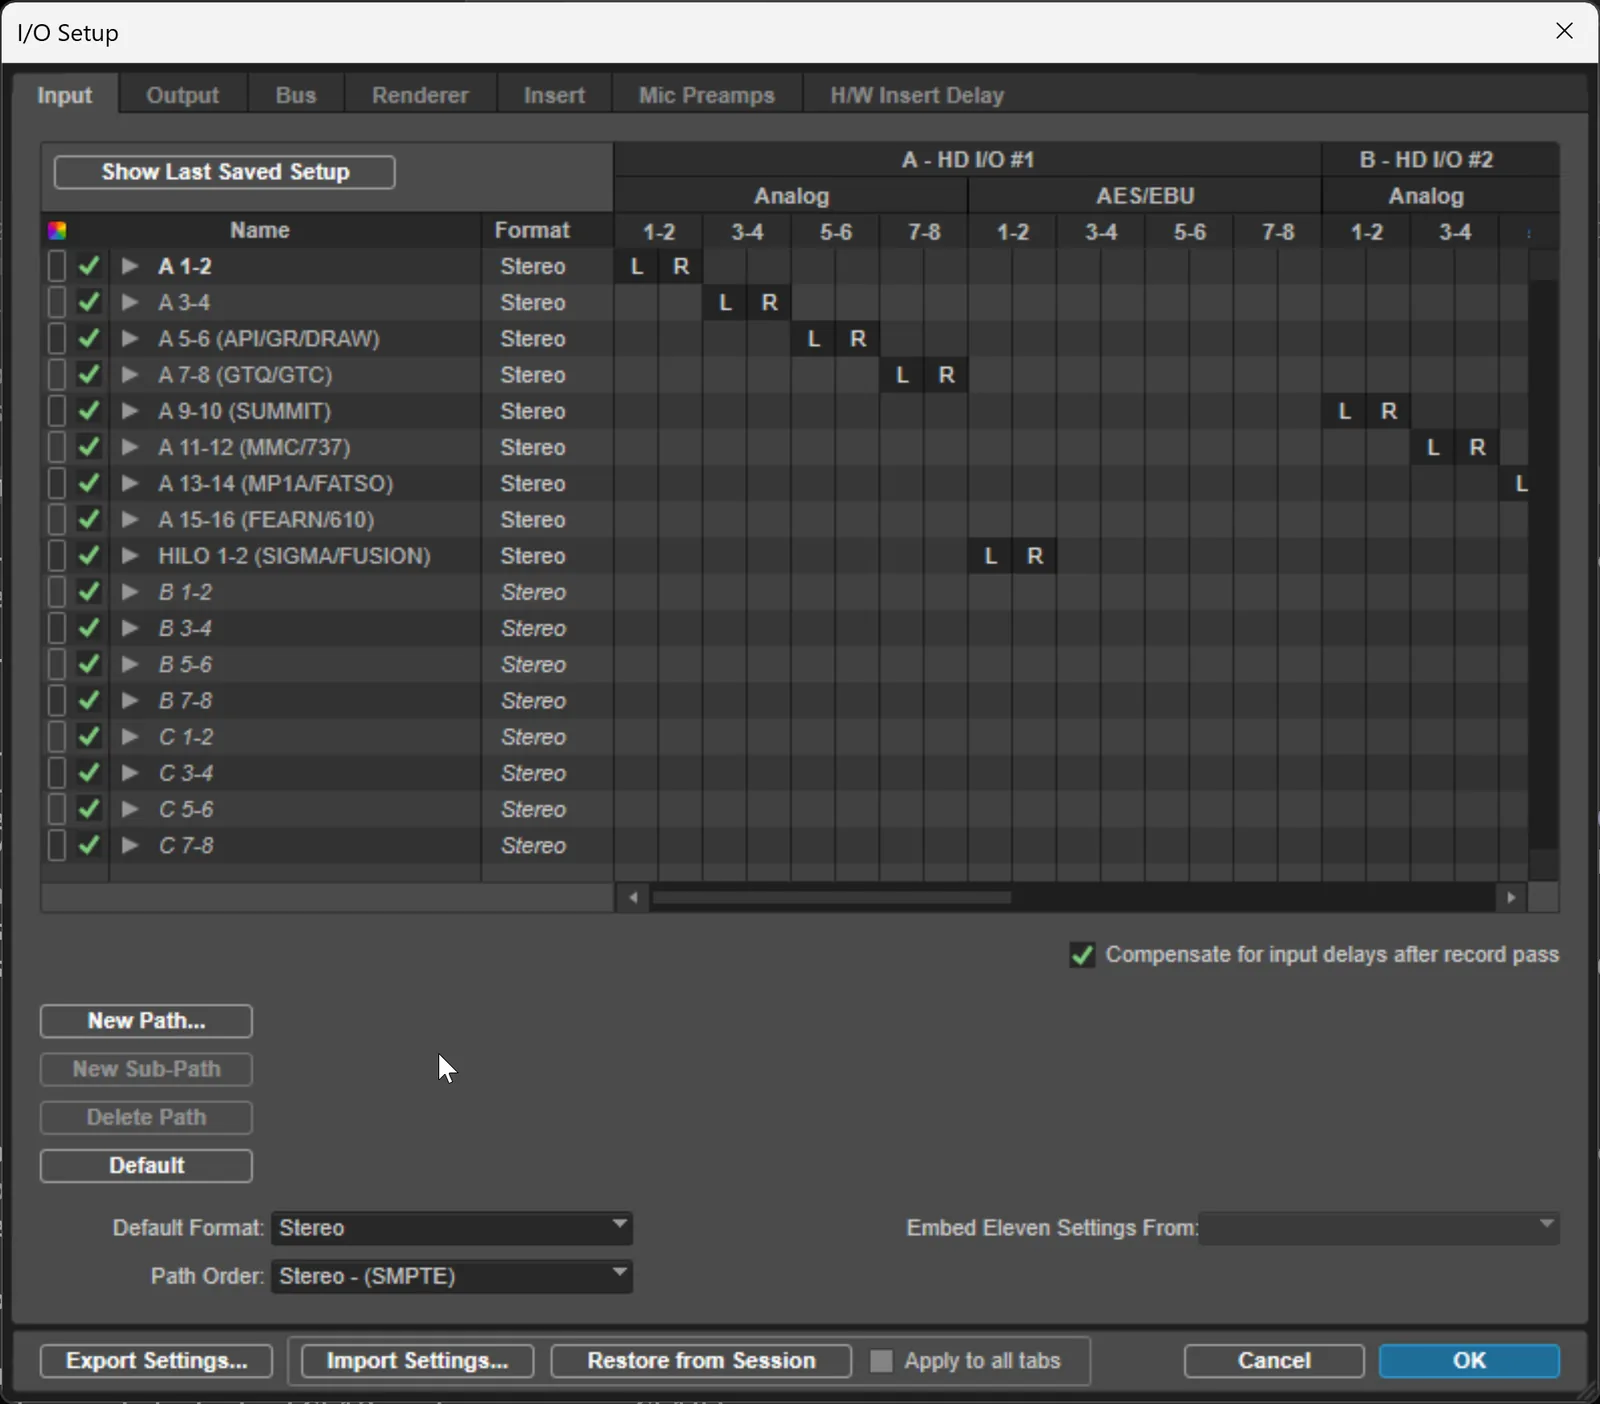
Since I have limited analog gear and often work on sessions with high track counts, I print (record) the analog-inserted track to a new track—freeing the hardware for the next track and preserving the sound for recall. Create a new audio track, set its input to the same bus as the analog-inserted track's output, record it in, then hide and make inactive the original. For a parallel blend, route the original track's output to the same bus and dial it under the printed version.
Reference loaded, hardware patched if you need it. Now we build.
Building the Mix
suggest a correction“When I mix a track, I normally start with the drums, and then the bass, and once I've got the rhythm section rocking and I have a good feel, I'll get the vocals in and then other key hook elements.”
—Mark ‘Spike' Stent, Sound on Sound, February 2010
I build from the bottom up sonically: drums first, then bass, then instruments, and finally the vocals that ride on top. This is about building the frequency and energy bed from the ground up—a separate decision from how your tracks are ordered on screen, which is its own organizational choice. Building the bed bottom-up lets you establish a solid foundation before adding the elements that sit on top of it. Some engineers start at the top—vocals first, then everything in service of the lead—and that approach has its own logic, especially in pop and hip-hop where the vocal is the song. The order matters less than the discipline of resisting the urge to jump ahead. Each step below assumes the previous is done. Every great building starts with the foundation, not the roof.
Carving the Mix
Before any specific track work, name the discipline that runs underneath everything else: carving the mix is the practice of giving every important element its own frequency zone, its own stereo position, and its own depth in the soundstage so nothing fights anything else. The frequency spectrum is finite real estate. If your kick lives at 60 Hz and your bass also lives at 60 Hz, only one of them can be heard clearly—the other turns to mud. If three guitar tracks all sit center between 1 and 3 kHz, the lead vocal has nowhere to land.
Every move you make from here on is a carving decision. The HPF on the rhythm guitar carves out room for the kick. The notch in the synth pad carves out room for the vocal. The hard pan on the rhythm tracks carves out room for the drums center. The pre-delay on the snare reverb carves out time so the dry transient cuts before the wet bloom. Done well, the listener never notices the carving—they just hear a record where every part is clear. Done badly, the mix sounds congested no matter how loud you make it.
The chart below is the frequency map I keep in my head when I am carving. Every instrument has zones where it lives, zones where it shines, and zones where it causes problems. Tape this to the wall above your monitors:
| Element | Foundation Zone | Presence/Definition Zone | Problem Zone (cut here) |
|---|---|---|---|
| Kick | 30–80 Hz (fundamentals; 808 kicks reach below 40) | 2–5 kHz (beater click) | 250–400 Hz (mud) |
| Bass | 40–200 Hz (fundamentals; 808 sub extends to ~20–30 Hz) | 700 Hz–1.5 kHz (definition) | 250–400 Hz (mud) |
| Snare | 150–250 Hz (body) | 5–7 kHz (crack) | 500–800 Hz (boxy) |
| Hi-Hat | — (HPF below 300 Hz) | 8–12 kHz (sizzle) | 1–2 kHz (clank) |
| Toms | 100–200 Hz (boom) | 3–6 kHz (attack) | 400–600 Hz (cardboard) |
| Cymbals/OH | — (HPF below 200 Hz) | 10–15 kHz (air) | 1–2 kHz (gong) |
| Acoustic Gtr | 100–250 Hz (body) | 3–6 kHz (sparkle) | 200–400 Hz (mud) |
| Electric Gtr | 100–250 Hz (low body) | 1–3 kHz (bite) | 300–500 Hz (mud) |
| Piano/Keys | 100–400 Hz (body) | 2–5 kHz (presence) | 250–500 Hz (mud) |
| Lead Vocal | 100–300 Hz (warmth) | 2–5 kHz (presence) | 300–500 Hz (boxy/mud) |
| BG Vocals | — (HPF below 200 Hz) | 5–10 kHz (air) | 300–500 Hz (mask the lead) |
The pattern reveals itself the third time you read it: nearly every instrument has its problem zone in the 250–500 Hz range. That is mud. The 6 dB cut at 350 Hz on a guitar bus, the 2 dB cut at 400 Hz on the drum bus—these are the moves that open up congested mixes. You do not need to memorize the chart. You need to understand that every track has a job, a zone, and a zone where it is in someone else's way. Carving is the work of moving each track into its job.
Kick and Bass
The low end will make or break your mix, which is why I start here. I once spent two hours on a hip-hop track trying to figure out why the mix sounded muddy and lifeless—it turned out the kick and the 808 were both sitting at 50 Hz, fighting each other on every single beat. The moment I high-passed the kick to let the 808 own the sub frequencies, the entire mix opened up. Two hours of frustration solved by one filter. The low end is that unforgiving.
When bass frequencies overlap, they cause ugly “wobbling”—undefined and muddy. Decide which element will predominantly occupy the lowest range (20–60 Hz). A subwoofer is essential for this, as nearfield monitors rarely do a great job in this region. If you are making decisions about sub-bass on speakers that cannot reproduce it, you are guessing.
In some cases, no filtering is necessary because the kick and bass play off each other naturally. But in most cases, a high-pass filter on one gives the other more room. Side-chain compression on the bass (triggered by the kick) is another powerful solution—the bass ducks slightly each time the kick hits, keeping both punchy and defined. From Travis Scott's Sicko Mode to virtually every Drake single since 2015, kick-bass side-chain is the engine of modern low end. Once you train your ear for it, you will hear it everywhere.
Sub-bass reinforcement. Sometimes the problem is the opposite: not too much low end but too little, because the source never had a fundamental to begin with—a thin DI bass, a vintage sample, a kick recorded with no weight. You have three honest options. A subharmonic generator (Waves Renaissance Bass and its relatives) synthesizes content an octave below what is already there—fast, but watch the mud it can add in the 100–200 Hz region. Layering a sine sub under the part gives you full control: tune an oscillator to the root notes (or play the bass line on a sub patch), tuck it 6–10 dB under the original, and high-pass the original so the sine owns the bottom octave alone. For kicks, sample reinforcement (Chapter 14's Sample Replace workflow, blended rather than replaced) adds the missing weight while keeping the original's character. Whichever route you take, the rules above still apply: one element owns the sub region, check the result in mono, and confirm on a system that can actually reproduce it.
Mixing low end when your monitoring lies. Most mixes are not made in calibrated rooms with subwoofers—they are made on small ported nearfields in untreated bedrooms, and that combination lies about the low end in two ways at once. The port exaggerates one narrow band near its tuning frequency and rolls off steeply below it, so one bass note booms and the notes below it vanish; the room's modes then add their own peaks and nulls at the mix position. If that describes your setup, do not mix low end by feel—mix it defensively. First, learn the lie: play a slow chromatic bass line and write down which notes jump out and which disappear; those are your room and port talking, not the mix. Second, average the room: walk while the track plays and listen from three or four spots—the average is closer to the truth than the sweet spot is. Third, use the analyzer as referee: pull up a spectrum analyzer on the mix bus next to a level-matched reference track and compare the low-end shape by eye—in an untrustworthy room, the analyzer settles arguments your ears cannot. Fourth, high-pass preemptively: anything that is not kick or bass gets a high-pass filter, because energy you cannot hear down there still eats headroom. Finally, verify on systems that do not share the lie—good headphones, the car, the phone, the mono cube. None of this replaces a treated room (Chapter 7); it keeps you from shipping a boomy mix in the meantime.
Drums
When the kit comes together, the drums stop sounding like separate microphones and start sounding like one instrument. Once kick and bass are meshing, work the rest of the kit against the Frequency Carving Chart above—the chart tells you where each piece should live and where it tends to fight the others. Use a spectrum analyzer like FabFilter Pro-Q or Waves PAZ for visual feedback if you need it, but trust your ears first. Keep midrange space for vocals; pushing too many high frequencies in drums will mask the brilliance of vocals down the line.
Panning is what turns a flat mono drum recording into a kit you can visualize. Decide if you want drums heard from the audience's perspective or the drummer's. I usually go for the audience's perspective—it is how most listeners experience a live performance. Pan values below use the standard convention where Center is 0, Hard Left is L100, and Hard Right is R100. Here is my starting point:
- Kick
- Center
- Bass
- Center
- Snare
- Center (or up to L10/R10 to favor the slight off-center placement of a recorded kit)
- Hi-Hat
- R30 to R50
- Ride
- L30 to L50
- Rack Toms
- Closest tom to snare slightly off-center (R20), next tom wider (R40)
- Floor Tom
- L50 to L75
- Overhead Cymbals
- L100 / R100 (hard panned for full stereo width)
- Room Mics
- L100 / R100 if a stereo pair, or matched to overhead positions
From the audience's perspective, a right-handed drummer's hi-hat sits on your right (R) and the ride and floor tom on your left (L)—the mirror image of what the drummer sees. Flip all of these if you mix from the drummer's perspective.
Once drums are tonally balanced, compressed, and panned, check your Drum AUX level. If each track is set to −12 dBFS, the sum can be much hotter. Highlight all drum audio tracks and group them (Ctrl+G / Cmd+G); in the group attributes dialog, enable Volume so the group's faders move proportionally. Then ride the group fader (not the AUX fader) until the Drum AUX meter lands around −8 dBFS. Drums are usually slightly higher overall than other groups in modern music.
Multi-Output Drum Routing
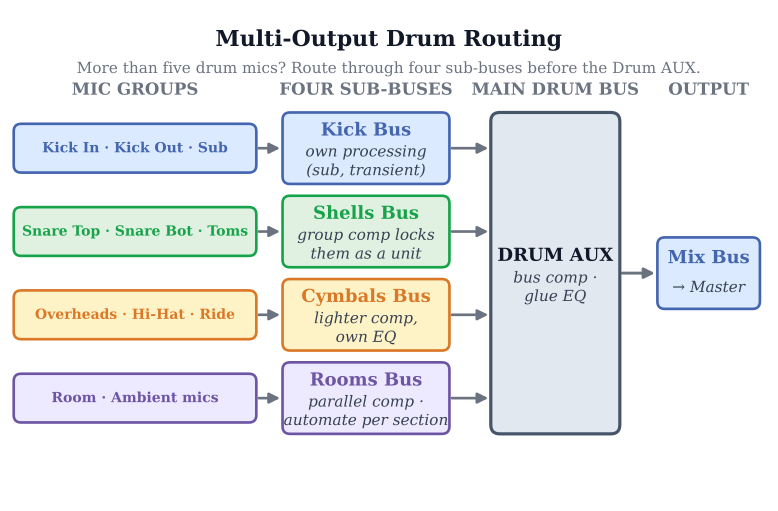
For a kit with more than five microphones, route drums through sub-buses before they reach the main Drum AUX. This is not architectural overkill—it is how every pro drum mix is built. The structure is:
- Kick routes directly to the main Drum AUX. Kick gets its own bus so kick-specific processing (parallel comp, transient designer, sub layer) does not bleed into anything else.
- Snare top + Snare bottom + Toms route to a Drums Shell sub-bus, then to the main Drum AUX. Group bus compression on the shells locks them as a unit without grabbing the cymbals.
- Overheads + Hi-Hat + Ride route to a Drums Cymbals sub-bus, then to the main Drum AUX. Cymbals usually want different EQ and less compression than shells—separating them makes that easy.
- Room mics + ambient mics route to a Drums Rooms sub-bus. This bus is where heavy parallel-room compression and saturation live; it can be ridden up in choruses for size or pulled down for tighter verses.
This four-bus structure (Kick, Shells, Cymbals, Rooms) is the foundation of nearly every pro rock, pop, and hip-hop drum sound from the past three decades. With it you can carve the kit's frequency space, automate the rooms for arrangement dynamics, and compress sub-groups without compromising the others.
Instruments
Now that drums and bass are grooving, move on to instruments. Start with the main attraction—the one featured most consistently throughout the song. Go one by one, adding each instrument only when the previous one has been compressed and EQ'd. Filter out unnecessary frequencies and bring out the tones that let each instrument sit well. If the tone and dynamics already sound good, do not feel a need to change them—one of the hardest skills in mixing is knowing when to leave something alone.
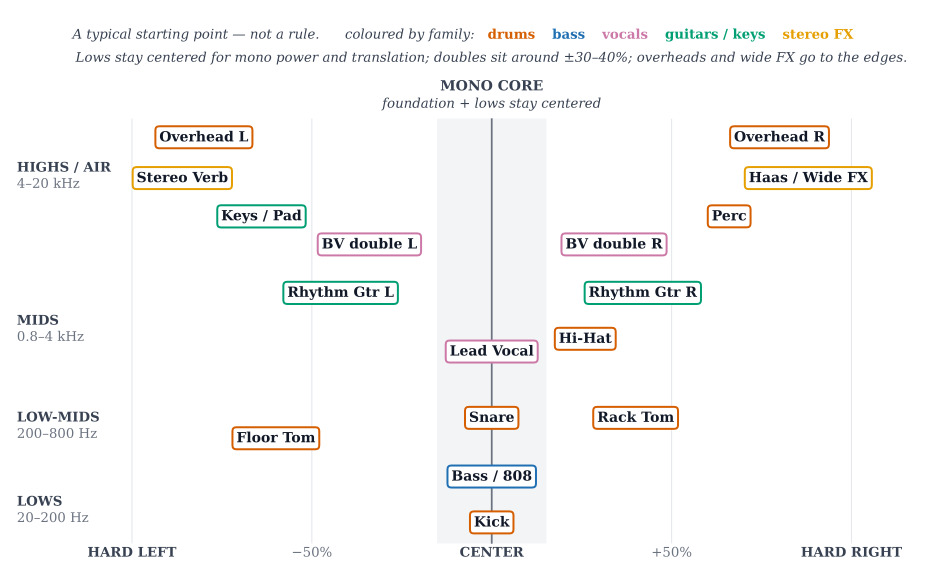
Panning is where your mix goes from a narrow column of sound to a wide, immersive stereo field. Do not pile everything in the center. Spread your instruments across the spectrum—rhythm guitars panned wide left and right, keys off to one side, percussion elements scattered wide. A good mix should feel like standing in front of a stage where every musician has their own position. Sometimes an automatic panning plugin like Soundtoys PanMan or Waves MondoMod can create movement—a synth that slowly drifts from left to right keeps the listener's ear engaged.
Hear the Panning
A repeating pluck you can place anywhere on the stereo map above. Sweep it hard left to hard right — equal-power panning, like a DAW pan pot.
Make sure there is still room for vocals. Keep instruments from occupying too much of the center stereo spectrum or too many mid frequencies that will clash later. I have mixed sessions where the instruments sounded incredible on their own, but the moment I brought in the vocal, everything fell apart—the guitars were living exactly where the vocal needed to be. I had to go back and carve a hole in the midrange of the guitars to let the vocal breathe. It is much easier to plan for this from the start. The overall instrument level on the Instrument AUX should be around −12 dBFS.
Vocals
The vocal is the first thing most listeners hear. It is the melody they hum, the lyrics they remember, the emotional center of the song. If the vocal is not clear, present, and compelling, nothing else matters. I have heard mixes with incredible drum sounds and pristine guitars that nobody noticed because the vocal was buried.
Lead vocals should be louder than backgrounds. Leads usually occupy the center while backgrounds are panned left/right or off-center. I typically use less compression on backgrounds and EQ them thinner and brighter than the lead—they should support the lead, not compete with it. Lead levels should be around −10 dBFS; backgrounds around −14 dBFS. Since vocals must be heard, do not be afraid to set them higher than feels “balanced” in solo—in context with the full mix, they often need to be pushed.
Try parallel and serial compression to make the lead sound loud and present while maintaining the same peak value. A touch of saturation on the vocal chain can fatten the sound and add character without raising the peak level—we cover saturation in detail later in this chapter. De-essing was covered fully in Chapter 16; if your lead is brightened with EQ for presence and you hear sibilance, that is the chain to revisit.
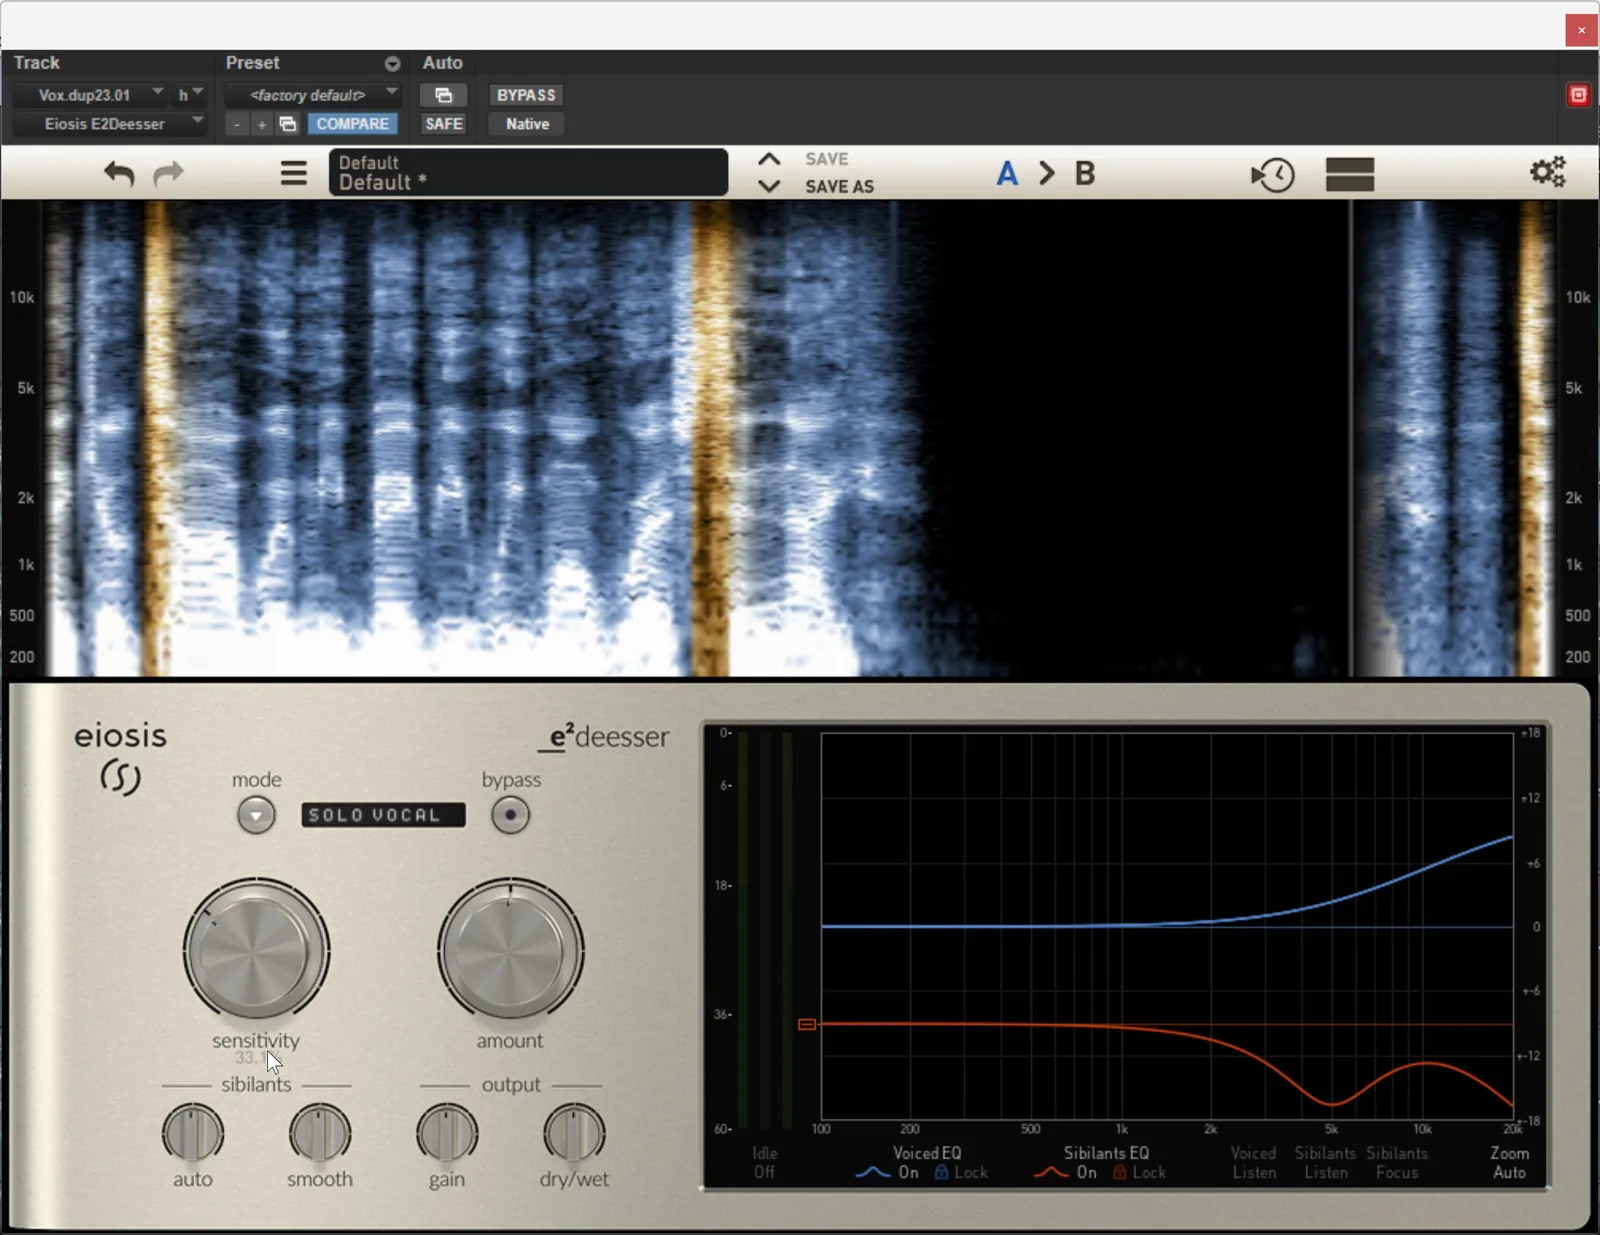
A pro vocal chain stacks several light moves rather than one heavy one. The order I reach for, in this sequence: (1) HPF and subtractive EQ to clean up rumble and 250–400 Hz mud. (2) Compressor 1, fast (1176-style) catching peaks at 3–4 dB GR. (3) Compressor 2, slow (LA-2A-style) smoothing the envelope at 2–3 dB GR. (4) Additive EQ for presence (3–5 kHz) and air (12 kHz+). (5) Saturation (Decapitator, Phoenix II, Kramer Master Tape) for body. (6) De-esser—last, because compression and especially saturation push the “sss” back up, so de-essing after them catches the sibilance the chain re-energized. (7) Sends to your reverb and delay AUXes. Then the fader. Each stage does a little. Stack them and the result is a vocal that sounds expensive without sounding processed. Andrew Scheps is known for elaborate vocal chains—though much of his processing runs through sends and parallel buses rather than a long insert stack; CLA chains a CLA-76 into a CLA-2A and rides the whole thing with automation. The serial chain above is the place to start—once you understand what each stage does in sequence, you can decide which stages to pull onto sends for parallel treatment. The plugins differ. The principle does not.

Mixing by Genre
Everything in this chapter so far is genre-neutral—gain staging, bus architecture, and the vocal chain work the same on a country record and a drill record. But the priorities shift by genre, and a mixer who moves between scenes needs to know what each one protects. (Chapter 19 maps the same territory from the mastering side, with loudness and low-end targets per genre; this is the mixing-side companion.)
Hip-hop and trap protect the low end and the lead vocal. The kick and 808 carry the record—tune them, give them the 40–80 Hz floor to themselves, and side-chain or carve anything that crowds them. The lead vocal rides dry and upfront (Chapter 17's rap-vocal guidance applies); ad-libs and doubles pan wide around it. Density lives in the beat, not in reverb.
EDM and dance protect energy and the drop. The kick–bass relationship is the genre's engine—side-chain pumping is a feature, not a fix—and the arrangement rules above run the show: builds strip elements out so drops can slam them back in. Mix for the club system and the phone speaker; the drop has to translate to both.
Pop protects the vocal and the polish. The lead vocal is the production's center of gravity—tuned, stacked, automated line by line—and every element around it is manicured: tight low end, controlled dynamics, bright detailed top. Pop mixes absorb the most automation of any genre; the movement is the product.
Rock protects energy and the backbeat. Drums and guitars share the power region, so the carving decisions (this chapter's Drums and Instruments sections) decide the record. The snare and the vocal trade the spotlight; guitars wall up left and right; the bass glues kick to guitars. Preserve dynamics—a rock record squashed flat loses the thing it exists for.
Country protects the lyric, as the Nashville school above demands. Every word legible, acoustic textures natural, fiddle and steel placed like band members on a stage rather than layers in a production. The vocal sits on top without dominating—the genre's oldest balancing act.
R&B and soul protect the groove and the vocal's intimacy. The pocket between bass, drums, and keys is sacred—do not quantize the life out of it at mix time with over-tight gating or heavy-handed transient work. Vocals run silky and close: generous low-mid body, smooth top, harmony stacks blended into one instrument.
Jazz, folk, and acoustic music protect realism. The mix recreates a performance in a believable space: minimal compression, natural dynamics, one coherent reverb rather than per-element environments, panning that matches where players would stand. The less the mix announces itself, the better it is working.
The deeper point: none of these are different techniques. They are different rankings of the same priorities this chapter teaches. Learn what each genre protects, and you can walk into any session and know—before the first fader moves—what must survive every decision that follows.
I learned this by crossing two genres that supposedly do not mix. I came up in hip-hop, where the groove and the low end are sacred and everything serves the beat. Then the country material started coming across my desk through the Georgia work, and country protects something else entirely—the lyric, every word, no exceptions. The first sessions were a fight, because I kept mixing the vocal like a hip-hop hook, tucked inside the track, and the song kept demanding I pull it back on top. That is exactly the point of this section: the techniques never changed between the two. What changed was the ranking—which priority I was allowed to spend and which one had to survive. Once I could hear what a genre protects, I could move between them without getting lost.
Time-Based FX in the Mix
suggest a correctionChapter 17 covered the full taxonomy of time-based effects—reverb types, delay types, modulation, gates, reverses—in detail. This section is about applying that toolkit at mix time. With levels, panning, EQ, and compression dialed in, take a second pass through the mix from the bottom up and add space and motion. This pass also gives you a chance to hear the entire mix with fresh ears.
Start with kick and bass. Long reverbs and delays almost always muddy the low end—keep these elements dry or nearly dry. Try adding chorus to fatten them instead. Sending to a distortion on an AUX FX track can add aggression and drive without the wash that reverb introduces.
Reverb in the Mix
In my template, I keep one of each major reverb type—a tight room, a medium plate, a long hall, and a convolution—loaded on separate AUX FX tracks at all times. Instruments I want more upfront (lead vocals, lead guitar lines) get short reverbs; instruments I want further back (pads, strings, background elements) get long ones. The reverb type does the heavy lifting: room for presence without push-back, plate for vocal shimmer, hall for grandeur, convolution for a believable real space.
One classic technique deserves its own paragraph: the pre-delay trick. It is what keeps a lead vocal upfront and spacious at once—40–80 ms of pre-delay lets the dry word land before the reverb blooms behind it, so the lyric stays present while the space opens up around it. I use it on vocals as much as on snares: the same move turns a flat, papery snare into a gunshot in a warehouse, letting the dry transient cut through before the tail blooms so you get the impact of a close source with the size of a big room behind it. It changed the way I approach both vocal and drum mixing.
The other move that separates working mixers from students: EQ every reverb return. High-pass at 200–400 Hz so the tail does not muddy the kick and bass (less aggressively on sparse or cinematic material, where a lower-extended tail is part of the size). Low-pass at 8–10 kHz so the wash does not clutter the air zone where vocals breathe. The reverb starts sounding like a space, not a haze. Same principle on delay returns—HPF the repeats so they sit behind the dry without competing for low-end real estate. A reverb without an EQ on its return is the single most common reason a mix sounds congested.
Delay in the Mix
I use more delays than reverbs in most mixes. Delay is more precise than reverb—you can time it to the song, shape it, filter it, and control exactly how much repetition you want. My template carries the tempo-synced delays Chapter 17 introduced: 1/2, 1/4, 1/8, dotted 1/8, 1/8 triplet, and 1/16 note. Short delays thicken; long delays fill gaps between phrases.
The single most useful technique I deploy is automating a 1/4-note delay onto the last word of a vocal phrase before a pause. The phrase floats into the silence on its own echo and the listener is carried through the gap until the next line lands. It is invisible to anyone who is not listening for it—and it is on virtually every modern record.
Specialty delays add character. Waves H-Delay has a smooth ping-pong mode for left-right bounces. Waves Manny Marroquin Delay offers distortion and phase modes that can make a delay sound like it is coming through a broken radio. Fattening effects like chorus, doubler, phaser, and slap delays use very short delay times to create width and thickness instead of rhythmic repetition.
The critical rule: do not run too many long delays at once, or the mix turns into a wash of overlapping echoes. Automate your delay sends so they fire only when needed—on the end of a vocal phrase, on a guitar riff between sections, during a breakdown. The best delay work is invisible until it is gone.
Set general FX levels for each instrument. The total level on the Main FX AUX should sit at −12 dBFS or below.
Saturation
suggest a correctionSaturation is one of the most powerful tools in mixing, and one of the least understood. When audio passes through analog circuits—tape machines, tube preamps, transformer-coupled gear—it picks up harmonic distortion. Not the ugly, clipping kind. The musical kind: single-ended tube stages add even-order harmonics, while tape and transformers lean toward odd-order (especially the third)—and the ear reads both as warmth, fullness, and presence. Saturation plugins emulate this behavior, and used well, they can transform a mix.
On individual tracks, saturation adds body without raising the peak level. A thin vocal suddenly sounds full. A snare that cuts but does not punch gets weight. I use saturation on lead vocals more than almost any other track—a touch of tube or tape emulation can make a vocal sound like it was recorded through vintage gear, even if it came straight out of a budget interface. The first time I dropped Soundtoys Decapitator on a vocal that had been bothering me for two days—thin, plasticky, no body, no matter what EQ I tried—the body came back inside thirty seconds. The vocal sounded like a person again, not a recording. That is the moment most engineers fall in love with saturation. Soundtoys Decapitator, Crane Song Phoenix II, and Waves Kramer Master Tape are all excellent choices.
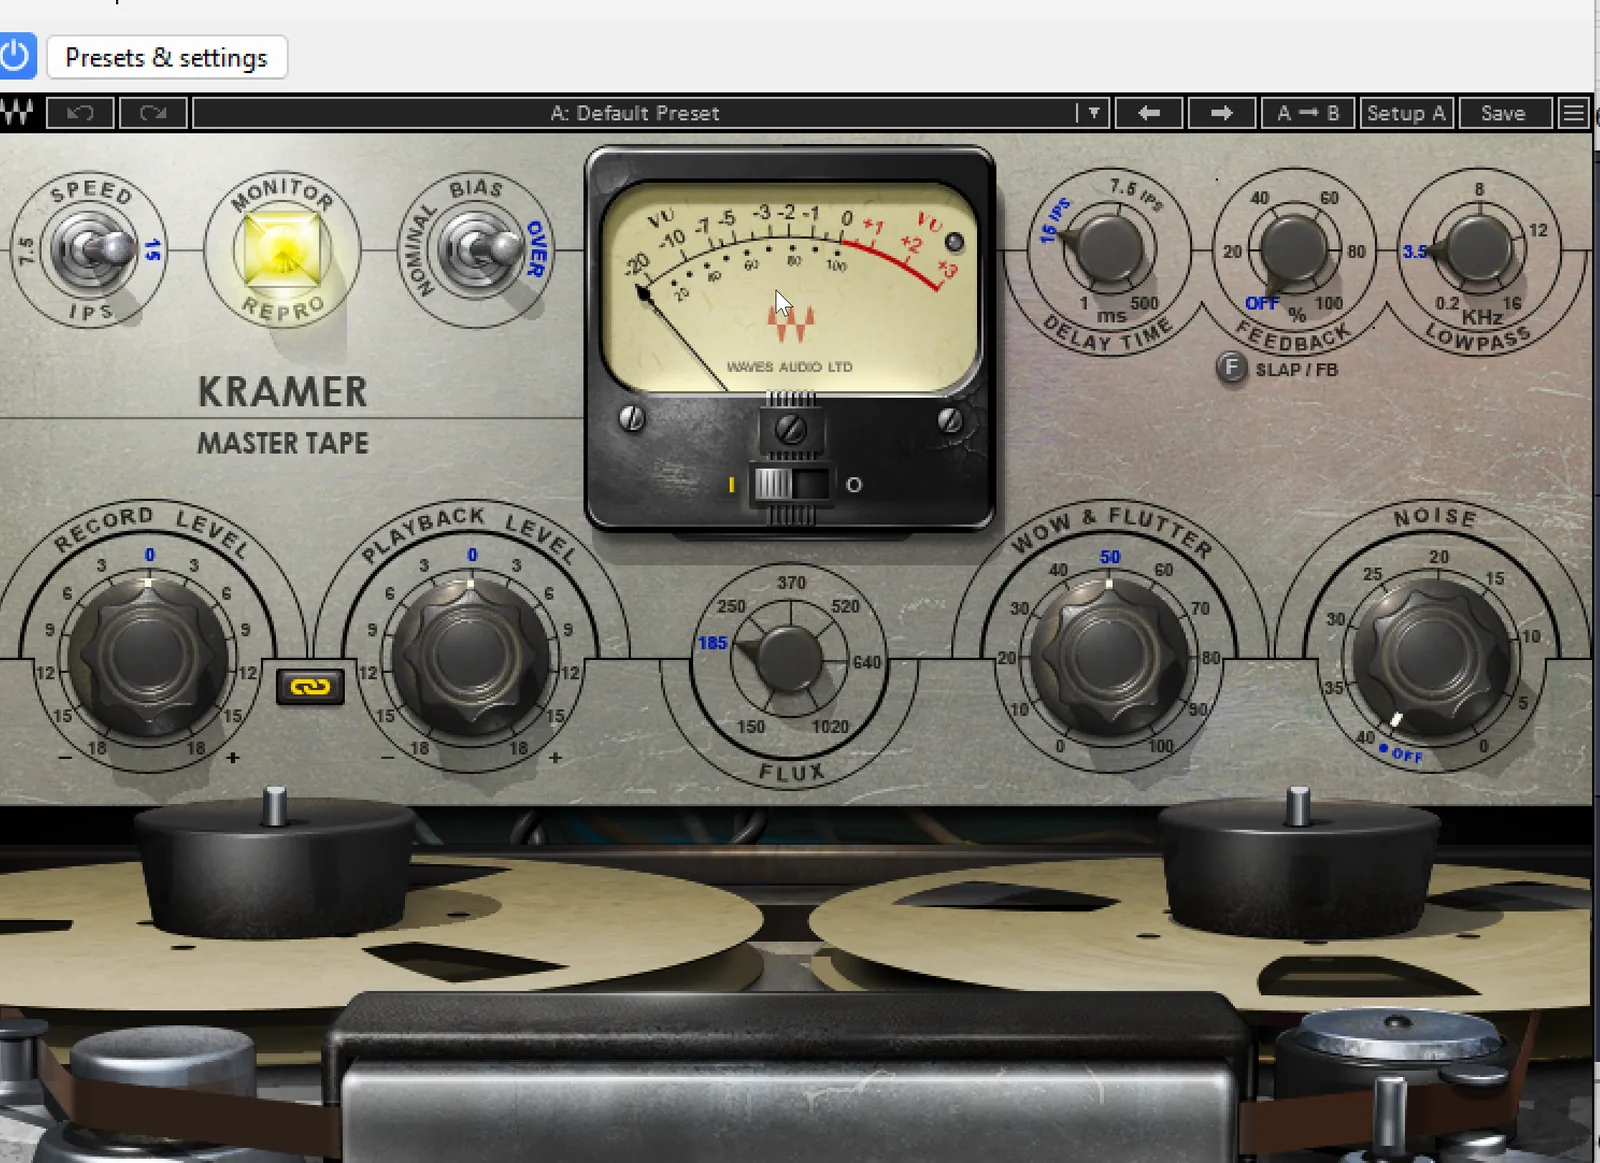
On buses, saturation serves a different purpose: it glues elements together the way running audio through an analog console does. Waves NLS simulates the harmonic distortion characteristics of different analog consoles—Neve, SSL, EMI—and applying it across your Main AUX Groups creates a cohesive “console sound” even in an entirely digital mix.
Pro Tools also includes HEAT (Harmonically Enhanced Algorithm Technology), a built-in analog saturation feature designed by Dave Hill of Crane Song. Unlike a plugin, HEAT is integrated directly into the Pro Tools mixer and applies an individual instance of analog emulation to every audio track simultaneously from a single global control. The Drive knob shifts between tape saturation (left) and tube distortion (right), while the Tone knob acts as a tilt EQ for brightness. HEAT can replace or supplement third-party saturation plugins, adding warmth, punch, and harmonic complexity to the entire mix with minimal setup. It is included with Pro Tools Studio and Ultimate subscriptions.
The rule with saturation is the same as in mastering: if you can hear it as an effect, you have gone too far. It should be the thing that makes a listener say “this sounds warm” without being able to explain why.
Automation
suggest a correctionAutomation is the difference between a good mix and a great one. A static mix—where every fader stays in one place from start to finish—is like a photograph. Automation turns it into a film. The vocal pushes forward two dB in the chorus because that is where the emotion peaks. The delay send opens up on the last word before a pause, carrying the phrase into silence. The guitar ducks half a dB when the vocal enters, then returns when it leaves. These moves are often so subtle that the listener never notices them consciously, but they feel them. A mix that moves with the song keeps the listener leaning in. A static mix lets them drift.
Volume Automation
By now your clip gain is locked in (Chapter 14). This is fader (post-insert) volume automation—riding the processed output; do not reach back into clip gain at mix time, which would change what every plugin downstream is reacting to. Volume rides are the most common and most powerful form of automation. In Pro Tools, click on a track where it says “waveform”—a list of automatable parameters appears. Choose volume. A line will appear on the audio region. Use the Pencil tool to draw changes: raise the guitar in the chorus where it gets buried, dip the piano during the vocal phrases, push the snare slightly louder in the bridge to build energy.
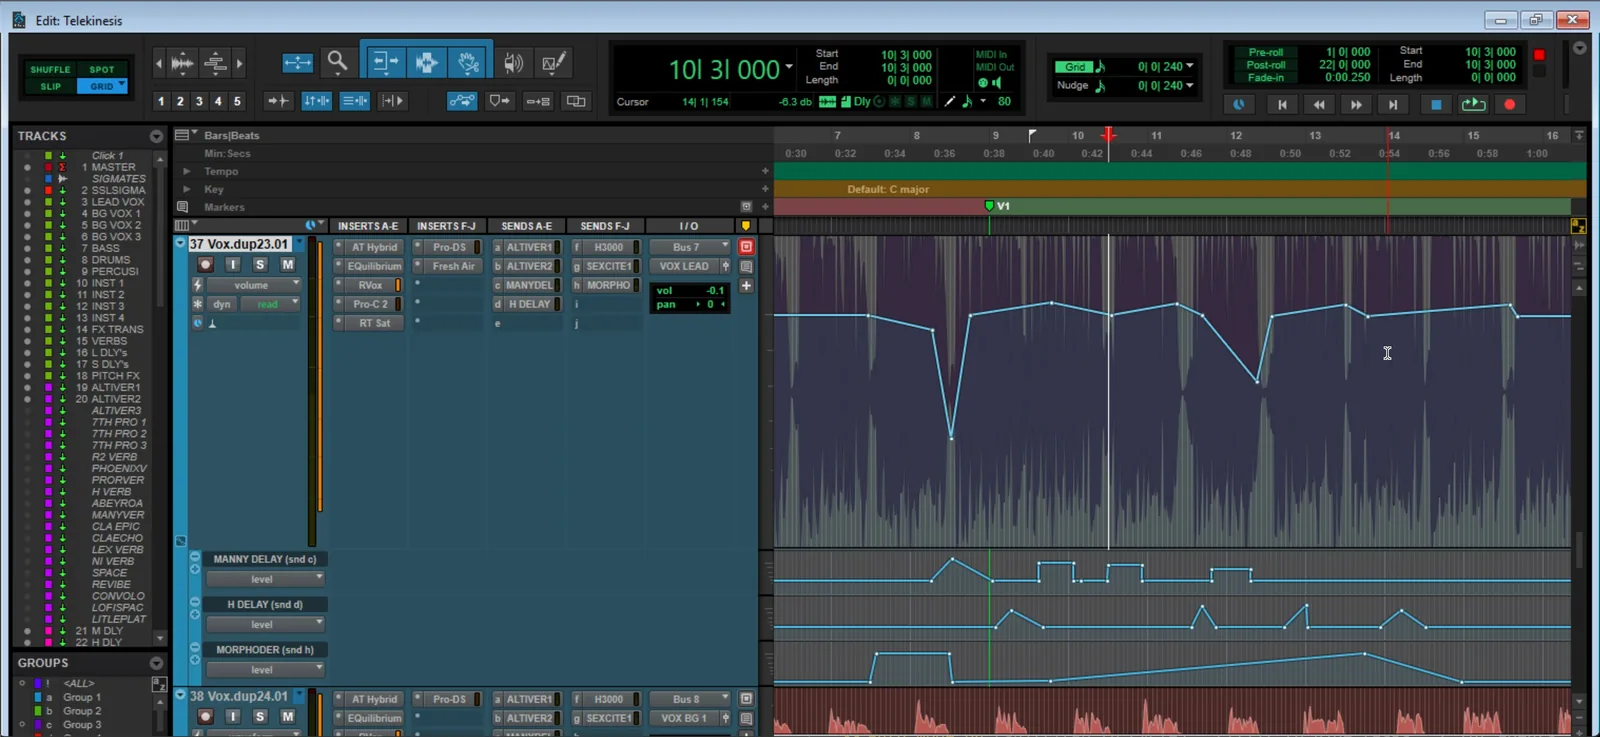
Vocal rides deserve special attention. Even after compression, a vocal will have moments that poke out or disappear—a soft word that gets lost, a belted note that jumps forward. Riding the vocal fader through the entire song, word by word, phrase by phrase, is tedious. It is also the single most impactful thing you can do for a mix. Professional mix engineers spend more time on vocal automation than almost any other task. Adele's Rolling in the Deep (mixed by Tom Elmhirst) is the modern textbook example—listen to how every word lands at the right level whether the arrangement is sparse or huge: the breaths placed, the chest-voice belts shaped, the quieter moments brought forward. That craft is not the singer or the compressor alone. It is the mixer riding the fader through every line. If the vocal is consistent and clear from the first word to the last, the listener stays connected to the song.
If word-by-word manual riding feels overwhelming on a busy session, automated leveling tools can do the heavy lifting and you handcraft the moments that matter on top. Waves Vocal Rider is the industry standard—it listens to the lead vocal against the rest of the mix and rides the fader automatically to keep the vocal sitting consistently against a constantly changing bed. iZotope Nectar includes a similar Auto-Level mode inside its vocal-processing suite. Sonible pure:level applies AI-driven dynamic leveling track-wide. None of these replace your taste—they get the vocal close, fast, so you can spend your time on the moments that need a human decision (the breath you want to keep, the belt you want to push, the word the listener has to hear).
Send and Effect Automation
Automating send levels gives you surgical control over your effects. I commonly automate a 1/4 or 1/8th note delay to open up only at the end of vocal phrases—carrying out the last word and filling the gap before the next line. During the verse, the delay is off. On the last syllable, it kicks in. The listener hears the phrase float into space. This is the kind of detail that separates a polished record from a demo.
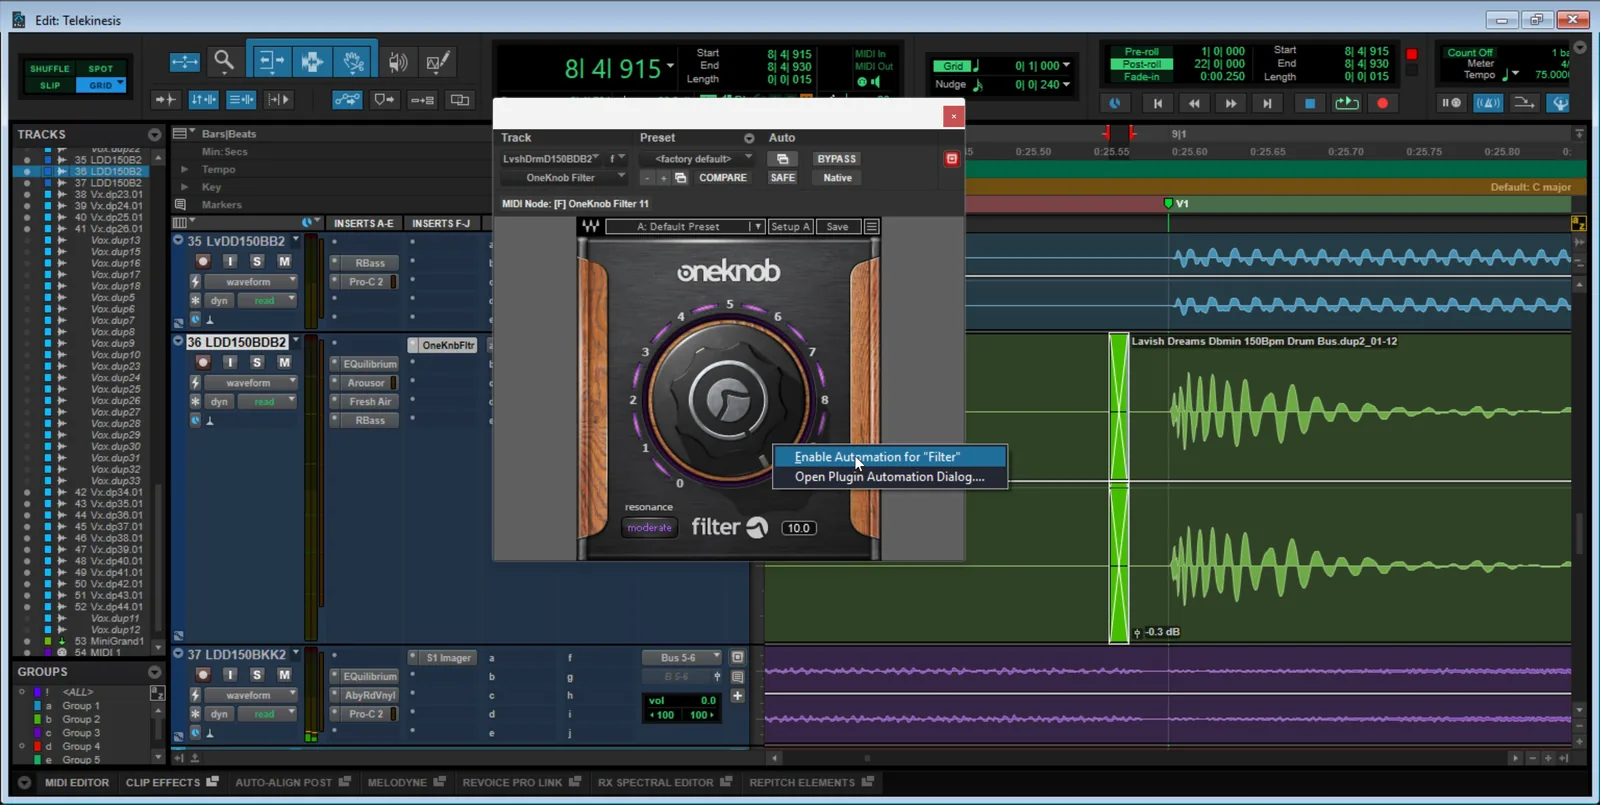
Send automation rides how much signal reaches an effect. Plugin-parameter automation is a different move—it reshapes the effect itself (a filter opening, a reverb growing). Setting it up takes a few steps:
- Open the plugin window on the track you want to automate.
- Modifier-click the control to arm it: Ctrl+Alt+Cmd+click (Mac) or Ctrl+Alt+Start+click (Windows) on the knob or fader—or click the plugin's Auto button to open the enable dialog. (Plain right-click alone does not arm a parameter for automation.)
- Add the parameter to the track's automation lane. Click the automation lane selector and pick the newly enabled parameter, then draw with the Pencil tool or write in real time.
A classic example: a low-pass filter that gradually opens over four bars, sweeping from dark to bright—you hear this in nearly every electronic build-up. Just about any plugin parameter can be automated, giving you far more control than a static insert setting.
Writing Automation and Choosing the Right Mode
You can draw automation with the Pencil tool, but you can also write it in real time. Pro Tools gives you six automation modes, and the difference between them is the difference between a clean ride and a destroyed take:
- Off
- No automation reads or writes. Faders and parameters move freely without affecting the playlist.
- Read
- Automation plays back but cannot be overwritten. The default for normal mixing playback.
- Touch
- Records your moves while you are touching the control, then snaps back to existing automation when you let go. The mode I use most for vocal rides—you can punch in corrections without overwriting everything around them.
- Latch
- Records your moves like Touch, but holds the new value when you release the control instead of snapping back. Use Latch when you want a fader ride to stay raised through the rest of a section. It is the right tool for one-direction rides (push the chorus up, leave it up).
- Touch/Latch
- A hybrid mode: the volume fader behaves like Touch (snaps back to existing automation on release), while all other controls—pan, sends, and switched controls such as mute—latch and hold. (Pro Tools Studio and Ultimate add a seventh option, Trim, which overlays the other modes to offset existing automation rather than overwrite it.)
- Write
- Erases existing automation and writes new data continuously during playback. Powerful and dangerous—use it only when you intend to start fresh.
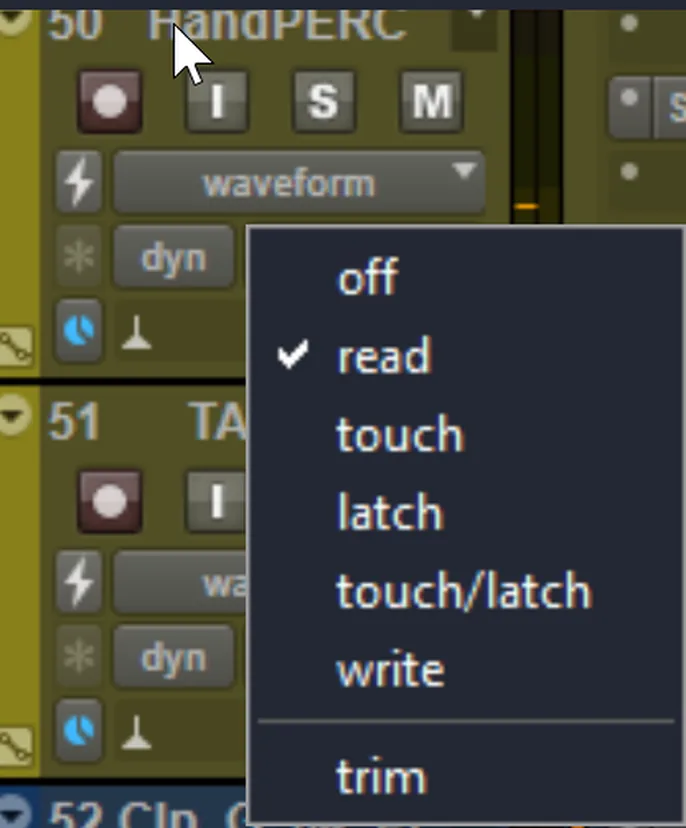
Try connecting a MIDI controller with physical knobs and faders—riding a real fader with your hand feels more musical than drawing with a mouse, and Touch and Latch modes were designed for exactly this workflow.
Get creative with automation. Automate filters, delays, reverbs, flanges, distortion, and panning. Try a slow pan that drifts a synth pad from left to right over a verse. Try a pitch-shift throw on the last word of a chorus. Try muting a reverb tail abruptly for a dramatic stop. The possibilities are endless, and the best automation is the kind that serves the song without drawing attention to itself.
Bus Processing: Main AUX Groups
suggest a correctionBy this point in a session, the mix is alive. Every track has been EQ'd, compressed, panned, saturated, and treated with effects. Each element has its zone. The vocal sits where it should, the kick punches where it should, the guitars carve their own pocket. What is left is the final two percent that separates a clean mix from a record—and that two percent lives on the buses. Now, we treat all those tracks as six groups: Drums, Bass, Instruments, Lead Vocals, BG Vocals, and FX.
Bus processing is fundamentally different from track-level processing. On individual tracks, you are shaping each element in isolation. On a bus, you are treating the group as a single instrument. The goal is glue—making the elements within each group feel like they belong together—not surgical correction. If you find yourself doing heavy corrective lifting on a bus, it is usually a sign to fix the individual tracks first. (That said, plenty of finished records lean hard on bus processing for character—this is a guideline, not a law.)
Drum Bus
The drum bus is where a kit becomes a kit. A compressor on the drum bus reacts to the combined energy of every drum hitting at once, and that interaction is what gives drums their cohesion. Set a slow attack (around 10–30 ms) so the transients of the kick and snare punch through before the compressor grabs, then a medium release timed to the tempo so the compressor recovers before the next hit. Low ratio (2:1 to 4:1), 2–4 dB of gain reduction. You should feel the drums tighten without hearing the compression.
This is also where parallel compression (New York compression) shines on the bus level. Its spiritual ancestor is John Bonham's drum sound on When the Levee Breaks—a kit tracked at Headley Grange with ribbon mics high in a stairwell, slammed through compression, producing drums that sounded twice the size of the room they were recorded in. Modern parallel compression on the bus is the same principle moved inside the box: a heavily processed copy of the dry sound, blended back in to scale it up. The procedure:
- Create a stereo AUX track called Drums Parallel and route a Send to it from the Drum Bus (post-fader, −∞ to start).
- Insert a compressor on the AUX—an 1176-style FET compressor or the SSL bus comp work great here.
- Set fast attack, fast release, high ratio (8:1 or higher) and pull the threshold until you have 10+ dB of gain reduction. It will sound smashed and terrible alone.
- Blend it underneath the dry Drum Bus by raising the AUX fader from −∞ until you hear the kit fatten without losing transients. Usually this lands around −15 to −8 dB on the parallel fader.
- Automate the parallel send so it pushes harder in the chorus and pulls back in the verse, riding intensity with the arrangement.
Shortcut: many modern compressors (FabFilter Pro-C, the Avid Pro Compressor) have a built-in Mix / Dry-Wet knob—dial parallel compression on a single insert with no AUX send at all. The AUX route gives more control (separate EQ on the parallel path); the mix knob is faster.
A gentle EQ on the drum bus can shape the overall tone of the kit—a slight high-shelf boost for air and shimmer, a small cut in the low-mids to reduce boxiness. Keep moves broad and subtle.
Vocal Bus
Lead and background vocals each benefit from light bus compression to even out the overall vocal level. A slow, transparent compressor (like an optical or VCA style) with 1–2 dB of gain reduction smooths out the dynamics without squashing the performance. If your lead vocal still has sibilance after individual track de-essing, a gentle de-esser on the vocal bus can catch what slipped through.
EQ on the vocal bus is useful for giving all the vocals a consistent tonal character—a slight presence boost around 3–5 kHz, or a high-pass filter to clean up any remaining low-end rumble that accumulated across multiple vocal tracks.
Instrument and Bass Buses
The instrument bus is where you carve final frequency space for the vocals. If the midrange still feels crowded, a gentle cut around the vocal's fundamental frequency range (roughly 1–4 kHz) on the instrument bus can open up room without thinning out any individual instrument. A touch of bus compression glues guitars, keys, and synths into a cohesive bed.
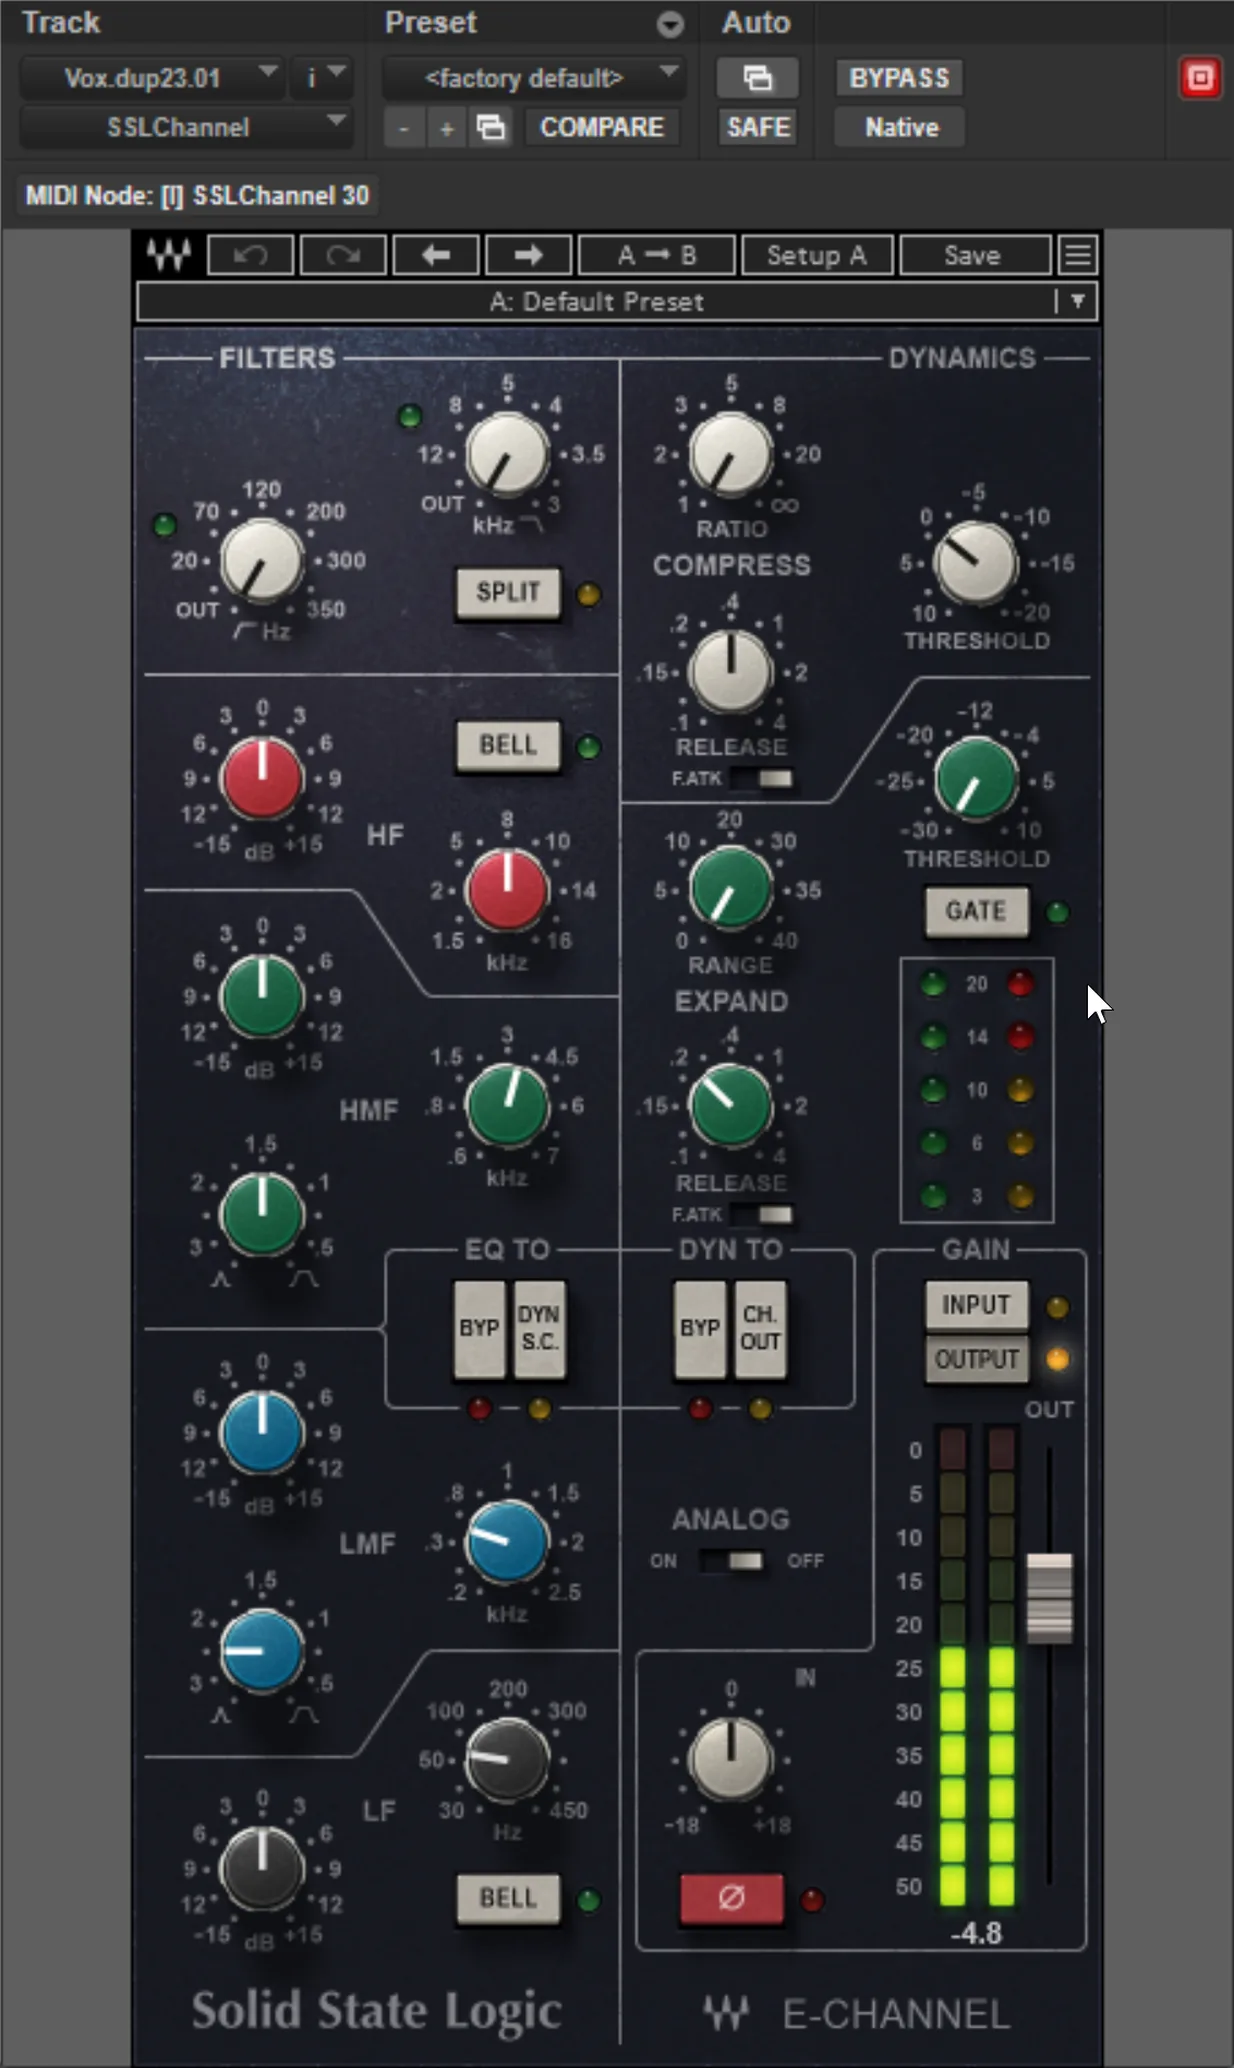
The bass bus—if you have one separate from the individual bass track—benefits from subtle compression to keep the low end consistent and a low-pass filter to remove any unnecessary high-frequency content that might clash with other elements.
Mid/Side on the Mix Bus
Mid/Side processing on the master—or on the Stereo Mix Bus before the Master Fader—is one of the most underused tools in a modern mixer's kit. By splitting the stereo signal into Mid (everything mono, the center) and Side (everything different between L and R, the width), you can shape center and edges independently:
- Tighten the low end. Roll off everything below 120–150 Hz on the Side channel. Bass and kick stay focused in the center where they belong, instead of smearing through reverb tails on the sides. This single move clarifies the low end of almost any mix.
- Widen the highs. A small high-shelf boost on the Side at 8–12 kHz makes the stereo field feel more open without touching the center vocal at all.
- Carve the center. A gentle Mid-channel cut around 300–500 Hz reduces center muddiness without affecting the panned guitars or stereo synths.
- M/S compression. A compressor on just the Mid channel can lock the center elements together; a separate compressor on the Side channel can be set with a longer release for a wider, more sustained stereo image.
FabFilter Pro-Q, Brainworx bx_digital V3, and Waves Center are all built for this work. Use M/S processing surgically—small moves on the master change every track in the mix at once.
The Stereo Mix-Bus Compressor
There is one more piece of bus processing that the front matter of this book promised and that no earlier section has delivered: the compressor strapped across the Stereo Mix Bus itself—the “2-bus compressor,” or mix-bus compressor—and it is the one piece of processing that changes every track in your session at the same time.
The concept is simple. A single stereo compressor sits at the output of your mix, after all the sub-buses and main group buses have summed, and before the Master Fader. Everything passes through it. Kick, bass, vocal, reverb tails, automation moves—all of it breathes against the same gain-reduction envelope. And that shared breathing is exactly the point. The technical term for what it does is “glue.” The less technical description is the sound of a finished record: elements that were previously polite strangers at a party become a band, locked together by the same invisible hand on the same volume knob, rising and falling as one. That quality—the sense that the mix is a single organism rather than a collection of tracks—is what the 2-bus compressor creates when it is working right.
The recipe. A gentle starting point that works on most contemporary material:
- Ratio: 2:1. Low enough that the compression is felt, not heard. This is not limiting.
- Attack: 10–30 ms. Slow enough that the transients of the kick and snare punch through before the compressor grabs. If you tighten the attack, you start softening the hits. That may or may not be what you want—but make it a choice, not an accident.
- Release: auto or 100–300 ms. Auto-release programs (present on most VCA-style compressors) adjust the recovery time based on the material, which keeps the compressor breathing with the song rather than fighting it. Manual release of 100–300 ms works on most 4/4 material at moderate tempos; faster tempos may need a shorter release so the compressor recovers before the next kick.
- Threshold: 1–2 dB of gain reduction on loud sections. If the gain-reduction needle dances more than 3 dB, you are not gluing—you are limiting. Pull the threshold back. The goal is a mix that is subtly tighter, not a mix that audibly pumps.
The debate that never dies: when to strap it on. This is the argument that splits engineers into two camps, and both camps have legitimate mixes to show you.
Camp one says: bolt it on at the end, after the mix is done. This looks safer. You approved a balance without the compressor in the chain, so you know what the uncompressed mix sounds like. Adding it at the end is a simple last step.
Camp two says: strap it on at the start and mix into it. This is what I do, and here is why. The mix-bus compressor is not a finishing coat—it is part of the sonic environment in which every fader decision you make exists. If you set the vocal at −10 dBFS without the bus comp, then add 1.5 dB of gain reduction, the vocal level has changed relative to everything else. The balance you approved was not the balance you are printing. If instead you work with the compressor engaged from the first fader move, every decision you make is already the decision-with-compression. You mix into the glue instead of having the glue applied to a finished mix. The practical effect is that you end up building a mix that wants to be compressed—tighter arrangement decisions, less level-stacking, more breathing room for the compressor to work—and the printed mix feels like one thing instead of a mix plus a compressor applied afterward.
The caveat: mix into it gently. Set the threshold conservatively at the start (0–1 dB GR) and nudge it toward 1–2 dB as the mix fills out. A bus compressor set to 4 dB of reduction during tracking will have you chasing false balances all session.
What not to do. Do not put a brickwall limiter on the mix bus while you are mixing. Chapter 19's mastering chain requires headroom—the gap between your loudest peaks and 0 dBFS is the mastering engineer's working material. If you commit a mix with a limiter already flattening the transients, that headroom is gone and there is nothing to recover. The mix-bus compressor and the master limiter are different tools at different stages for different reasons. One glues. The other maximizes. Keep them separate.
For circuit character, the teaching from Chapter 16 applies directly: a VCA-style compressor is the standard choice for 2-bus work because it is precise, fast-responding, and clean enough that it adds glue without imposing a strong tonal signature on material it does not know in advance. The opto circuit is musical but slower; the FET is punchy but colored. For a compressor sitting across everything, clean control and predictable behavior matter more than character. Use character on the individual elements that earned it.
Bus Processing Order and Saturation
On buses, I place compression before EQ—compress to glue first, then EQ to shape the result. The same buses are also where I add bus saturation: Waves NLS across the Main AUX Groups gives the entire mix a cohesive analog warmth that ties everything together (see the Saturation section above for details).
During this stage, make slight volume adjustments between groups to really get things “sitting in the pocket.” The overall balance between Drums, Bass, Instruments, Lead Vocals, BG Vocals, and FX is the final act before summing—small moves here have a big impact on the feel of the entire record.
Mix Levels Quick Reference
The numbers below are the starting points I reach for on most contemporary records. They are not laws—a sparse acoustic ballad sits differently than a hip-hop record, and you should always trust your ears over a meter. But these targets give you a calibrated starting point, and they keep you honest about headroom for mastering:
| Element | Target (dBFS) | Notes |
|---|---|---|
| Master Fader peak | −3 to −6 | Headroom for the mastering engineer |
| Individual track peak (pre-insert) | −12 to −18 | Gain-staging baseline; clip gain to here |
| Drum AUX (sum) | −8 | Slightly hotter; drums drive modern records |
| Bass AUX | −10 | Locked under the kick |
| Instrument AUX | −12 | Headroom for the lead vocal |
| Lead Vocal | −10 | Pushed in context, not in solo |
| Background Vocals | −14 | Support, never compete |
| Main FX AUX | −12 or below | Effects stay tasteful |
Read this table together with the Frequency Carving Chart from earlier in the chapter. Carving tells you where each element lives in frequency; this table tells you how loud each element should be. Together they are the two coordinates of every mix decision: where and how loud.
Summing
suggest a correctionMost mixes end the same way: dozens of tracks become two channels. (Immersive formats like Atmos are the exception—there the mix resolves into a bed plus objects, covered later in this chapter.) How that combination happens—the summing—affects the final sound more than most engineers realize. In Pro Tools, digital summing is pure math: the computer adds the waveform values together. It is clean, accurate, and perfectly transparent. Analog summing runs your tracks through real circuits, and those circuits introduce subtle harmonic content, crosstalk, and saturation that many engineers believe adds warmth and dimension.
There is no definitive proof that one is objectively better—sound quality is subjective, and plenty of incredible records have been summed digitally. But most of the famous records I grew up listening to went through an analog console, and when I finally tried analog summing myself, I understood why. The difference is not dramatic—it is not like flipping a switch from bad to good. It is more like the difference between a high-resolution photograph and a film print. Both are beautiful, but one has a quality the other does not.
I chose the SSL Sigma because the SSL summing sound is behind most of my favorite records. Once I got it, I understood why—it imparts a subtle warming characteristic just by running audio through it. Input levels can be increased for an edgy distortion on more aggressive songs. All tracks are summed to two stereo mix buses, making parallel compression simple.
To use a summing amp, you need a D/A converter with at least 8 outputs (I use 32 for the Sigma). Send the output of each Main AUX out a different output on the DA converter. Connect each to the summing amp, which sums them into a stereo output. That output feeds the Mix Bus—like the Master Fader but usually with analog signal processors: light mix-bus compression, EQ, tape saturation, and possibly a de-esser.
Keep Mix Bus processing minimal so the mastering engineer has room to work. Send the output back to the A/D converter and record into Pro Tools. After recording, you have a professional stereo mix ready for mastering. You can either send the mastering engineer the Pro Tools session or export the recorded stereo clip with Export Clips as Files (Ctrl+Shift+K / Cmd+Shift+K).
Bouncing
suggest a correctionBefore you bounce anything, run the three-step mono check covered in the next section—it is much cheaper to fix a phase problem now than after the file has gone out. Then, if you sum in the computer, use the Pro Tools Bounce function. In your Edit window, select the entire region to bounce, then press Ctrl+Alt+B (Win) or Cmd+Option+B (Mac). Choose your preferred settings and select where to save. Pro Tools can also bounce multiple stems or output paths in one pass, directly from the Edit window, for mixes, stems, and other deliverables.
Pro Tools supports offline bouncing, which is dramatically faster than real time. However, if your bounce involves running through outboard gear, you will need to bounce in real time by deselecting offline bounce. If no outboard gear is needed, offline bouncing is a huge time saver. My own habit, even in the box: I route the mix to a stereo audio track and record it in real time, so a printed stereo master sits in the session for recall—then I export or bounce that clip. What I heard is exactly what I get.
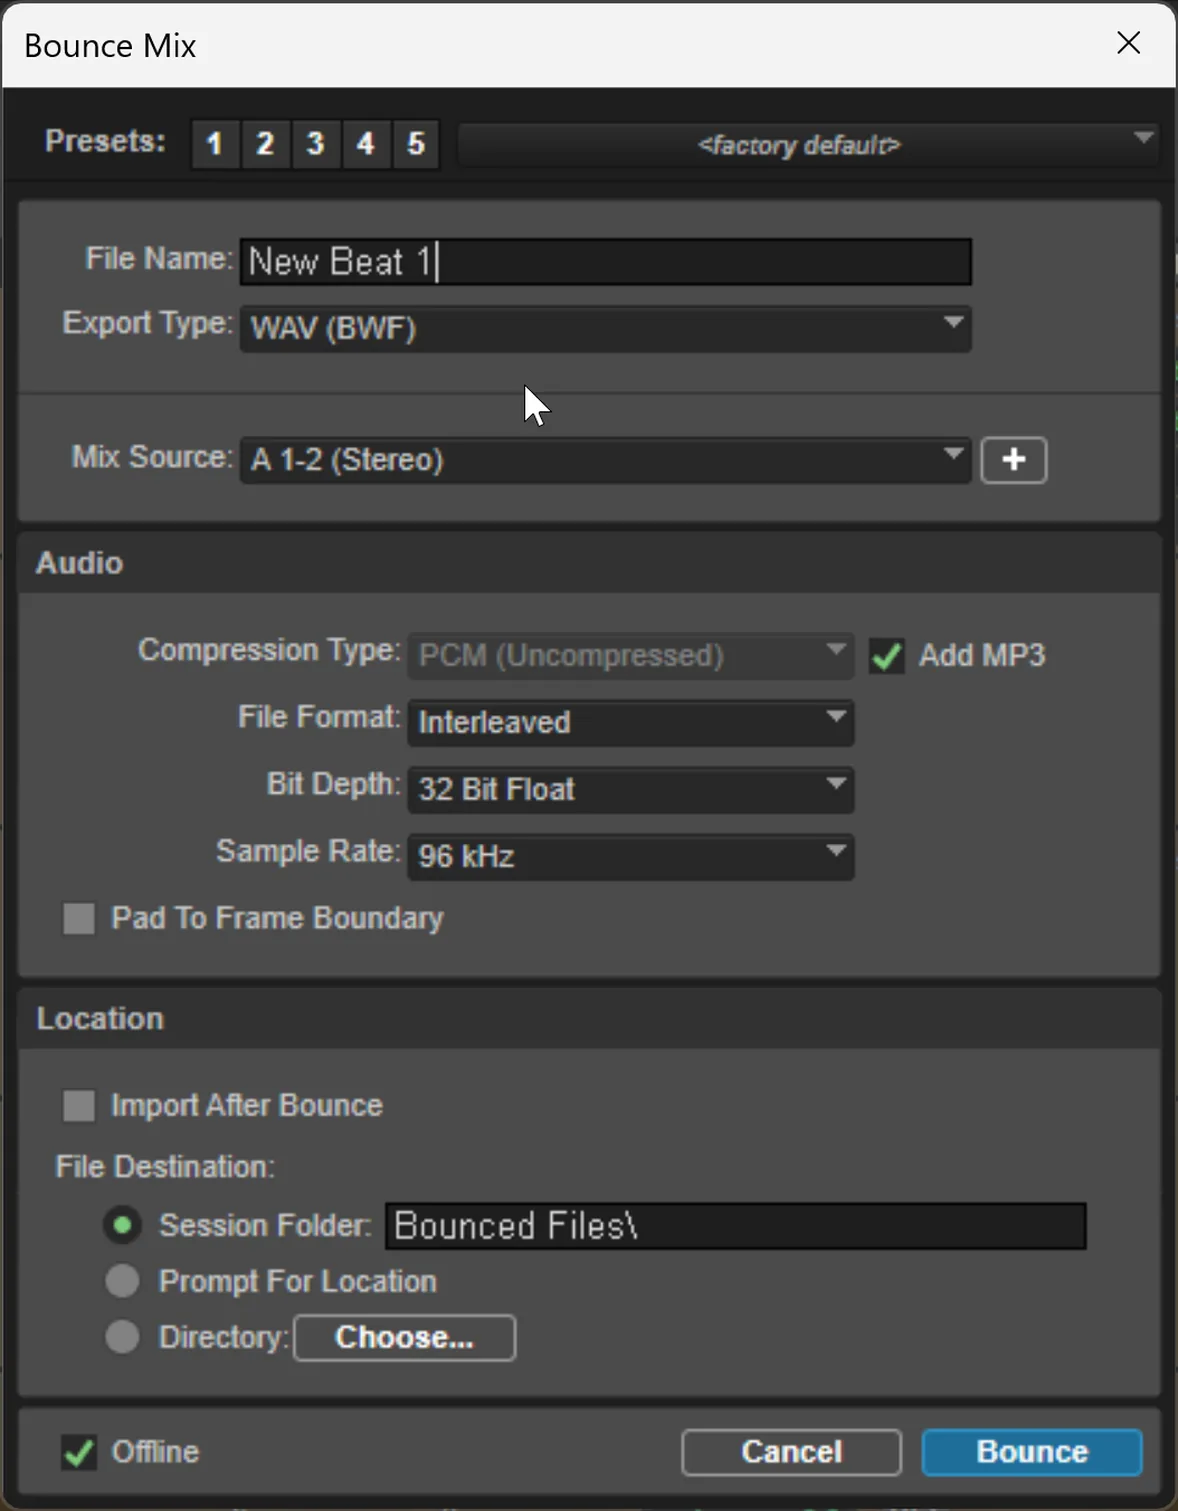
The settings above show a mix bounce for mastering—32-bit, 96 kHz. (A 16-bit/44.1 kHz bounce would be a CD master, not what you want when handing a mix to mastering.) However, if you are bouncing a mix intended for mastering, use higher-quality output settings. Check with your mastering engineer for their preferred audio quality. When mastering, I generally prefer 32-bit, 96 kHz WAV files with peaks between −3 and −6 dBFS.
For modern delivery, understanding loudness standards is critical. Streaming platforms use loudness normalization—Spotify targets approximately −14 LUFS (Loudness Units relative to Full Scale), Apple Music targets approximately −16 LUFS, Tidal targets −14 LUFS, and YouTube targets approximately −14 LUFS. Mixes that are excessively loud will be turned down by these platforms, negating the benefit of heavy limiting. Many engineers now mix with a LUFS meter on the Master Fader to monitor integrated loudness throughout the process. The Avid Pro Limiter includes LUFS and True Peak metering for this purpose.
Loudness While Mixing
“How do you get it loud without jeopardizing the integrity of that song?”
—Manny Marroquin, Tape Op #109, September 2015
Marroquin's question is the question every working mixer eventually wrestles with: should you mix toward a streaming target like −14 LUFS, or mix open and let the mastering engineer chase loudness? The answer is mix open. Mixing toward a final loudness target means you have a limiter slammed on the master while you make EQ and compression decisions, which compromises everything you hear and forces you to fight the limiter all the way through. Pulled off, your mix sounds great. Slammed, it sounds slightly different than the un-slammed version, and you have been making decisions about the slammed version.
The professional workflow: keep your master peaks between −3 and −6 dBFS while mixing, monitor your LUFS reading for awareness only, and trust the mastering engineer (or your own mastering pass in Chapter 19) to push the loudness. The mastering chain has the right tools for that final stage. Mix open—do not make decisions through a slammed limiter. But loudness is not only a mastering problem: a lot of a record's final loudness is baked in at the mix stage. Saturation, harder track compression, and a tight arrangement are what let a master get loud cleanly—a mastering engineer cannot conjure density from a thin, over-dynamic mix without artifacts. If you know the master needs to hit hard, build that energy into the mix; just do not do it by strapping a limiter across the master while you work.
Reference-Matching Tools
Manual A/B against a reference track is essential, but a new generation of plugins makes the comparison quantitative. iZotope Tonal Balance Control 2 sits on your Master Fader and overlays your mix's frequency curve against curves derived from thousands of professionally mastered tracks across genres—you can see in real time whether your low end is too thin or your top end is harsh. Sonarworks SoundID Reference measures and corrects your monitoring system itself, so the curve you hear is closer to a flat reference and translates better between rooms. ADPTR MetricAB (and Mastering The Mix Reference) lets you load up to sixteen reference tracks, level-match instantly, and toggle between mix and reference with a single click, with spectrum and mono comparison views. Use these as supplements to your ears, not replacements.
Stem Export Workflow
For any project beyond a personal stereo bounce, you will be asked for stems. Stems are bounced sub-mixes with full effects and automation baked in, exported at the same sample rate, bit depth, and length as the master so they line up at zero. The standard delivery package for film/TV/license submissions:
- Drums stem (the entire Drum AUX, processed)
- Bass stem
- Instruments stem (or split: keys, guitars, synths if requested)
- Lead Vocals stem
- Background Vocals stem
- FX / Reverbs and Delays stem
- Instrumental (full mix minus all vocals)
- Acapella / Vocals Up (vocals plus their effects, no instrumental)
- TV Mix (instrumental with backgrounds but no lead vocal, used when picture sync requires a singer drop)
In Pro Tools, use Bounce Mix and choose multiple bus sources, or solo each Main AUX Group in turn and bounce. Current Pro Tools (Studio and Ultimate) supports multi-output bouncing, where every Main AUX Group can be exported in a single pass. Always print stems summing to the same final mix—if your stems do not add back up to the master, you have routing problems to solve before delivery.
Mixing From Received Stems
The traffic runs the other way too: increasingly, the session you are hired to mix is not a session at all—it is a folder of stems from a producer you have never met. The workflow has its own rules. Import everything into your template session and confirm every file starts at bar 1 and shares one sample rate and bit depth (Chapter 14's import discipline); a stem that drifts against the others is unusable until the source exports it correctly. Play the stems summed, flat, against the producer's rough mix—that rough is your reference for what they already approved. Then gain-stage the stems onto your Main AUX Groups exactly as if they were tracks.
The trap is double-processing. Stems usually arrive with EQ, compression, and effects printed in—so a stem is a decision, not a raw source. Compressing an already-compressed drum stem stacks gain reduction the way Chapter 16 warned against, and you cannot un-bake a printed reverb. Work additively and gently: broad EQ moves, light bus glue, level and automation rides. If a stem fights you—a vocal drowning in printed delay, a bass with no definable fundamental—do not heroically process around it; ask for a drier export or a split (the lead dry plus a separate FX stem). One email saves a day of fighting. And when something is locked beyond rescue, say so honestly: a re-balance of finished stems is a legitimate deliverable, but it is not the same job as a mix, and the client should know which one they are getting.
Checking Your Mix
suggest a correctionIf possible, check your mix across multiple monitors or stereo systems before bouncing. You will hear things in one monitor that were not apparent in another. My main monitors are ATC SCM20s (very flat—great for surgical mixing and mastering), Avantone MixCubes (the modern Auratone: a mono, midrange reality check for “how it sounds on a phone”), and an ATC SCM0.1/15ASL subwoofer for low-end detail. (I still keep a pair of NS-10s around but rarely reach for them in the studio now.) I will also check in my car or on headphones. Having multiple monitors is not a necessity—most important is one great pair that you are very familiar with, set up in the perfect spot.
Mixing on Headphones
Let me address something the textbooks used to pretend was not happening: most students mix primarily on headphones. Laptop on the desk, no treated room, cans on. Pretending otherwise helps nobody, so here is what you need to know.
What headphones distort. Speakers have a physical characteristic called crosstalk: the left speaker's output reaches your right ear slightly later and quieter, and vice versa. Your brain uses that interaural information constantly when judging width, depth, and mono compatibility. Headphones have zero crosstalk—left goes to left, right goes to right, perfectly separated by the foam seals against your head. The result is that stereo images read unnaturally wide in headphones. A hard-panned guitar that lives at the edge of a speaker mix feels like it is inside your skull. Reverbs that are tastefully spacious on speakers can feel cavernous, even overwhelming, on headphones. If you do not compensate for this, you will underuse stereo width—narrowing guitars and effects to avoid the headphone exaggeration—and the mix will sound narrow on speakers.
Room loading is the second problem. Speakers physically pressurize the room they operate in, and that room loading is part of what makes bass feel like bass. On headphones, bass judgment shifts—the low end can feel bigger or thinner than it actually is, depending on the seal of the transducer against your ear. A mix that sounds perfectly balanced on cans has been known to arrive at the mastering engineer with a low end that needs significant correction. The mono check does not catch this.
Finally, headphones give you a level of detail isolation that speakers rarely match: you hear the reverb tail with clinical clarity, you hear the de-esser click on every sibilant, you hear the noise floor of every track. This is useful for editing and technical work. For mix balance, it can mislead you—the detail you hear at −40 dBFS on cans may be completely inaudible on monitors at normal listening levels.
Making it work. This is not an argument to avoid headphones—it is an argument to use them intelligently.
Start with the right tool: neutral open-back headphones for mix decisions whenever possible. Open-back designs are closer to speaker behavior than closed-backs because they allow some rear-wave release and image more naturally; Chapter 7's headphone discussion names the standard candidates. Closed-backs seal everything in; the headphone image exaggeration is at its worst.
Add correction and room-emulation software. Two categories of tool exist here:
- Correction software (Sonarworks SoundID Reference) measures your specific headphone model against a flat target and applies a real-time correction curve that takes out the coloration your headphones add. The result is a more neutral, speaker-adjacent listening environment. Chapter 7 already covers SoundID Reference for monitor correction; the same product works on headphones.
- Room-emulation software (Steven Slate Audio VSX) goes further: it simulates listening in a virtual studio control room, applying HRTF processing to introduce synthetic crosstalk and room reflections so the headphone image behaves more like a speaker mix. Whether these tools accurately model real rooms is a subjective question and depends heavily on the individual user's anatomy. Evaluate them in your own workflow before depending on them for mix decisions.
A crossfeed plugin applies a simplified version of the same idea without full room emulation—it bleeds a small delayed and filtered amount of each channel into the opposite channel, narrowing the extreme separation of headphone listening toward speaker-like crosstalk. Goodhertz CanOpener Studio is the most widely cited dedicated crossfeed tool; some room emulators include it as a mode. It takes less CPU and makes fewer claims than full room emulation—a reasonable middle ground.
Reference tracks do even more work on headphones than on speakers. Because the headphone environment is so consistent from session to session, A/B'ing against a commercially mixed and mastered track—loaded and level-matched per the procedure earlier in this chapter—gives you a reliable calibration anchor. If the reference sounds right on your headphones and your mix sounds wrong in the same comparison, you have actionable information. Without the reference, you have a mix that sounds like whatever your headphones tell you it sounds like.
The mono check is unchanged—engage it, hunt for collapse, fix what you find. And the non-negotiable, regardless of how good your headphone setup is: translation-check on real speakers before calling a mix done. A car stereo, a laptop speaker, a phone, a friend's home system—at least two playback environments that are not your headphones. Every mix decision you made in isolation on cans gets pressure-tested in the wild. This ties directly to Part E of this chapter's exercise: check on monitors, headphones, and a phone or laptop speaker, and treat that sequence as a requirement, not a suggestion.
One final note: the binaural Atmos rendering discussed later in this chapter is a different animal from headphone mixing. That section addresses a specific playback format and production workflow. This section is about stereo mixing on headphones as a primary monitoring environment.
Always check your mix in mono before bouncing. This is not optional. A huge portion of your audience will hear your music through phone speakers, Bluetooth speakers, laptop speakers, and club systems summed to mono. If your wide, beautiful stereo mix collapses when summed to one channel—if the guitars disappear, the reverb turns to mush, or the background vocals drop out—those listeners hear a broken mix. Mono will expose phase cancellation issues that stereo hides. Hard-panned background vocals and stereo FX are the usual culprits. Expect some change in mono—a wide stereo image never folds down perfectly, and that is normal. The goal is not zero difference; it is that both the stereo and the mono versions sound good. What you are hunting for is collapse: an element that vanishes or drops way down, which signals phase cancellation to fix.
The mono check is a three-move discipline:
- Engage mono. Use a monitor controller's mono switch (Dangerous Monitor ST, Avid Pro Tools | HD MTRX), or insert a metering plugin with a sum-to-mono control (iZotope Insight is the standard) on the last insert slot of your Master Fader and click its mono button.
- Listen for collapse. Play the chorus and the heaviest section. If anything you can hear in stereo disappears or gets quieter in mono, you have phase cancellation. Track down the culprit (almost always a hard-panned stereo source or a chorus/doubler effect) and either narrow the stereo width, re-time the duplicate, or accept the trade-off intentionally.
- Disengage before bouncing. A mono master accidentally exported is one of the most common professional embarrassments—make this a hard habit.
Immersive Mixing
suggest a correctionThe first time I heard a Dolby Atmos mix on a proper speaker array, I understood immediately why the industry is moving in this direction. Sounds did not just come from left and right—they existed above, behind, and around me. A vocal felt like it was floating in the center of the room. Rain effects fell from the ceiling. It was the difference between looking at a photograph and standing inside the scene.
This chapter focuses on stereo mixing because stereo is still the dominant deliverable for most projects, but Pro Tools Studio and Ultimate include an integrated Dolby Atmos renderer that lets you mix, monitor, and render Atmos content inside a single session. Apple Music, Tidal, and Amazon Music all stream in Atmos. Sony 360 Reality Audio is supported on Amazon Music for spatial delivery (Tidal dropped the format in 2024 in favor of Atmos). The demand for engineers who can work in spatial formats is growing fast.
Beds vs. Objects
The single most important concept in Atmos is the distinction between beds and objects:
- Bed
- A traditional channel-based mix—usually 7.1.2 (left, right, center, LFE, left surround, right surround, left back, right back, plus two height channels). The bed is where everything that does not need to fly around lives: the kick, bass, rhythm guitars, pads, the foundation. You mix to the bed the way you mix in stereo, just with more channels.
- Object
- An individual mono or stereo element that carries 3D positional metadata. The renderer places objects dynamically in space at playback time, adapting to whatever speaker layout the listener has (5.1.4, 7.1.4, 9.1.6, or binaural headphones). Use objects for elements that need to move, point, or sit somewhere specific—lead vocals, lead instruments, ad libs, signature delays and reverbs, sound effects.
A typical Atmos session has a 7.1.2 bed plus 10–30 objects. Pro Tools supports up to 118 objects in a single session.
Atmos Session Setup
The walkthrough below is the canonical Pro Tools Atmos session bring-up. It looks complicated the first time and routine the third:
- Create the session. Start a new session at 48 kHz (the Atmos standard), 24-bit minimum, file type BWF. (Pro Tools enables Atmos itself through the renderer in the next step—there is no “Dolby Atmos” choice in the New Session dialog.)
- Configure the Atmos Bus. Setup arrow Atmos arrow enable the integrated Dolby Atmos Renderer. The renderer creates an Atmos Bus and a folddown chain. Choose your bed format (7.1.2 standard).
- Route bed elements (drums, bass, rhythm tracks, pads) to the 7.1.2 bed bus. These tracks pan within the bed using the standard PT pan controls.
- Convert object tracks. For each track that should be an object (lead vocal, lead guitar, signature FX), change the output assignment to one of the Atmos Object slots. The track now uses the 3D Object Panner with X (left-right), Y (front-back), and Z (height) coordinates—all three automate.
- Monitor the format you are mixing for. The renderer can monitor 5.1.4, 7.1.2, 7.1.4, 9.1.6, or binaural for headphones. Always cross-check binaural before delivery—most listeners will hear your mix on AirPods, not in a 9.1.6 room.
- Render the master. Export arrow ADM BWF File. ADM (Audio Definition Model) BWF is the industry-standard Atmos master file—it carries the bed, all objects, and all positional metadata in a single deliverable. This is what Apple Music, Tidal, and Amazon ingest for spatial streaming.
A few practical notes. Atmos masters target −18 LUFS integrated (looser than the −16 LUFS stereo target) because spatial mixes need more dynamic range to feel three-dimensional. Always deliver an ADM BWF for the spatial submission and a separate stereo WAV for the standard streaming version—they are different masters with different limiting and balance choices, even from the same session. And keep your stereo mix the priority on a project budget where you can only do one well; a great stereo mix that translates everywhere beats a mediocre Atmos mix that only sounds right in one room.
If you have the opportunity to learn immersive mixing, take it—it is not a gimmick. It is the future of how people will experience music.
How Listeners Actually Hear Atmos
I once spent two days tweaking the height layer of an Atmos mix on a calibrated 7.1.4 rig, convinced I had the overhead percussion placement exactly right. The client listened on AirPods on the subway and texted: “sounds great, everything feels really wide.” No mention of height. That is not a failure—that is the reality of how Dolby Atmos Music reaches most ears.
The majority of Atmos Music listeners are not sitting in a speaker array. They are on earbuds or headphones—AirPods Pro, AirPods Max, or similar—receiving a binaural render of your mix. The Dolby Atmos renderer collapses the full bed-plus-objects session into a two-channel signal designed to simulate three-dimensional space through headphones, using a Head-Related Transfer Function (HRTF). An HRTF is a mathematical model of how a listener's ear shape, head geometry, and torso affect the way sound arrives at the eardrums from every direction in space. By filtering the audio to mimic those arrival differences, the renderer creates the impression that sounds are coming from above, behind, and around you—not just from two drivers pressed against your head.
Personalized Spatial Audio — Apple's implementation of a listener-specific HRTF, introduced in iOS 16. Using the TrueDepth camera on an iPhone with Face ID, the setup process captures multiple views of the listener's face and each ear—you hold the iPhone in front of your face and slowly turn your head as prompted (up, down, and to each side) so the camera can map the pinna geometry from several angles. That geometry data is processed entirely on-device (no images are stored or sent to Apple servers) and converted into a personal HRTF profile that syncs across all the listener's Apple devices via end-to-end-encrypted iCloud. Compatible hardware includes AirPods Pro (all generations), AirPods Max, AirPods (3rd generation and later), Beats Fit Pro, Beats Studio Pro, and Beats Solo 4.
The practical implication for your session: the binaural monitoring switch in the Dolby Renderer is not a curiosity—it is your client's living room. Apple Music applies its own Spatial Audio algorithm to the Atmos ADM BWF on playback (it does not pass the Dolby binaural metadata through unchanged), so the binaural you monitor in Pro Tools will not be byte-for-byte identical to what AirPods deliver, but it is close enough to catch problems: a height object that reads as “directly overhead” on speakers can smear into vague wideness in the binaural fold-down; a reverb tail that sounds lush and spatial on a 7.1.4 rig can turn to mush when rendered to two channels. Audition the binaural render at full mix level on a good pair of sealed headphones before every revision and before every delivery. What you hear there is closer to what your listeners will hear than anything your speaker array tells you.
Creative Mixing in Dolby Atmos
Early on, my Atmos mixes made every mistake this section warns about—I turned everything into an object and flew sounds around the room simply because the format allowed it. The mix that taught me better was one where I stopped showing off and asked a simpler question: what does this song actually need from the space? I left the band locked into a solid bed, made objects of only the lead vocal and one guitar line answering it, and used the height layer for nothing but the reverb and the room. It was the first Atmos mix I made that sounded like a record.
Knowing the technical architecture of Atmos is not the same as knowing what to do with it. The session setup, the bus routing, the ADM BWF export—those are procedures you learn once. The harder work is developing creative instincts about where things live in three-dimensional space and why. Most early Atmos mixes suffer from the same problem: engineers discover that everything can move overhead, so everything does. The result is exhausting—a mix that sounds like a demonstration reel rather than a record.
Beds vs. Objects as a Creative Choice
The bed-versus-object decision is not just a technical routing choice; it is a statement about what is structural and what is focal. Think of the bed as the architecture of the record—the load-bearing walls. Think of objects as the furniture: placed deliberately, positioned to draw attention, and capable of movement. The bed should feel invisible in the best possible sense: it holds everything together without calling attention to itself. Objects should earn their three-dimensional placement.
As a practical rule: anything that is always present and always in the same place belongs in the bed. Kick drum, bass, rhythm guitars, keyboard pads, room reverb returns, and the foundational atmosphere of the track all go to the 7.1.2 bed. The listener should feel those elements as space itself—the room the song exists in. By contrast, the elements that carry the song's narrative identity make the strongest objects: lead vocal, lead instrument, key ad libs, and any sound effect that needs to point somewhere specific. If you cannot articulate where an element should sit in three-dimensional space and why it matters emotionally, it belongs in the bed, not as an object.
Overloading the object layer is the most common structural mistake. A session with thirty objects and a thin bed will feel busy and unrooted. A session with a dense, well-mixed bed and eight to twelve carefully chosen objects will feel immersive in a way that serves the song.
What Belongs Overhead—and What Does Not
The height layer is the most misused dimension in early Atmos work. The ceiling is not a second horizontal plane where you park things that will not fit on the sides. It is a tool for two specific effects: ambient envelopment and vertical drama.
Ambient envelopment is the sensation of being inside a space rather than in front of it. Reverb tails, room reflections, subtle atmosphere, crowd noise, and environmental texture all work overhead because that is how those sounds arrive in real life—rain falls, air moves, rooms breathe above and around you, not just to your left and right. Pushing early reflections and diffuse reverb returns out into the surround and height layers—as bed elements in the ear-level side surrounds (Lss/Rss) and the bed's two overhead channels (Ltm/Rtm), or as static objects at Z values between 0.3 and 0.7—creates the sensation of acoustic space without drawing conscious attention to any one direction.
Vertical drama is intentional: a synthesizer sweep that climbs from the floor to the ceiling, a vocal harmony that descends, a sound effect that enters overhead and lands in front. These moves work because they are rare. If the height layer is always active with musical content, the listener's brain adapts and the ceiling disappears as a dimension. Reserve the dramatic overhead moments for the song's emotional peaks and they will read as powerful. Use them everywhere and they read as noise.
What categorically does not work overhead: kick drum, bass, or any low-frequency content. Human spatial hearing loses directional resolution below roughly 200 Hz—the auditory system cannot localize bass frequencies in space, so placing bass in the height channels serves no perceptual purpose and will fold down destructively. The LFE channel and the bed's L/R/Lss/Rss handle all sub-bass and kick. Similarly, lead vocals almost never sound right directly overhead—the voice belongs in front of or around the listener, anchored to a human body somewhere in the room, not emanating from the ceiling.
Reverb and Ambience in Three Dimensions
Stereo mixing uses reverb to create the illusion of depth along a single axis: a dry sound feels close, a wet sound feels far. Atmos expands this to three axes, which changes the strategy entirely.
The most effective 3D reverb approach is to decouple the early reflections from the diffuse tail and send them to different parts of the field. Early reflections (those arriving in the first 80 ms or so) carry directional information about the space; route these to the bed's surround and height channels at a low level to establish the room's shape without smearing the source. The diffuse tail—everything after the initial reflections have settled—can extend higher into the field and wrap further behind the listener. The combination creates the sensation of a real acoustic space: the source is identifiable in front, the room grows around it, and the ceiling carries the space's breath.
For music production specifically, two send strategies dominate: a dedicated Atmos reverb object (a mono return routed to an object at a fixed height position, mid-room depth) gives the reverb a precise location that anchors the source in space; a bed reverb return spread across the Lss/Rss side surrounds and the Ltm/Rtm top-middle channels wraps the listener without pointing anywhere. The first works well for lead elements that need presence; the second works for pads, strings, and background atmosphere. Using both simultaneously, with the bed reverb lower in level, creates a layered spatial impression that holds up in binaural.
The Stereo and Binaural Fold-Down as a Creative Constraint
The fold-down is not a final check—it is a design constraint that should govern every creative decision from the start of the session. Most of your listeners will hear a binaural render on AirPods or a stereo downmix through a soundbar. If a creative choice only works on a 7.1.4 speaker array, it is not a creative choice—it is an accident that the format happens to support.
The practical discipline is to mix in fold-down passes throughout the session, not just before delivery. After placing an object or committing to a height reverb level, switch the renderer to binaural and listen for sixty seconds. Ask two questions: does this element still read as intentional, or has it dissolved into vague wideness? Does the fold-down version feel like a different record, or just a slightly flatter version of the same one? The Atmos mix that succeeds is the one where the binaural render sounds like a great stereo mix with extra space—not like a great spatial mix that loses half its meaning when it leaves the speaker room.
A useful mixing rule: the stereo fold-down must stand on its own. Start your Atmos session by completing a strong stereo bed mix before you assign a single object. The discipline of building a stereo foundation first means the fold-down is never an afterthought, and it forces you to identify which elements genuinely benefit from spatial placement versus which ones you are moving to the overhead layer because the format makes it possible.
Genre Conventions
Commercial Atmos releases have established working conventions by genre, and knowing them prevents the mix from sounding unfamiliar in the wrong way.
- Pop and R&B: Lead vocal as a center-front object, slightly elevated (Z ≈ 0.1–0.2) to give it presence without floating it overhead. Background vocals spread to the sides and rear of the bed. Atmospheric synths and reverb tails extend into the height layer. Bass and kick stay in the bed floor.
- Hip-hop: Minimal height activity. The genre's power comes from a locked low-end foundation and a close-in vocal that feels personal. Overhead elements, if present, are textural—a pad, a sub-melody, a sample tail. Moving the 808 or the snare into the height layer is almost always wrong.
- Rock and live recording: The height layer works best as room ambience—the sense of a real acoustic space above and around the listener. Overhead drum mic bleed, room reverb, and audience atmosphere read as authentic. Flying a guitar solo overhead tends to sound like a demo of the format, not a record.
- Electronic and ambient: The format's strongest genre. Synthesizer textures, arpeggiated elements, and modulated pads all work overhead because the genre has no acoustic reference to violate. Objects can move fluidly without sounding unnatural, and the height layer can carry significant energy without confusing the listener about where things should be.
- Classical and jazz: Prioritize envelopment over localization. The goal is to place the listener inside the hall, not to isolate instruments in three-dimensional space. A well-mixed Atmos classical recording feels like the third row; a poorly mixed one feels like instruments have been repositioned for a technology demonstration.
Common Beginner Mistakes
I learned the low-end rule the hard way. On an early immersive mix I let the kick and a sub-heavy synth drift up into the height objects because it sounded huge in my room on the full speaker array. The client listened back on AirPods and said the low end “disappeared and then got weird”—which is exactly what bass does when you ask the ceiling to carry it.
Everything is an object. The session has fifty objects and a nearly empty bed. The mix has no foundation—it feels like furniture floating in empty space. Rebuild the bed first.
The overhead layer never rests. Musical content in the height layer from bar one to the final fade. The listener adapts within thirty seconds and stops hearing the ceiling as a separate dimension. Save the height layer's active energy for the chorus, the drop, the final section.
Low-frequency elements in height channels. Bass, kick, and any element below roughly 200 Hz assigned to overhead objects. The listener cannot localize them there; they fold down destructively. Move everything below 200 Hz to the bed's L/R or LFE.
Ignoring the fold-down until delivery. The binaural check at the end reveals that half the creative decisions in the height layer have collapsed into undifferentiated width. Checking fold-down throughout the session would have caught this on pass two, not pass twenty.
Panning the lead vocal off-center or overhead. The vocal is the human anchor of the record. Moving it out of the center-front position—even slightly behind or above—makes the mix feel spatially confused. The voice belongs where a person would stand.
Over-automating object positions. Objects that move continuously throughout the song create motion sickness rather than immersion. Reserve position automation for intentional moments: a sound effect crossing the room, a transition sweep, a specific dramatic beat. Static or nearly static object placement is almost always more musical than constant movement.
The immersive field is a genuinely new creative dimension—not a gimmick, but also not a license to throw sounds at the ceiling and call it spatial. The engineers whose Atmos work holds up are the ones who learned to ask the same question about every placement decision: does this serve the song, or does it serve the format?
The Final Listen
suggest a correction“There's different mixes and there's good mixes, but there's no perfect mix… That's something I think you learn with experience—when to say that's enough.”
—Andy Wallace, in a 2025 interview with Rick Beato
Congratulations on finishing the first draft of your mix. The first draft. Because if you have done this work seriously, you do not consider it final yet. Walk away. Sleep on it. Come back tomorrow with fresh ears. Listen on monitors. Listen on headphones. Listen in the car—specifically the car, because cars are where most music gets heard and the bass response in a small enclosed cabin will reveal a low end you missed. Listen on a phone speaker. Reference on every playback system that matters to your audience.
Then send drafts to people whose ears you trust. Producers, artists, fellow engineers, friends with good taste—and listen carefully for what they hear that you missed. Some of my best mix moves have come from a single comment from someone hearing the song for the first time. They are not better mixers. They have something I do not have at hour twenty: a fresh perspective. Take notes. Pull the session back open. Make another pass. The mix is the sum of all the small decisions you make over hours, days, sometimes weeks—and that sum often includes decisions you cannot make until other ears have heard it.
Once you are satisfied, do a final organization sweep—most of this you have been doing all along, so this is just the last pass: delete unused playlists, confirm every track is labeled and grouped, then print your final mix as a 32-bit, 96 kHz WAV with peaks between −3 and −6 dBFS—the same settings as the Bouncing section, sized to leave the mastering engineer room for compression, EQ, saturation, and limiting. A clean session is a professional courtesy—to the mastering engineer, to a future collaborator, and to your future self.
The mix is a song you have been listening to for hours, days, sometimes weeks. By the end you cannot hear it as a listener anymore—you hear what you fixed, what you fought, what you wish you had time to revisit. The discipline is recognizing that the listener has none of that context. They press play once. They feel the song or they do not. When you stop hearing the mix as your problems and start hearing it as the song you set out to make, you are done. In the next chapter, we will finalize your mix in the mastering process.
Review Questions
Work these before moving on — every question is answerable from this chapter. Written answers live in the instructor Answer Key, available to course adopters.
- Tom Lord-Alge calls mixing “a process of subtraction.” Explain what this means in terms of the four balance dimensions of mixing (volume, tone, spatial positioning, depth) and the Carving the Mix discipline.
- What is automation, and what are the six Pro Tools automation modes? How do you automate a plugin parameter?
- What is a good approach to signal flow in terms of setting up your Pro Tools mixing template?
- Walk through, step by step, the process you would follow to complete a mix from beginning to end.
- What is the difference between digital and analog summing?
- Why would you want to EQ after compressing and vice versa?
- What are some saturation plugins and why are they useful? What is HEAT and how does it differ from saturation plugins?
- What is the Mix Bus and how can it enhance your mix?
- What is the difference between Clip Gain and the fader? Why does this matter for gain staging?
- Describe bus compression and parallel compression on a drum bus. Walk through the parallel compression procedure step by step.
- Would you use short or long delays to make a sound bigger? Short or long reverbs to push it back? Why?
- What are two tools you can use to keep a lead vocal crisp yet reduce harsh sibilance?
- Why is it important to check your mix in mono and how can you do this?
- What are LUFS, and why are loudness standards important for modern mixing? Should you mix toward a streaming target or mix open and let mastering chase loudness?
- What is a reference track and how should you use one during the mixing process? Name two reference-matching plugins that can supplement your ears.
- What is immersive mixing? Walk through a Pro Tools Atmos session—beds vs. objects, the Atmos Bus, monitoring formats, and the ADM BWF master deliverable.
Studio Exercise: Track 7 — The Capstone Mix
This is the chapter you have been building toward since Chapter 12. Open the time-based-effects session you saved as [Song]_v6_TBE at the end of Chapter 17, Save As [Song]_v7_Mix. Verify every track is labeled, color-coded, and routed to its Main AUX Group (Drums, Bass, Instruments, Lead Vox, BG Vox, FX). Import a commercial reference track, route it to your monitor path, loudness-match it. Calibrate monitors to reference SPL.
Part A — Verify Gain Staging. Your clip gain was set back in Chapter 14—do not redo it now, or you will change what every plugin downstream is reacting to. Verify the Master Fader peaks below 0 dBFS with all faders at unity, and fix any track clipping its insert chain.
Part B — Build the Bed. Build in the order that fits the song. Bottom-up (the default here): kick and bass first (HPF one, let the other own the sub), then the rest of the kit (sub-buses for shells, cymbals, rooms if the kit warrants it), then instruments (carving frequency space for the vocal as you go), then lead and background vocals last. Top-down (how many pop and hip-hop mixers work): start with the lead vocal and build the bed underneath it. Either way, carve frequency space as you go, pan deliberately, and note which order you chose and why. Use the Carving the Mix discipline at every step.
Part C — Bus Processing. Gentle bus compression on Drum, Vocal, and Instrument buses. Set up parallel compression on the Drum Bus per the five-step procedure in this chapter. Add bus saturation (Waves NLS, Soundtoys Decapitator, or your choice) across your Main AUX Groups.
Part D — Automation. At least one meaningful move on every key element: a vocal ride that pushes the chorus, a delay throw on the last word of a phrase, a low-pass sweep into a drop, a reverb-tail mute on a dramatic stop. Use Touch and Latch modes.
Part E — Final Listen and Bounce. Reference against the commercial track. Run the three-step mono check. Listen on monitors, headphones, and a phone or laptop speaker. Bounce a 32-bit, 96 kHz stereo WAV with peaks between −3 and −6 dBFS. Save as [Song]_v7_Mix.wav—your input to Chapter 19 mastering.
Optional Stretch. Bounce the full stem package (Drums, Bass, Instruments, Lead, BG, FX, Instrumental, Acapella, TV Mix). Set up an Atmos render if you have Pro Tools Studio or Ultimate. Drop iZotope Tonal Balance Control or ADPTR MetricAB on the Master Fader and document where your mix sits against commercial references.
Common Pitfalls. Skipping gain staging; mixing in solo; stacking long delays; pushing the master toward a streaming target before mastering; failing the mono check; chasing the reference and losing the song.
What You Are Building Toward. The bounced WAV is the deliverable Chapter 19 will master. Headroom, balance, a mix that translates—do this work and you have given the mastering engineer a great mix to make even better.