Chapter 19 · Mastering, Post-Production & Delivery
Mastering
“The point in mastering is to make a recording sound better than the original when played back at any level.”
—Bob Ludwig, Tape Op #105, January 2015
By the end of this chapter, you will be able to:
- Identify the conditions a stereo mix must meet before mastering begins, including peak headroom between -3 and -6 dBFS, the absence of a mix-bus brickwall limiter, a passed mono check, and a native bit-depth bounce
- Sequence the standard mastering signal chain in order—compression, EQ, saturation, multiband compression, de-essing, stereo imaging, limiting, and dither—and explain why each stage precedes the next
- Apply Mid/Side processing to split a stereo signal into Mid and Side channels and describe how independent compression, EQ, and width adjustment on each channel achieves tonal and spatial control unavailable with standard stereo processing
- Compare LUFS, the K-System, and streaming loudness normalization, including the platform targets for Spotify/YouTube (-14 LUFS) and Apple Music (-16 LUFS), and explain why normalization ended the loudness-war incentive for streaming delivery
- Distinguish true peak from sample peak, explain how inter-sample peaks arise during D/A reconstruction, and apply a -1.0 dBTP output ceiling with 4x oversampling to prevent downstream codec clipping
- Select and configure the appropriate specialized mastering workflow—stem mastering for surgical element control, vinyl mastering with mono bass below 200 Hz and a loudness ceiling around -12 to -14 LUFS, or Atmos mastering at -18 LUFS via ADM BWF—based on the delivery format required
- Select the correct dither type (TPDF, noise-shaped, or POW-r) for a given bit-depth reduction target and prepare multi-format deliverables for CD, hi-res streaming, and lossy codecs by applying dither only at the final conversion stage
- Embed ISRC, BWF bext/axml, and ID3 metadata fields in every delivered master file and explain how correct metadata routes royalties and prevents unmatched credits on distribution platforms
You bounced the mix at the end of Chapter 18. Thirty-two-bit, 96 kHz, peaks between −3 and −6 dBFS, headroom intact. That stereo WAV file is the input to this chapter—and what we do with it now is the last creative work the song receives as a standalone record before it goes out into the world.
The first time I sent a mix to a dedicated mastering engineer, I thought the record was already as good as it was going to get. I had spent days on it. Every level was right, every EQ move was intentional, every reverb tail sat exactly where I wanted it. Then the master came back and I barely recognized it—everything was wider, punchier, and louder without sounding crushed. Frequencies I did not even know were fighting each other had been resolved. The track breathed differently. That is when I understood: mastering is not about fixing the mix. It is about unlocking what is already there.
Mastering is the final creative step in the music chain before release. (Projects bound for film, TV, games, or sync have creative work still ahead—Chapter 20—but for the record itself, this is the finish line.) A master copy of the song (or songs) is created, and that master becomes the source from which all copies are made—whether pressed to vinyl, burned to CD, or uploaded to streaming platforms. The objective is to achieve consistent tone and volume across an album, set transitions between songs, and prepare the final deliverables for distribution. The mastering engineer typically receives a stereo mix from the mixing engineer (or in some cases, stems from the Main AUX Groups) and applies that last layer of polish to make the record competitive with other professionally released music.
Do not confuse simpler with easier. Mixing involves hundreds of individual decisions across dozens of tracks. Mastering involves fewer moves, but each one affects the entire song. Unlike mixing, there is no other track to hide a problem behind—and no engineer downstream to catch what you miss. The mastering engineer is the last set of hands before the record reaches the world. That is what makes the stage so nerve-wracking: what you print goes out, for good. If you over-compress the master, the whole record suffers. If you miss a resonance, every listener on every platform hears it. One mistake at this stage can cost a client thousands of dollars. For this reason, a mastering engineer must have exceptional ears, a trusted monitoring system, and absolute command of their tools.

The tools themselves are familiar—EQ, compression, de-essing, limiting, saturation, stereo imaging, sometimes even time-based effects. The difference is scope. Instead of applying these tools to individual tracks, the mastering engineer applies them to the song as a whole. That shift in scale is what makes mastering so unforgiving. If too many corrections are needed at this stage, the problem is almost certainly in the mix, not in the master. A great mastering engineer can enhance a mediocre mix, but do not count on anyone to perform a miracle that should have happened before the stereo bounce. The fixes that belong in the mix belong in the mix.
Mastering is the one stage where the right instinct is usually to do less. By the time a song reaches me here, the building is done—the parts are played, the mix is balanced, the decisions that make it a record have already been made. My job is not to add anything but to judge what is there: to hear the song the way a stranger will, on systems I cannot predict, and to make the few small moves that let it translate everywhere without ever calling attention to themselves. A great master is the one nobody notices.
It comes down to a single discipline: do less, do it right, and respect what is already there. The discipline of mastering is the discipline of restraint. Every move you make changes the entire record, so every move has to earn its place. The mix is the answer; the master is how you let that answer be heard—and the hardest skill in this whole chapter is knowing when to stop turning knobs.
Preparing for Mastering
suggest a correction“Sometimes the best thing you can do is nothing.”
—Greg Calbi, Tape Op #86, November 2011
Calbi's restraint is the entire job in one sentence. Mastering starts with what you decide not to do. Whenever possible, have your tracks mastered by a different engineer than the one who mixed them—a fresh set of ears brings objectivity that the mixing engineer (who has heard the song hundreds of times) cannot. A dedicated mastering engineer in a calibrated room will catch issues the mixer missed and bring a new perspective to the overall sound.
What a Master-Ready Mix Looks Like
If you are the mixer sending a mix to be mastered—or you are mastering your own mix—there is a checklist of conditions the file should meet before mastering even begins. Send a mix that does not meet these and you are paying the mastering engineer to fight your file instead of polishing it:
- Peaks between −3 and −6 dBFS on the bounced stereo file. This gives the mastering engineer room to add compression, EQ, saturation, and limiting without clipping.
- No brickwall limiter on the mix bus. Let mastering handle final limiting. A limited mix is a flat mix; the transients you crushed cannot be brought back.
- Mono check passed. If the mix collapses badly in mono, mastering cannot fix it. Hard-panned stereo sources and chorus/doubler effects are the usual culprits—fix them in the mix.
- Bounced at the session's native sample rate and bit depth, or higher. 32-bit float, 96 kHz is the pro standard for delivery to mastering. Do not pre-convert to CD-quality (16-bit / 44.1 kHz) before mastering—do that conversion at the very end.
- Files clearly labeled and organized.
[Song]_v7_Mix.wav(the file you bounced at the end of Chapter 18). If sending stems, label each by Main AUX group (Drums, Bass, Instruments, Lead, BG, FX, Instrumental, Acapella, TV Mix). - Reference track included or named. Tell the mastering engineer what you want it to sound like by giving them a commercial reference in the same genre.
- Notes on intent. Two sentences max. “We are going for an −8 LUFS hip-hop hit” or “We want it loud but transient-rich, like the Bon Iver record I sent.” The mastering engineer can do their best work when they know the destination.
I once received a mix where the artist had slammed a limiter on the master fader “to make it loud.” The waveform looked like a brick. There was nothing left to work with—every transient had been destroyed. I had to ask for a new bounce with the limiter removed, which cost the client an extra day. Leave the loudness to the mastering engineer. The mix's job is balance, depth, and emotion. The master's job is loudness, polish, and platform-readiness.
Throughout the mastering process, regularly A/B your master against a commercial reference track in the same genre. This keeps your ears calibrated and prevents you from drifting too far in any direction—especially regarding tonal balance, low-end weight, and overall loudness.
Mastering requires critical listening at high detail, which leads to ear fatigue faster than almost any other studio work. Take regular breaks—at least five minutes for every 20–30 minutes of focused listening. When your ears are fatigued, you make poor decisions about EQ and loudness. I have learned this the hard way: decisions I made at hour three of a mastering session almost always needed to be revisited the next morning. Come back with fresh ears to make final judgments.
The Mastering Signal Chain
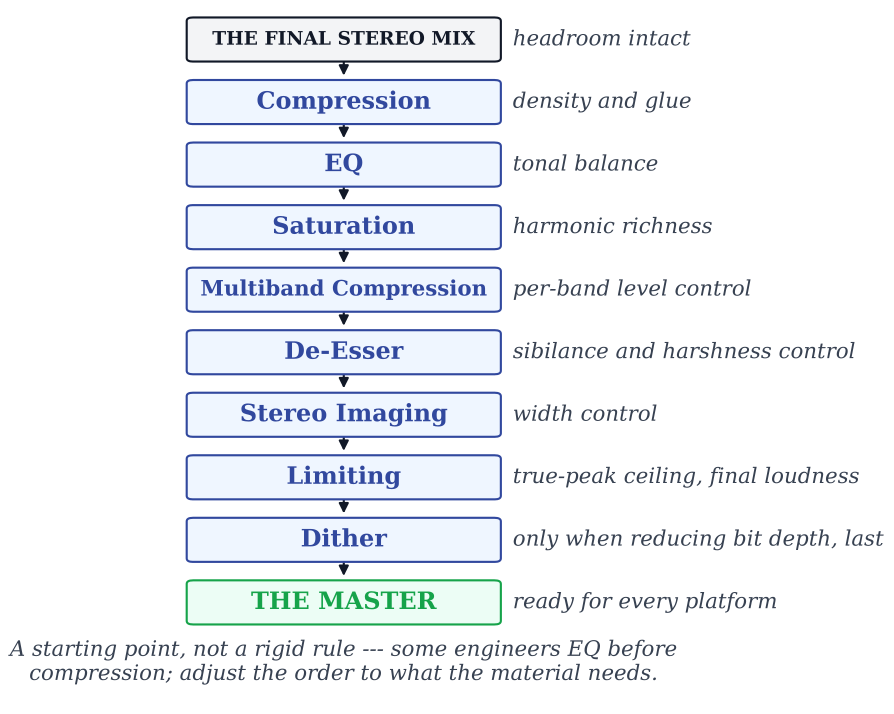
suggest a correctionA typical mastering signal chain follows this order:
Compression — → EQ → Saturation → Multiband Compression → De-Esser → Stereo Imaging → Limiting → Dither
This is not a rigid rule—some engineers prefer EQ before compression, and the order should be adjusted based on what the material needs. But understanding this typical chain provides a solid foundation. Think of it like a recipe: you can adjust the seasoning, but you probably should not frost the cake before you bake it. Note where multiband compression and de-essing sit—late in the chain, just before the limiter—so they can catch the last harsh peaks and resonances the broad earlier stages left behind, instead of forcing the limiter to fight them.
Compression in Mastering
suggest a correctionI start with compression because it shapes everything that comes after. Compression alters frequency response in program-dependent ways: a fast-attack compressor catching transients tends to dull the highs (transients carry most of the high-frequency energy); an opto-style unit with its slow program-dependent response can darken in subtler ways. The shift varies by compressor topology and by what is being compressed, but it is always there. If I EQ first and then compress, the compressor can undo my tonal work. By compressing first, I know exactly what I am EQing.
Compression during mastering typically comes in two forms: a mix-bus compressor and a multiband compressor. Mix-bus compressors are used gently—slow attack, fast release, low ratio, 2–3 dB of gain reduction at most—just enough to give the track a sense of “glue,” that feeling that all the elements are living in the same space. Push a mix-bus compressor too hard and the track starts pumping; use it right and the listener cannot tell it is there, but they would miss it if you bypassed it.
Multiband compressors break the frequency spectrum into bands and compress each one independently. This is enormously powerful. A broadband compressor reacts to the loudest energy in the signal—usually the kick or a heavy 808, since most of a track's energy lives in the low end. Every time the low end hits, the whole mix ducks with it. A multiband compressor tames that low-end pumping without touching the highs at all.
Multiband compression is also a surgical tool for frequency problems. Maybe the cymbals are harsh only during the chorus—simply EQing the whole song to fix it would leave the verses sounding dull. A multiband compressor can reduce that harsh range only when it exceeds a set threshold, leaving everything else untouched. The trade-off is that aggressive multiband compression can sometimes narrow the stereo image, so use a high-quality tool like FabFilter Pro-MB or Waves Linear Multiband and check your imaging after every adjustment.
Mid/Side Compression
A third compression tool that lives in modern mastering is Mid/Side compression. Like the M/S EQ we will cover later in this chapter, M/S compression splits the stereo signal into Mid (the mono center, where kick, bass, lead vocal, and snare live) and Side (the stereo difference, where reverb, panned guitars, and stereo width live), then compresses each independently.
This is enormously useful at mix-bus scope. A compressor on just the Mid channel can lock the center elements together—tightening the kick, bass, and lead vocal as a unit—without compressing the spatial information on the sides. A separate compressor on the Side channel, often with a longer release, can be used to manage the stereo image's dynamics, holding the width consistent through quiet and loud sections. The result is a master that feels both centered and wide at the same time, which is exactly the perceptual trick a great master pulls off.
FabFilter Pro-MB and Pro-C (in Mid/Side mode) and the Brainworx bx_dynEQ V2 are the tools I reach for. As with all M/S processing, small moves change the entire image—a 1 dB difference in Side compression is the difference between a cohesive master and a smeared one. Use sparingly.
EQ in Mastering
suggest a correctionAfter compression, I reach for a high-quality mastering EQ to achieve tonal balance and make up for any high-frequency loss from the compression stage. Mastering EQ is about broad strokes, not surgical cuts.
Genre awareness is critical here. Hip-hop and dance music typically carry a pronounced bump around 60 Hz—that is intentional and expected. Cutting it would strip the genre of its identity. Rock and jazz, on the other hand, usually call for a tighter low end. You have to understand the sonic signature of the genre you are mastering, or you will “fix” things that are not broken.
The chart below maps the rough territory I work toward by genre. These are starting points, not laws, and individual records vary widely. The LUFS column shows what professional masters typically measure (pre-normalization); on streaming, platforms normalize integrated loudness to roughly −14 to −16 LUFS (Spotify and YouTube near −14, Apple Music −16), but the master file's actual integrated loudness still drives how it translates and how much dynamic range survives:
| Genre | Typical Master LUFS | Low-End Character | Mastering Notes |
|---|---|---|---|
| Hip-hop / Trap | −8 to −10 | Pronounced 60 Hz sub bump | Heavy 808s; minimal headroom; loud still expected |
| EDM / Dance | −7 to −9 | Tight, punchy sub | Maximum loudness for club playback |
| Pop | −10 to −12 | Controlled but full | Vocal-forward; competitive loudness |
| Rock | −10 to −13 | Tight low end, no excess sub | Drums and guitars retain dynamics; analog warmth |
| Singer-Songwriter | −14 to −16 | Natural | Preserve dynamics; less limiting |
| Jazz | −16 to −18 | Natural, refined | Heavy dynamics; minimal compression |
| Classical | −18 to −23 | Natural | Full dynamic range; almost no limiting |
These are typical delivered-master loudness values, not post-normalization playback levels. Streaming platforms normalize to roughly −14 LUFS—a −7 LUFS master gets turned down 7 dB on playback, which removes the loudness advantage while keeping whatever distortion the limiting added.
This is where reference tracks earn their keep. I pull up a commercially released track in the same genre—something I trust sonically—and import it directly into the mastering session. I match levels and flip back and forth constantly. The reference is not a target to copy; it is a guardrail that keeps me from drifting. Without one, it is easy to chase your own tail—boosting highs, then compensating with more lows, then wondering why the whole thing sounds different from where you started.
A note on EQ technique itself: mastering EQ should always favor broad strokes over surgical notches. The reason is psychoacoustic. Narrow Q cuts on a full mix often leave audible artifacts—phasing, ringing, or the subtle “hole” the ear notices because every other instrument's harmonics around that band have been dropped together. A 0.7-Q shelf at 12 kHz is invisible. A 6-Q notch at 2.7 kHz on the same master sounds like something is missing, even if the listener cannot identify what. If you find yourself reaching for a narrow Q on the master, that fix probably should have happened in the mix.
Saturation
suggest a correctionThere is a reason vinyl records and analog tape still sound appealing to so many listeners: harmonic distortion. When audio passes through analog circuits, transformers, and tape, it picks up subtle harmonic content—added even- and odd-order harmonics (tape and transformers lean toward odd-order, single-ended tube stages toward even)—that the human ear perceives as warmth and fullness. Saturation plugins emulate this behavior, and in mastering, a touch of saturation can bridge the gap between a mix that sounds “digital” and one that sounds like a record.
I use saturation after EQ because I want it to color the final tonal shape, not get reshaped by later processing. The key word is subtlety. You are not trying to make the track sound distorted—you are trying to add a sense of analog depth. A little tape emulation can tame harsh transients in the high end while thickening the lower mids, making a thin mix sound more substantial without touching a single EQ band.
When I first started experimenting with saturation in mastering, I overdid it. The track sounded warm, sure—but also muddy and smeared. The lesson: if you can hear the saturation as an effect, you have gone too far. It should be the kind of thing the listener feels rather than identifies.
De-Essing the Master
suggest a correctionThe mastering de-esser exists for one job: catching the residual sibilance the mix-stage de-esser missed—and the sibilance that mastering itself re-energized. Compression, saturation, and any high-frequency EQ boost all push “sss” and “shh” back up, so the de-esser sits late in the chain, after those stages have done their damage. Set it by ear at the sibilant band (sweep 4–10 kHz in listen mode, same technique as Chapter 16), aim for gain reduction only on the offending syllables, and bypass it entirely on instrumental material—there is nothing for it to catch, and a misconfigured detector will chew on cymbals instead. If the master needs more than 2–3 dB of de-essing, the problem belongs back in the mix.
Stereo Imaging
suggest a correctionA great master sounds wide. Not artificially wide, not phasey or hollow—just spacious, like the music occupies a three-dimensional field between the speakers. Stereo imaging tools help you get there, and the best ones let you work in frequency bands so you can widen the highs (where reverb tails and ambient detail live) while keeping the lows anchored in mono (where kick, bass, and low-frequency energy need to stay focused).
The most powerful imaging tool in mastering is Mid/Side EQ. It splits a stereo signal into two components: the “Mid” channel (everything identical in left and right—usually kick, bass, lead vocal, snare center) and the “Side” channel (everything that differs between left and right—stereo reverb, panned guitars, wide synths). Listening to these channels independently is like looking under the hood of a mix. You might discover a resonance that only exists in the Mid, which you can notch out surgically without affecting the Sides. You might roll off bass below 100 Hz in the Side channel to tighten the low end and focus the kick drum. These are moves that would be impossible with a standard stereo EQ.
Always check your master in mono. Collapse the stereo image to a single channel and listen carefully—if elements disappear, lose volume, or sound thin, you have phase cancellation problems. This is not optional. A significant portion of your audience will hear your music in mono: phone speakers, Bluetooth speakers, club systems summed to mono, one earbud in at the gym. If your wide, beautiful stereo master falls apart in mono, it falls apart for a lot of real listeners. Check it every time.
A word about reverb in mastering: it is occasionally used to add cohesion—a very short, subtle room can make disparate elements feel like they belong together. But use it sparingly and always roll off the low frequencies in the reverb return. Bass reverb creates mud, and mud at the mastering stage is catastrophic because it affects the entire mix.
Limiting and Output Level
suggest a correctionThe limiter sits at the end of the chain, and its job is straightforward: raise the overall loudness of the track to a competitive level without introducing audible distortion. That sounds simple. It is not.
Push the limiter too little and your track sounds thin and distant next to everything else on a playlist. Push it too hard and you get a lifeless, over-compressed wall of sound where every transient has been flattened. The sweet spot is narrow, and finding it requires constant A/B comparison with your reference track. Digital brickwall limiters are the standard tool here—they use lookahead processing to anticipate peaks and prevent any signal from exceeding the output ceiling. The name says it all: nothing gets past the wall.
One trick I have learned over the years: running two limiters in series, each doing moderate work, often produces cleaner results than pushing one limiter hard. I try to keep each limiter under 3 dB of gain reduction for the cleanest sound.
Why over-limiting hurts even when it is not “distorting.” Students expect over-loud masters to sound obviously broken, and they usually do not—which is exactly the trap. The ear judges loudness largely from average energy, so a limiter that shaves transients and raises the average reads as “louder and more exciting” on first listen—for about thirty seconds. The damage shows up later and lower: with the peaks gone, the kick and snare stop contrasting against the body of the mix, the rhythm loses its physical push, and the unvarying density fatigues the ear in a way listeners feel as boredom long before they would call it distortion. Brief clipping on isolated drum transients, by contrast, can pass unheard—the ear masks a millisecond of distortion inside a loud transient, which is why some mastering engineers deliberately prefer a hair of clipping to deeper limiting on percussive peaks. The lesson runs in both directions: do not trust the thirty-second loudness impression (level-match before judging, as Chapter 16 taught), and judge a master by whether it still moves at minute three.
Converters and True Peak
suggest a correctionA high-quality AD/DA converter is essential for mastering. The converter is the bridge between the analog and digital worlds, and any coloration or distortion it introduces becomes part of every copy of the master. I learned this firsthand when I upgraded from a budget interface to a dedicated mastering converter—the same session, the same plugins, the same settings, and the low end suddenly had definition it never had before. The converter was not adding anything; it was simply stopping the old one from taking things away. Some engineers intentionally push the ADC input to get a hotter, slightly saturated sound, but I do not recommend this unless you have deep experience with your specific converter and know exactly where its sweet spot is.
One critical concept that trips up students: the difference between sample peak and true peak. A sample peak measures only the discrete digital values, but the analog waveform reconstructed during D/A conversion can exceed those values—these are called inter-sample peaks. Picture it this way: your DAW shows a waveform that peaks at −0.3 dBFS, so you think you are safe. But between those sample points, the actual reconstructed curve overshoots past 0 dBFS, and the listener's DAC clips. You never see it on your meters, but they hear it as distortion. True-peak measurement reconstructs the waveform between samples using 4× oversampling (per ITU-R BS.1770-5) to estimate the actual analog peak. For this reason, modern mastering engineers use true-peak limiting and set the output ceiling to −1.0 dBTP (decibels True Peak) or lower—this leaves headroom for the inter-sample overshoot and for the additional overshoot that lossy codecs (Spotify's OGG, Apple's AAC) introduce during encoding. FabFilter Pro-L offers true-peak limiting with up to 32× oversampling for ultra-precise inter-sample detection; iZotope Ozone's Maximizer offers true-peak limiting as well. Use them.
Loudness and Metering
suggest a correctionThe loudness wars were real, and their casualties are still on your playlist. For decades, artists and labels pushed mastering engineers to make records louder and louder, believing that the loudest track on the radio would grab the most attention. The result was an arms race that sacrificed dynamics for volume. Some of those masters are genuinely painful to listen to today.
How loud is too loud? Judging loudness with dBFS alone is nearly impossible—most professional tracks peak near 0 dBFS yet vary wildly in apparent loudness, because a heavily compressed signal sounds louder even at the same peak level. The RMS (Root Mean Square) measurement was the traditional solution, calculating average amplitude over time to give a more meaningful picture of perceived loudness.
To put RMS values in perspective, here are widely-cited measurements from well-known masters (approximate figures drawn from Ian Shepherd's loudness analysis “How Loud Is Too Loud?”—treat them as illustrative, not exact):
| RMS (dBFS) | Track | Character |
|---|---|---|
| ≈−5 | Metallica, “The Day That Never Comes” (CD) | Massive distortion, clipping |
| ≈−6 | Oasis, “Some Might Say” | Severe clipping distortion |
| ≈−8 | Feeder, “Pushing the Senses” | Heavy clipping distortion |
| ≈−10 | Katatonia, “Consternation” | Clean, punchy, great dynamics |
| ≈−13 | Sugar, “Fortune Teller” (1992) | Natural dynamics |
| ≈−17 | Metallica, “The Day That Never Comes” (Guitar Hero) | Full dynamics, low loudness |
Notice that the same Metallica song appears at both extremes (the table's RMS figures are approximate, drawn from one published analysis of the era). The CD version was crushed to roughly −5 RMS—more than ten decibels louder than the Guitar Hero cut, and fans were so outraged by the distortion that a petition circulated demanding a remaster. The Guitar Hero version, sourced from the unmastered stems, preserved the full dynamics and sounded dramatically better. That is the loudness war in a single data point.
Before LUFS became universal, Bob Katz's K-System formalized the working mastering engineer's monitoring and metering discipline. The system pairs three loudness reference points—K-20 for film and orchestral mastering, K-14 for moderately compressed pop, rock, and home listening, K-12 for broadcast—with calibrated monitoring at 83 dB SPL (C-weighted, slow) pink noise per channel. The K-number names where 0 on the meter sits below full scale: K-20 places 0 VU at −20 dBFS, K-14 at −14 dBFS, K-12 at −12 dBFS, each calibrated so that 0 VU of pink noise reads the same 83 dB SPL per channel (Katz, 2014)—so a more compressed master simply moves to a lower K-number (less headroom above the reference) while the 83 dB monitoring anchor never moves. With a K-System meter at 0 VU and monitors calibrated, the same fader position produces the same perceived loudness on every session, which is the precondition for making consistent mastering decisions across hours, days, or different projects. The K-System was the working mastering engineer's discipline for two decades; today most rooms anchor to LUFS-calibrated monitoring instead, but understanding K-System decodes a generation of mastering literature and studio conversation—and the calibrated-monitoring principle behind it has not aged a day.
While RMS served the industry well, the modern delivery standard is LUFS (Loudness Units relative to Full Scale), defined by ITU-R BS.1770 (revision 5, published 2023; its true-peak metering dates to the original 2006 standard). LUFS improves on RMS in two important ways. First, it applies K-weighting—a perceptual filter that rolls off the low end and lifts the high frequencies with a shelf, so the meter weights loudness the way the ear hears it. Second, it applies gating—the algorithm excludes silent passages from the integrated reading so quiet intros and outros do not skew the number. The result is a measurement that tracks actual perceived loudness across the program, not just average energy. This is the metric every streaming platform uses to normalize playback.
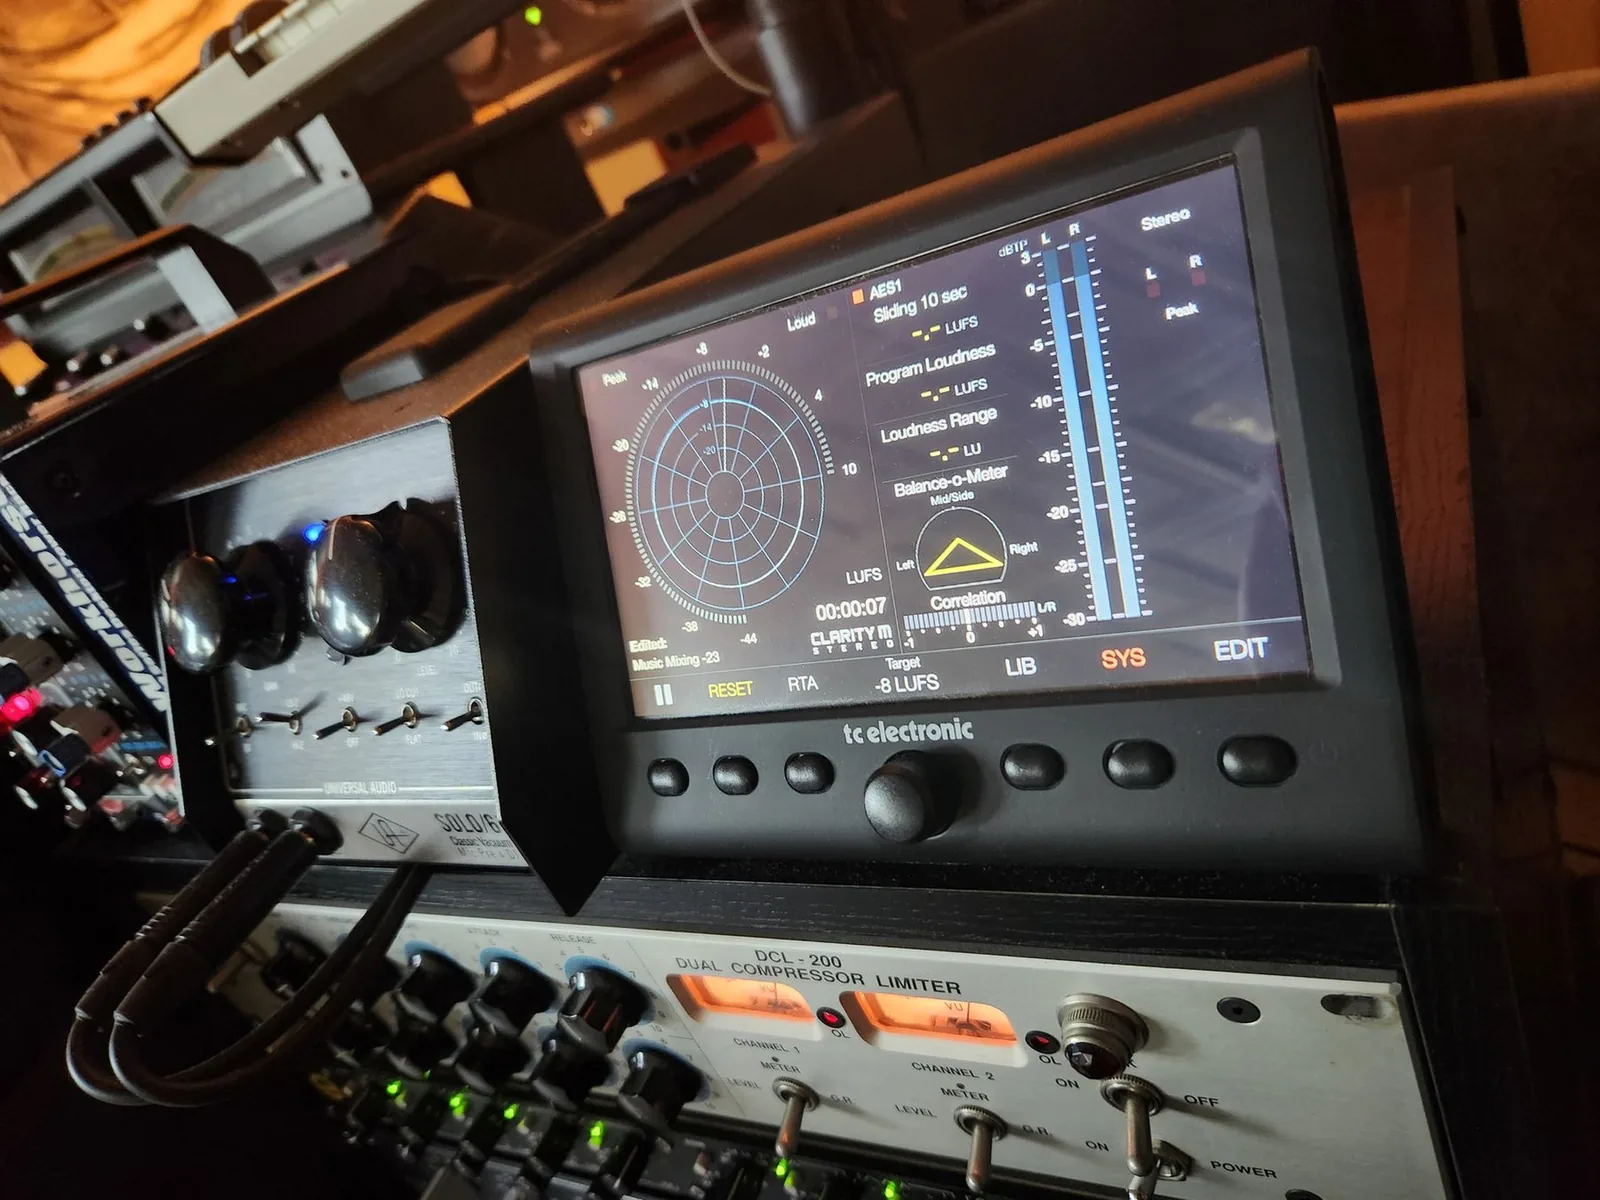
Here is why LUFS matter to you personally: streaming platforms now use loudness normalization. Spotify targets approximately −14 LUFS, Apple Music approximately −16 LUFS, and YouTube approximately −14 LUFS. If your master is significantly louder than these targets, the platform will simply turn it down—negating the benefit of heavy limiting while preserving every bit of distortion it introduced. The loudness war, for streaming at least, is over. The platforms enforce the ceasefire. For this reason, mastering engineers now target appropriate LUFS levels for their intended delivery platform rather than pushing for maximum volume.
Dither and Output Formats
suggest a correctionThe last step in the mastering effects chain is dither. This one confuses students because it sounds counterintuitive: you are deliberately adding noise to improve quality. Here is why it works. When you reduce bit depth—say, from 32-bit floating point to 16-bit for CD—you are essentially rounding sample values, and that rounding creates a specific type of distortion called quantization error. Dither replaces that patterned, audible distortion with a tiny amount of random noise (Pohlmann, 2010) that is far less objectionable. The noise floor rises slightly, but the distortion disappears. It is one of those elegant solutions where a small, controlled imperfection prevents a larger, uglier one.
Three flavors of dither dominate professional mastering, and the choice matters more than students realize. TPDF (Triangular Probability Density Function) is the neutral default—spectrally flat, transparent, the safe choice when you are unsure. Noise-shaped dither pushes the dither energy into frequencies the ear is least sensitive to (typically above 12–15 kHz), making the perceived noise floor lower than TPDF at the cost of a small high-frequency rise. POW-r 1, 2, and 3 are the dither presets built into most pro DAWs: POW-r 1 uses minimal, narrow-band shaping and stays flattest across the audible band, while POW-r 2 and 3 apply progressively stronger psychoacoustic noise shaping. For 16-bit / 44.1 kHz CD masters, noise-shaped dither (POW-r 2 is a typical choice) is the working standard. For 24-bit deliveries to streaming, TPDF is fine—the noise floor at 24-bit is so low any shaping is academic. Apply dither only at the final bit-depth reduction, never twice in the same chain.
Mastering is an ever-changing field. Today, I output several formats of each master: CD quality (16-bit, 44.1 kHz), high-resolution files for streaming services (24-bit, 96 kHz or higher), and compressed formats like AAC for portable listening. Apple Music and Tidal support lossless and high-resolution audio, making high-quality masters increasingly important.
When converting between sample rates—for example, from a 96 kHz session to 44.1 kHz for CD—use a high-quality sample rate converter (SRC). Poor sample rate conversion introduces artifacts that are subtle but real. Many mastering engineers prefer to work at higher sample rates and convert down as the final step, using dedicated SRC algorithms in tools like iZotope RX, Steinberg WaveLab, or dedicated hardware converters. For sample-rate conversion specifically, I reach for iZotope RX—its SRC is cleaner than most.
I prefer to do all my processing in Pro Tools, and then bring the processed files to a dedicated mastering application like Steinberg WaveLab for final assembly and sequencing.
Track Transitions and Delivery
suggest a correctionBefore the transitions comes the sequence itself—the decision of what order the songs play in, which on an album-length project is a craft of its own. The classic wisdom holds: open with strength (the first track teaches the listener what the record is), place another peak two or three songs in, let the energy breathe in the middle rather than sag, and close with intention—either the emotional summit or the quiet afterword, but on purpose. As you audition an order, listen to every junction: how each ending meets the next beginning in key, tempo, and density. Two adjacent songs in the same key can feel inevitable or monotonous; a lift of a step feels like forward motion; a hard tempo collision can be a feature at the record's turning point and a flaw anywhere else. Sequence with fresh ears and the skip button in mind—the order is the album's arrangement, and the same tension-and-release thinking from Chapter 18 applies at this larger scale.
Setting transitions between songs is an art that most listeners never think about but always feel. A well-sequenced album has a rhythm to it—not just within each track, but between them. Some ballads need a long, quiet pause to let the emotion settle. Up-tempo tracks might sound best with tight transitions that keep the energy moving. Occasionally, two songs benefit from a crossfade that blurs the boundary between them entirely. There is no formula. Listen to the album as a whole, in order, and let the music tell you what it needs. Steinberg WaveLab is the industry-standard tool for this work—it lets you arrange tracks in album order, set precise gaps and crossfades, add CD text and metadata, and export final deliverables, all in a dedicated mastering environment built for sequencing.
For digital distribution, every platform has its own requirements—we will cover the specifics in the Streaming Platform Delivery Specifications table later in this chapter. The universal rule is simple: upload in the highest quality format the platform accepts and let them handle the conversion. For Dolby Atmos spatial audio delivery, Apple Music accepts ADM BWF (Audio Definition Model Broadcast Wave Format) files rendered from your immersive mix session. If you are still preparing physical CD masters, always request a proof copy from the manufacturer and listen to it in multiple environments before approving the full run—I have caught problems on proof copies that were invisible in the studio but obvious in a car stereo.
Metadata and Discoverability
A client once called me two weeks after release because his track was generating streams with no royalty credit—the distributor had matched it to the wrong recording. The fix was trivial once we knew what it was, but the uncredited streams were gone. The culprit was an empty ISRC field in the delivered WAV file. Embed your metadata before delivery and that call never happens.
Every master file you send to an aggregator or distributor should carry its metadata baked in. For WAV and BWF deliverables, the bext chunk (defined in EBU Tech 3285) holds originator, date, and—via the axml chunk per EBU Tech 3352—the ISRC itself. For MP3 exports, the ID3v2 tag carries ISRC in the TSRC frame; title, artist, composer, and year go into the standard TIT2, TPE1, TCOM, and TDRC frames respectively. Steinberg WaveLab and iZotope RX both write these fields directly to the file; fill them before you bounce the final master, not as an afterthought at upload time.
The ISRC (ISO 3901:2019) is a twelve-character alphanumeric code that permanently and uniquely identifies a specific recording—not the song, but the specific master—for every platform that reports streams, every PRO that distributes royalties, and every sync database that tracks usage. Platforms and aggregators read it for crediting; SoundExchange uses it to route digital-performance royalties to rights holders. Without a correct ISRC in the file, those royalties accumulate in an unmatched pool and are distributed to whoever does have correct metadata. Secure your ISRCs before delivery, not after—your distributor assigns them automatically at no extra charge, or you can register directly at usisrc.org for a one-time $95 fee that authorizes up to 100,000 codes per year (the prefix is yours for life). Registration and ISRC assignment are covered in Chapter 21; the point here is operational: the code must live in the file.
Specialized Mastering Workflows
suggest a correctionBeyond the standard stereo master, three specialized workflows show up regularly in modern releases: stem mastering, vinyl mastering, and Atmos mastering. Each has its own constraints and decision criteria.
Stem Mastering
“It's just so much easier to fix the drums if you're just listening to the drum stem and fixing the drum stem, and not ruining the bass because you're futzing around with the drums on a stereo track.”
—Emily Lazar, Sound on Sound, May 2021
Stem mastering takes a different starting position than traditional stereo mastering. Instead of one stereo file, the engineer receives 4–8 stems from the Main AUX Groups (Drums, Bass, Instruments, Lead Vocals, BG Vocals, FX—the same groups Chapter 18 walks through in the stem export workflow). Each stem can be processed independently before the final stereo sum: compress the drum stem alone to bring the kick forward without affecting the snare; M/S the instrument stem to widen the synths without smearing the vocal; lift the lead vocal stem 0.5 dB without rebalancing the entire mix.
The advantage is precision—surgical control over individual elements without touching anything else. The trade-off is responsibility: the mastering engineer is making mix-level decisions, which puts pressure on the mix-vs-master boundary. Stem mastering also costs more (more files, more processing, more decisions) and takes longer to deliver.
When to use stem mastering: the mix has issues that need fixing but the mixer is unavailable; album tracks have inconsistent low-end weight or vocal levels and need unifying; the artist explicitly requests it. When not to: the mix is already close to right. Stereo mastering preserves the mix's identity, which is usually the goal.
Vinyl Mastering
Vinyl is back in a serious way, and mastering for vinyl carries constraints that streaming masters do not. Send a streaming-loud master to a cutting house and the lathe will refuse to cut it—or it will cut, distort, and skip on playback.
The constraints to know:
- Bass below 200 Hz must be summed to mono (or near-mono). Stereo low-frequency information physically jumps the needle out of the groove. Use M/S processing to high-pass the Side channel below 150–200 Hz.
- Sibilance is brutal on lacquer. Sharp 5–10 kHz transients can carve into the cutting head and produce distortion on playback. Aggressive de-essing on the master is often required for vinyl that was not for streaming.
- Loudness has a hard ceiling. A vinyl cut targeting −8 LUFS will distort or skip. −12 to −14 LUFS is realistic for a quality cut. The louder you push, the worse vinyl playback gets.
- Side time matters. A 12-inch LP tops out around 22 minutes per side, but that is the quiet-cut maximum—at competitive (loud) cutting levels, 15–18 minutes per side is realistic. The longer the side, the quieter and shallower the cut.
It helps to know what physically happens to your file after delivery, because every constraint above traces back to the plant. The approved master is cut in real time onto a lacquer—an aluminum disc coated in soft nitrocellulose—by a cutting lathe whose stylus carves the actual groove. The lacquer is electroplated to grow a metal negative (the father), the father grows a positive (the mother, playable and used for checking), and the mother grows the stampers that press heated vinyl pucks into records. Each generation loses a little fidelity and each stamper wears out after a few thousand pressings—which is why test pressings exist: a short run pulled from the production stampers for the artist and mastering engineer to approve before the full run. Listen to the test pressing on a real turntable, all the way through, both sides; it is the last chance to catch a problem before it is pressed ten thousand times.
The pro move: deliver a separate vinyl master with these constraints applied. Do not just send the streaming master to the cutting house and hope. A great vinyl press starts from a vinyl-specific master cut and proofed for the format.
Atmos Mastering
Spatial audio masters are different beasts than stereo. Chapter 18 covered the session setup, the bed-versus-objects distinction, and the ADM BWF deliverable. From the mastering side:
- Atmos masters target −18 LUFS integrated (lower than the −16 LUFS stereo target) because spatial mixes need more dynamic range to feel three-dimensional.
- Loudness is measured on the full Atmos render, not the stereo or binaural folddown. Use the Dolby Atmos Renderer's loudness meter for the final number that matters.
- ADM BWF is the deliverable format for Apple Music, Tidal, and Amazon spatial submissions.
- Limiting is generally lighter on spatial masters than on stereo. The renderer handles loudness encoding; aggressive bus-limiting can flatten the spatial impression.
If a project commissions both stereo and Atmos masters, master them separately. They are different deliverables with different goals—do not assume one converts cleanly to the other. The artist who pays for both gets two records that translate differently in the wild, and that is the right outcome.
Modern Mastering Tools
suggest a correctionTwenty years ago, a mastering studio required a room full of dedicated hardware—purpose-built EQs, compressors, and converters that cost more than most cars. Today, software has closed the gap to the point where a laptop running the right plugins can produce masters that compete with anything from a high-end facility. That does not mean the tools do not matter—it means the barrier to entry has shifted from budget to knowledge.
iZotope Ozone is the industry-standard mastering suite, offering a complete chain of modules—EQ, dynamics, exciter, imager, maximizer, and more—inside a single plugin. Its AI-powered Master Assistant analyzes your audio and generates a starting-point chain, which is useful for beginners learning what a mastered track should look like, though experienced engineers typically use it as a jumping-off point rather than a final answer. The Stem Focus feature lets you adjust individual elements within a mixed stereo file—AI source separation doing what used to require the stems. When a client asks you to turn down the vocal slightly and you do not have them, it often works.
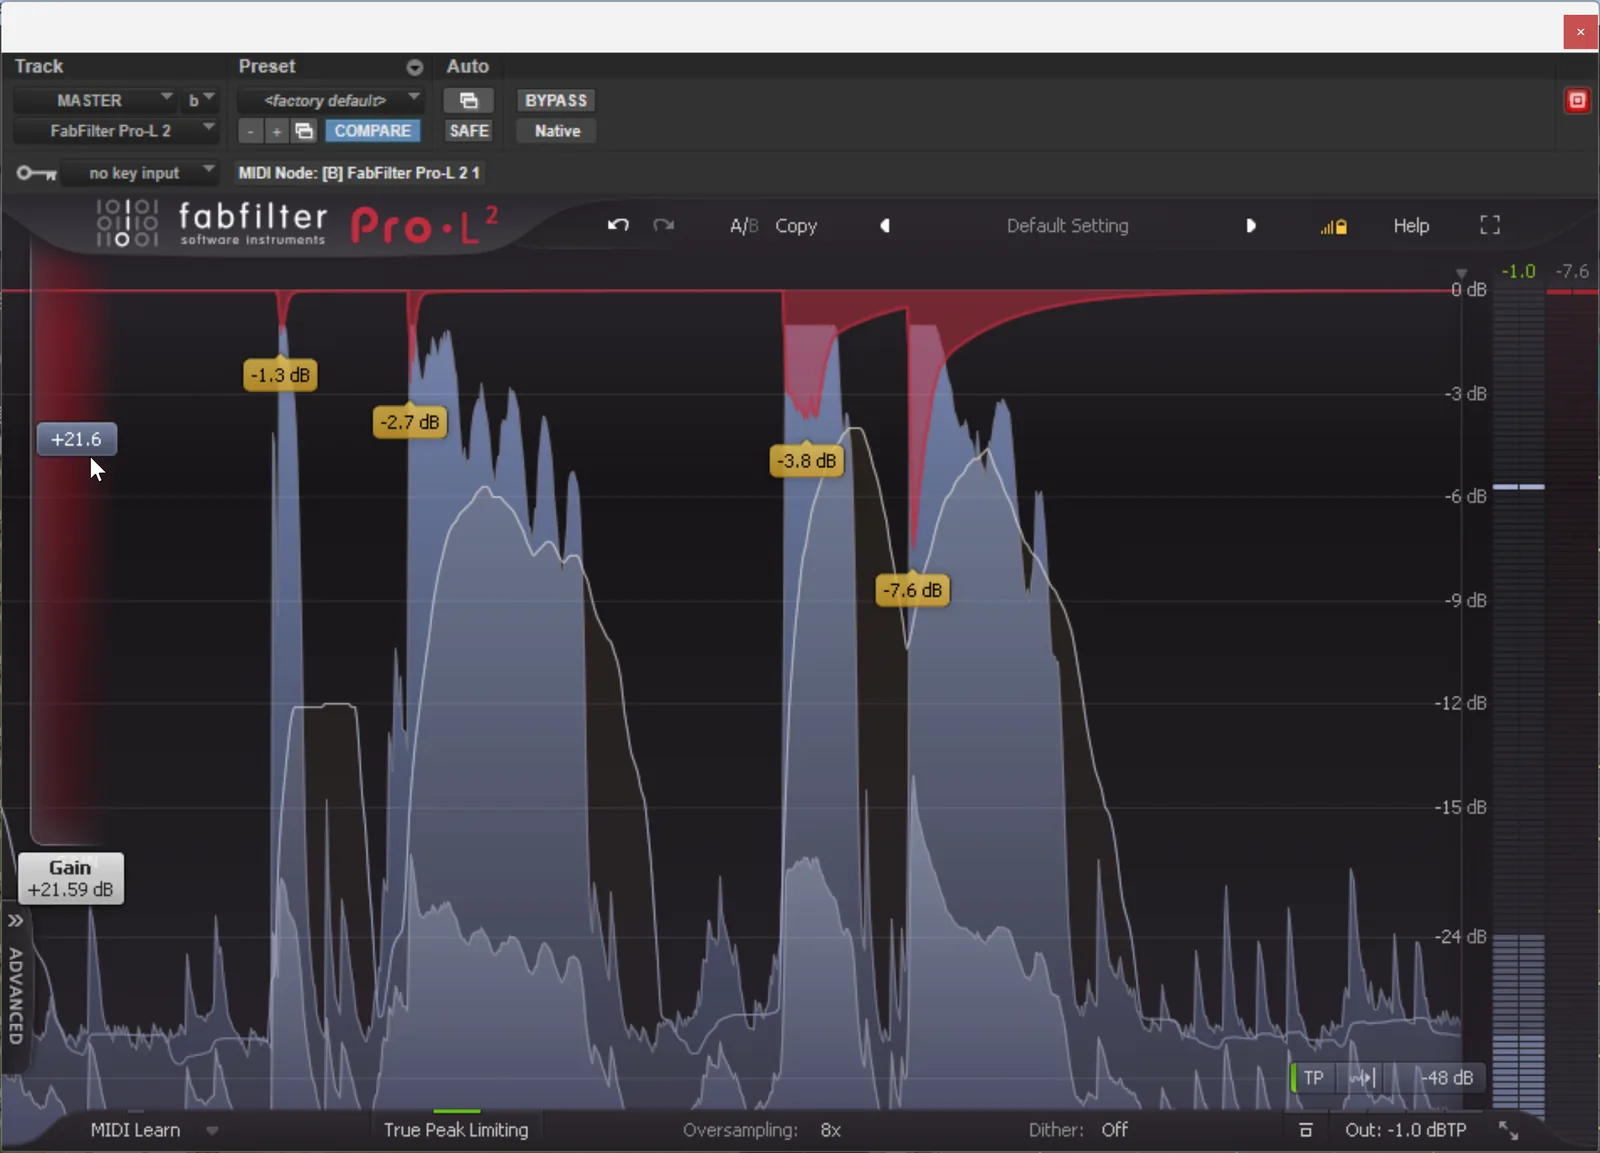
FabFilter Pro-L is a true-peak brickwall limiter with eight algorithms, comprehensive LUFS metering (including EBU R128 and ITU-R BS.1770-4 compliance—the revision Pro-L implements; the 2023 update to BS.1770-5 added object-based-audio loudness measurement (Annex 4) without changing typical music readings), up to 32x oversampling, and Dolby Atmos surround support. I keep it at the end of nearly every mastering chain. Its real-time level display makes it easy to see exactly how hard you are pushing.
FabFilter Pro-Q handles surgical and mid/side EQ with a built-in spectrum analyzer that overlays your signal in real time—invaluable for identifying problem frequencies. FabFilter Pro-MB provides transparent multiband dynamics. oeksound soothe is a tool that has become indispensable in many studios: it dynamically identifies and suppresses resonances in real time, handling harshness that would otherwise require tedious manual EQ work.
Compressors and Limiters
A.O.M. Invisible Limiter G2 is a transparent, look-ahead brickwall limiter with automatic attack/release optimization that has become a go-to for clean loudness without audible pumping or distortion. DMG Audio Limitless is the most adaptive limiter on the market—it splits incoming audio into multiple bands internally and applies independent limiting to each, producing transparent loudness even on aggressive program material. Many mastering engineers reach for Limitless on rock and electronic mixes where Pro-L reveals its character. Sonnox Oxford Inflator is a category of one—it adds perceived loudness through harmonic enhancement rather than gain reduction, the way analog tape and console electronics did before brickwall limiters existed. A subtle Inflator pass before the limiter often produces a more musical result than another dB of GR.
EQs and Dynamics
Maag Audio EQ4 earns its place on countless mastering chains for one specific feature: the Air Band, a switchable high-shelf reaching up to 40 kHz that adds an ineffable “sheen” to vocals and full mixes. There are sonic effects that happen above the audible range that the ear nonetheless registers, and the Air Band is the most famous example. Brainworx bx_digital V3 is the standard-bearer mastering EQ for Mid/Side work, offering up to 11 bands per channel, dynamic EQ on each band, and the cleanest M/S decoding in any plugin. Brainworx bx_masterdesk Classic is a popular all-in-one mastering processor—compressor, EQ, stereo widener, and limiter in a single window—designed by Brainworx founder Dirk Ulrich to emulate a complete high-end analog mastering chain rather than any single engineer's rack. DMG Audio EQuilibrium is a deeply configurable EQ for surgical and mastering work, with selectable analog-modeled band shapes and linear-phase options—the EQ I reach for when I need precision the others cannot give.
Premium Analog Emulations
Acustica Audio has built a category of high-end mastering plugins (Coral, Diamond, Pink, Sand) that capture the harmonic behavior of specific analog hardware via convolution-style sampling rather than algorithmic modeling. They are CPU-heavy and acquired taste, but the realism on a transparent passage is hard to argue with. Universal Audio Manley Variable Mu and Universal Audio Massive Passive (UA exclusives, but available as native plugins—no UAD hardware required) emulate two of the most widely used hardware mastering tools—the Manley tube compressor and Manley tube EQ. Working mastering engineers running UAD systems often build a chain around these two as a first move and add other plugins around them.
Metering and Reference
iZotope Insight 2 is a multi-purpose meter that displays LUFS (integrated, short-term, momentary), true peak, dynamics range, stereo correlation, vectorscope, and surround—everything a mastering engineer needs to QC a master in a single window. Youlean Loudness Meter 2 (free) offers excellent LUFS metering; its platform-target presets (Spotify, Apple, YouTube, Tidal) require the paid Pro version. NUGEN Audio MasterCheck Pro solves a problem most engineers do not realize they have: it lets you preview your master through every streaming codec (Spotify OGG, Apple AAC, YouTube Opus, MP3) at the platform's actual bitrate before you upload, so inter-sample peaks introduced by codec encoding can be fixed at the source rather than discovered after release.
The meters are only half of the reference picture. The other half is other records: keep two or three commercial masters you trust on a muted track in the session, level-matched to your master with clip gain—not matched by feel, matched by the LUFS readout. Louder always sounds better for the first ten seconds, which is exactly how long an unmatched A/B takes to fool you. Match levels, switch instantly, and listen for tonal balance, low-end weight, and stereo width. If your master holds up at matched loudness against records you trust, it will hold up everywhere else.
Streaming Platform Delivery Specifications
suggest a correctionYour master is done. It sounds incredible. Now you need to deliver it to the world—and every platform has different requirements. The following table summarizes the technical specifications for major streaming and distribution platforms. Bookmark this table. You will refer to it constantly.
| Platform | Streaming Codec | LUFS | Spatial | Upload Format |
|---|---|---|---|---|
| Spotify | OGG Vorbis/AAC (320 kbps); Lossless FLAC (24-bit/44.1k, included with Premium) | −14 | None | WAV/FLAC, 16–24-bit |
| Apple Music | AAC/ALAC (Lossless, 24-bit/192k) | −16 | Dolby Atmos | WAV/AIFF, 24-bit/96k |
| YouTube Music | AAC/Opus (256 kbps) | −14 | None | FLAC / Linear PCM |
| Tidal | FLAC (Hi-Res 24-bit/192k) | −14 | Atmos | WAV/FLAC, 24-bit/96k |
| Amazon Music | FLAC (Ultra HD 24-bit/192k) | −14 | Atmos / 360 RA | WAV/FLAC, 24-bit |
| SoundCloud | Opus/AAC (256 kbps) | −14 | None | WAV/FLAC/MP3 |
| Bandcamp | FLAC (Lossless) | None | None | WAV/FLAC/AIFF |
A few rules that will save you from embarrassing mistakes: Always upload in the highest quality format the platform accepts—let the platform handle the conversion to its streaming codec. Never upload an MP3 to a streaming service; the platform will re-encode it, compounding quality loss through double compression. If your master targets −14 LUFS, it will play back at its native volume on Spotify and YouTube without normalization. On Apple Music (−16 LUFS target), a −14 LUFS master will be turned down by 2 dB. Some engineers create two masters: one at −14 LUFS for general distribution and one at −16 LUFS optimized for Apple Music.
Worth knowing: Spotify offers users three normalization presets they can switch in the app—Loud (−11 LUFS target with a small headroom limiter applied to quiet tracks), Normal (−14 LUFS, the default), and Quiet (−19 LUFS, for late-night listening). Most working mastering engineers target −14 LUFS as the most translatable across user preferences and platforms. Apple Music's Sound Check (also user-toggleable) targets −16 LUFS. The takeaway: do not chase loudness past the platform target, because the platform will only turn it down.
Note: Platform specifications change. Always verify current requirements at each platform's creator/artist portal before final delivery.
The Disc Deliverables: Red Book, DDP, and Apple Digital Masters
suggest a correctionThe table above covers streaming. Two more delivery targets carry their own specs: the pressed disc and Apple's hi-res pipeline. The audio CD is still governed by the Red Book standard Chapter 4 introduced: 16-bit / 44.1 kHz stereo PCM, with a practical program ceiling of about 79.8 minutes—sequence a longer album and something has to come off the disc. CD-Text carries album and track titles inside the disc for players that display them.
What the pressing plant actually wants is not a disc at all. DDP (Disc Description Protocol) — the standard fileset a plant ingests to cut the glass master. A DDP fileset contains:
- The disc image—the entire sequenced program as one continuous audio file.
- The PQ/TOC data—every track start, pregap, and index point, plus the ISRC for each track and the disc's UPC/EAN. The ISRCs you embedded in the WAV files earlier in this chapter do not travel to the disc automatically—they are entered again here, into the subcode itself.
- CD-Text, if used.
- An MD5 checksum so the plant can verify the data arrived bit-perfect.
Never mail a burned CD-R as a production master: every write error on a $0.50 blank gets faithfully pressed into ten thousand copies, and a CD-R carries no checksum to catch it. (Chapter 21 covers the replication line itself—glass master, stamper, pressed discs.) Two PQ habits worth keeping: respect the standard two-second pregap before track one, and nudge each track-start mark a few frames ahead of the downbeat so no player clips a first transient on skip-to. WaveLab renders DDP filesets directly, and Studio One's Project Page builds them inside the DAW—see the DAW Comparison sidebar at the end of this chapter.
Apple Digital Masters (formerly Mastered for iTunes) is the disc spec's streaming-era cousin: Apple's certified-provider program for hi-res delivery. Certified mastering engineers and studios deliver 24-bit masters—96 kHz is the common deliverable; up to 192 kHz is accepted—and Apple performs the AAC encode; qualifying releases are badged on Apple Music. The operational rule is encode-preview before you submit: Apple's free tools (the Apple Digital Masters droplet, built on afconvert and afclip) run your master through Apple's own AAC encoder and report any clipped samples. This is the same inter-sample arithmetic behind this chapter's −1.0 dBTP ceiling, now verified against the actual codec—NUGEN MasterCheck Pro performs the equivalent preview inside the DAW. If the encode clips, back the limiter off until it does not. The AAC the subscriber hears is the master you are actually delivering; preview it like one.
The Finished Master
suggest a correction“Sometimes you have to know when to leave your hands off of it, that it's actually pretty damn good the way it is.”
—Bernie Grundman, Red Bull Music Academy, October 2017
Congratulations on finishing your master. Before you send it out, do one last thing: walk away. Not for five minutes—for a day. Come back with completely fresh ears and listen to the entire project from start to finish, in order, without touching a single fader. Listen in your studio, then listen in your car, then listen on earbuds. If something bothers you in all three environments, fix it. If it only bothers you in one, it is probably that playback system, not your master.
There is a moment in every mastering project where you have to decide it is done. Not perfect—done. I have seen engineers chase perfection until they made the master worse, undoing good decisions because they lost perspective. Trust your process, trust your ears, and trust the work you put in.
This is also where the song stops belonging to you. The microphone you chose in Chapter 5 and placed in Chapter 6. The room you treated in Chapter 7. The cables and equipment you understood in Chapters 8 and 9. The Pro Tools template you built in Chapter 11. The vocal you tracked in Chapter 12, the production you arranged in Chapter 13, the comps and edits you assembled in Chapter 14. The EQ you sculpted in Chapter 15, the dynamics you tuned in Chapter 16, the time-based effects you placed in Chapter 17. The mix you balanced and bounced in Chapter 18. The compression, EQ, saturation, imaging, limiting, and dither you applied in this chapter. All of it collapsed into one stereo file. The master is the last thing you touch before the music belongs to the listener. Make it count—and then let it go.
Before you archive the project, capture it properly: print a 24-bit master WAV at the session sample rate, the dithered 16-bit/44.1 version, the streaming master, and stems if the contract calls for them—then back the whole session up twice, on two different drives. Masters get remastered, sync requests arrive years later, and the engineer who can reopen the session in one piece is the engineer who gets the next call.
You may think your work for this project is over, but it is quite possible you will need to return to the studio one last time to sync it with video. We will investigate Pro Tools and video in the next chapter.
Review Questions
Work these before moving on — every question is answerable from this chapter. Written answers live in the instructor Answer Key, available to course adopters.
- What is mastering, and how does it differ from mixing?
- Describe the typical mastering signal chain in order and explain why the order matters.
- What is dither, and why does adding noise actually improve audio quality when reducing bit depth?
- Walk through the Master-Ready Mix Checklist: what conditions must a mix meet before it is ready to send to mastering?
- A client comes in wanting a pop song mastered. The whole track is harsh, the low end is weak, the kick lacks focus, and the overall volume is all over the place. Walk through your mastering signal chain and describe how you would address each problem.
- What is the difference between a mix-bus compressor, a multiband compressor, and a Mid/Side compressor? When would you use each during mastering?
- Explain how a brickwall limiter uses lookahead processing to prevent clipping. Why is it placed at the end of the chain?
- Why are the AD/DA converter and monitoring system so important to the mastering engineer?
- What is the difference between RMS and LUFS, and why has LUFS become the standard for modern mastering?
- What is the difference between sample peak and true peak? Why should mastering engineers set their output ceiling to −1.0 dBTP or lower?
- Explain Mid/Side EQ in mastering. How can a mastering engineer use it to tighten the low end or widen the stereo image?
- Spotify targets −14 LUFS and Apple Music targets −16 LUFS. If your master measures −12 LUFS, what will happen on each platform and why?
- What is stem mastering? When would you choose it over traditional stereo mastering, and what are the trade-offs?
- What are the key constraints of mastering for vinyl that do not apply to streaming masters?
- What makes Atmos mastering different from stereo mastering? Cite the LUFS target, the deliverable format, and why a stereo master should not just be “rendered” to Atmos.
- Why is a commercial reference track essential during mastering, and how should you use one in your session?
- You are finishing three versions of the same master: a 16-bit / 44.1 kHz CD delivery, a 24-bit / 96 kHz hi-res streaming file, and a rough reference MP3 for the client. For each version, state which dither type you would apply (TPDF, noise-shaped, or POW-r), explain why, and identify which version—if any—requires no dither at all. Justify every choice from the chapter's principles.
Studio Exercise: Track 8 — Master the Capstone
This is the final exercise in the eight-track song-build pipeline (Chapters 12–19). Open the mix you bounced at the end of Chapter 18—[Song]_v7_Mix.wav—and master it to streaming-ready specification. Tracks 9 through 11 (Chapters 20–22) extend this work into picture, protection, and AI augmentation.
Setup. New Pro Tools session at 32-bit / 96 kHz. Import the mix file as a stereo audio track. Add a Master Fader. Import a commercial reference track in your genre, route it directly to your monitor path, and loudness-match it. Calibrate monitors to your reference SPL.
Part A — Listen First. Before you place a single plugin, listen to the mix front to back at reference SPL. Take notes. What needs lift? What needs taming? What is already great? Resist the urge to start processing.
Part B — Build the Chain. Insert plugins on the master in this order: compressor (gentle, 1–3 dB GR), broad EQ (genre-aware moves per the Mastering Targets table), saturation (subtle, even-order warmth), multiband compression (even out uneven bands), de-esser (tame residual sibilance), stereo imager / Mid/Side EQ (tighten lows, widen highs), brickwall limiter (−1.0 dBTP true-peak ceiling), dither (last, only when reducing bit depth). Each stage should do one specific small thing.
Part C — Hit Loudness Targets. Use a LUFS meter (Youlean Loudness Meter 2 free, or FabFilter Pro-L). Print TWO masters: one at −14 LUFS integrated for Spotify / Tidal / YouTube, one at −16 LUFS integrated for Apple Music. Both with −1.0 dBTP true-peak ceiling.
Part D — Reference and Mono Check. Toggle between your master and the commercial reference repeatedly. Match tonal balance, low-end weight, vocal presence. Run a mono check on the master—if anything collapses in mono that did not in mix, your stereo imaging introduced a phase issue. Fix before bouncing.
Part E — Bounce and Deliver. Bounce two final files: [Song]_v8_Master_Streaming.wav (−14 LUFS, −1.0 dBTP, 24-bit/44.1 kHz) and [Song]_v8_Master_AppleMusic.wav (−16 LUFS, −1.0 dBTP, 24-bit/96 kHz hi-res). Reference them one final time. If you are satisfied, the eight-track pipeline is complete.
Common Pitfalls. Slamming the limiter for loudness; surgical EQ instead of broad strokes; chasing the reference too literally; skipping the mono check; mastering at hour 4 with fatigued ears; sending the streaming master to vinyl without re-mastering; assuming a stereo master converts cleanly to Atmos.
What You Have Built. Eight chapters. Eight tracks. One song carried from the first recording (Chapter 12) all the way to final platform-ready master delivery (this chapter). The song-build pipeline is complete. What you do next—release it, send it to the artist, start the next one—is up to you.