Chapter 17 · Mixing & Processing
Time-Based Effects
“Ambient Music is intended to induce calm and a space to think. Ambient Music must be able to accommodate many levels of listening attention without enforcing one in particular; it must be as ignorable as it is interesting.”
—Brian Eno (Music for Airports liner notes, 1978)
By the end of this chapter, you will be able to:
- Distinguish the three spatial roles of time-based effects—depth, width, and scale—and select reverb or delay to address each role on a given track
- Identify the short-delay family (phasing, flanging, chorus, doubling, and the Haas effect) and explain how each type fattens or widens a signal without pushing it back in the depth field
- Configure slapback, tempo-synced rhythmic delays (quarter-note, dotted-eighth, and ping-pong), and ducking delay, explaining the rhythmic and spatial function each serves in a mix
- Compare the sonic characters of the eight reverb types—chamber, plate, spring, convolution, algorithmic, shimmer, gated, and reverse—and select the appropriate type for a given musical context
- Adjust the six core reverb controls—pre-delay, decay time, size, diffusion, EQ/damping, and mix—to place a sound at a target depth and clarity within a mix
- Route time-based effects via shared AUX sends rather than track inserts, and distinguish post-fader from pre-fader sends and mid from side processing for reverb and delay
- Apply practical mix strategies—automating sends for arrangement dynamics, matching reverb and delay depth to genre conventions, and chaining effects—to build a cohesive spatial image in a complete mix
Solo a vocal track with no effects. It sounds close, flat, and lifeless—like someone singing in a closet. Now add a touch of reverb and a short delay. Suddenly the voice has dimension. It exists in a space. It breathes. That transformation—from a raw, dry signal to something that sounds like a record—is the power of time-based effects.
Time-based effects are how we create depth, width, and dimension in a mix. They are the ultimate blending tools—they can make a thin guitar sound massive, push a background vocal into the distance, or make a snare crack echo through an imaginary stadium. There are two main categories: delay and reverb. Understanding the difference between them—and when to use each—is one of the most important skills you will develop as a mixing engineer.
Depth, Width, and Scale
suggest a correctionBefore we dig into how delay and reverb work, you need to know what you are trying to accomplish. Time-based effects do three jobs: they place sounds along the front-to-back axis (depth—how close or distant a sound feels), along the narrow-to-wide axis (stereo image), and they add rhythmic motion and spatial scale (where a sound exists relative to bigger surrounding spaces). Reverb is the depth tool. Short delays are the width tool. Long delays add rhythm and signal scale. Get all three right and your mix breathes; get them wrong and everything sits in a flat row of equally distant elements.
Front-to-Back Depth
Sound that originates close to you has a higher proportion of direct sound than reverberated sound. Sound from further away bounces off more surfaces, giving you a higher proportion of reverberated signal relative to the direct. Your ear uses that ratio to judge distance.
In a mix, the rule follows: the more reverb on a track, the further back it sits. A lead vocal with no reverb feels like the singer is in your face. The same vocal in a long hall reverb can feel like they are thirty feet away (it depends on how much you use). The early reflections, the room size, and the decay time together create the front-to-back placement. To pull a sound forward, use less reverb (or none). To push it back, use more.
I think about this on every mix. When the lead vocal has to dominate, I keep it almost dry and let the backgrounds bloom in a longer reverb behind it—the contrast in distance is what makes the lead feel close. When I want a guitar to feel like it is in a different room than the drums, I send it to a longer reverb than the kit. The reverb is the depth control.
Stereo Width and Fattening
While reverb pushes things back, short delays make things bigger and wider while keeping them upfront. This is the distinction students miss most often: when you want a guitar fat and wide, you do not reach for reverb—you reach for a chorus, a doubler, or a Haas-effect short delay. The sound stays right in your face but suddenly feels twice as large.
A few of the most useful width tools:
- Chorus and doublers (15–35 ms with detuning) make a single voice or guitar sound like multiple sources playing together—thicker and wider without pushing back.
- Haas-panned short delays (15–25 ms, original panned hard left, copy panned hard right) make a mono guitar feel massive across the stereo field while still appearing to come from one direction. Always check in mono—phase cancellation can crush it.
- Ping-pong delays bounce repeats between left and right speakers, creating motion across the stereo field without making the source sound distant.
- Stereo width plugins (Soundtoys MicroShift, Voxengo Stereo Touch, Waves S1) use micro-pitch-shifted short delays to widen vocals and instruments instantly.
Bigger is not always better. A wide chorus on a lead vocal can blur the focal point. A doubled rap vocal panned hard left and right loses the center weight that makes it hit. And the wider you push something, the less of it survives a mono fold-down—a real problem for radio, club PAs, and especially phone speakers, where an over-wide element can drop out entirely. Width that vanishes in mono is a reason to hold back. Use width to support the song, not impress the listener.
Rhythm and Spatial Scale
The third job of time-based effects is rhythmic motion and a sense of scale beyond the room. Long delays do both. A 1/4-note or 1/8-note delay on a guitar or vocal weaves the source into the song's pulse—the repeats land on or between beats, turning a static phrase into something that moves with the rhythm. At the same time, a discrete echo at 100 ms or more tells your brain the surrounding space is enormous—a hard surface a hundred feet away, a canyon wall, a mountain miles down the valley. Reverb gives you rooms and halls; long delays let you reach beyond the walls into landscapes.
A single dotted-1/8 delay on the last word of a chorus can make the hook feel like it is bouncing off the back of a stadium. A 1/16 delay on a hi-hat turns a simple beat into something busier without changing the performance. A 1/2-note delay automated to appear only on a transition turns a four-bar phrase into a six-second sonic event. Long delays are how you make a record feel like it is being performed somewhere bigger than the room you are mixing in.
Why This Matters First
You can know every reverb plugin and delay plugin on the planet, but if you do not know whether you are trying to push a sound back, fatten it forward, or extend it into bigger space, you will reach for the wrong tool. Depth, width, and scale are the three questions you should be asking on every track. The rest of this chapter is about how to deliver the answer.
Delay
suggest a correctionDelay finally clicked for me on a hip-hop session where the lead vocal kept feeling small no matter how loud I pushed it. A producer in the room said “throw a delay on the ad libs”—my go-to there is a quarter-note delay. Two seconds of routing later, the ad libs were echoing through the spaces between the main phrases and the verse felt twice as big without me touching the fader. Delay is not just an echo—it is a way to make a recording feel like it lives somewhere.
Shout “hello” in a canyon and a moment later you hear it come back. That is delay in its most basic form—a repeat of the original signal after a period of time. But in the studio, delay is far more than a simple echo. Depending on the timing, it can thicken a vocal, create rhythmic patterns, widen a guitar, fill gaps between phrases, or transform a static sound into something that moves and breathes. It is one of the most versatile effects you will ever use.
Every delay plugin has a handful of core controls. Understanding what each one does—and more importantly, when to reach for it—is what separates intentional effect design from random knob-turning:
Delay Time — How long in milliseconds (or note values) before the repeat is heard. This is the most important control. Under 35 ms and you will not hear a distinct echo—the delay blends with the original signal and alters its character. Above 35 ms and you hear discrete repeats. Tempo-synced delays (1/8th, 1/4 note, etc.) lock the repeats to the song's groove.
Feedback — How many times the delay repeats. At zero feedback you get a single repeat. Raise it for more echoes; near 100% the trail runs essentially forever, and above that it self-oscillates and runs away.
Mix — The balance between dry (original) and wet (delayed) signal. When using delay as a send effect on its own AUX track (the standard routing for time-based effects, detailed later in this chapter), leave this at 100% wet—the send level controls how much signal reaches the delay.
LPF/HPF (Low/High Pass Filter) — Shapes the tone of the repeats. Rolling off high frequencies makes each repeat darker and warmer, simulating the natural decay of analog tape echoes. Rolling off lows keeps the delays from muddying the low end.
Modulation (Depth and Rate) — Adds subtle pitch variation to the repeats, creating a chorus-like shimmer. A little modulation makes a delay sound warmer and more organic; too much makes it seasick.
Short Delays: Under 35 ms
suggest a correctionThis is the toolbox for fattening and widening. Reverb pushes back; short delays do the opposite—they make a sound feel bigger, wider, and more present without changing its position in the depth field. When a vocal is too thin, when a guitar is too narrow, when a synth pad sounds flat, these are short-delay problems, not reverb problems. Reach for these tools first; reverb second.
Delays under 35 ms are too fast to hear as distinct repeats. Instead, your brain perceives them as part of the original sound—an alteration of its character rather than an echo. This is where some of the most powerful and creative effects in audio live.
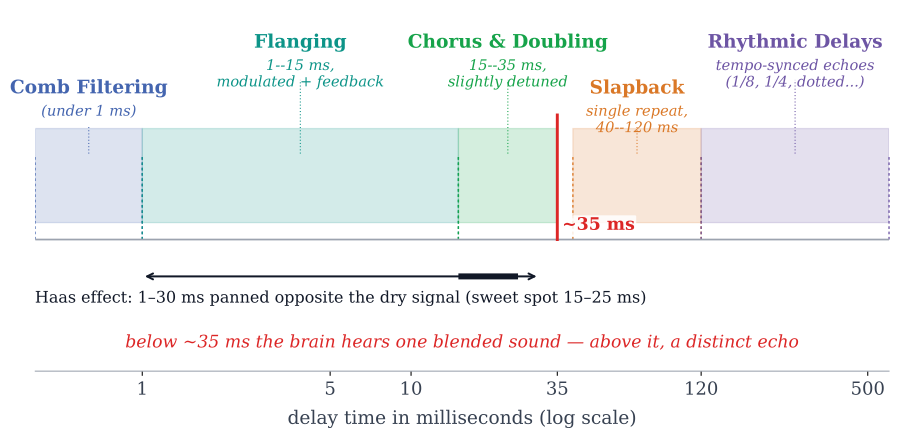
Hear the Delay
Fire a pluck into a feedback delay. Set the delay time and feedback amount, and hear the repeats decay exactly as the map describes.
Phasing and Flanging
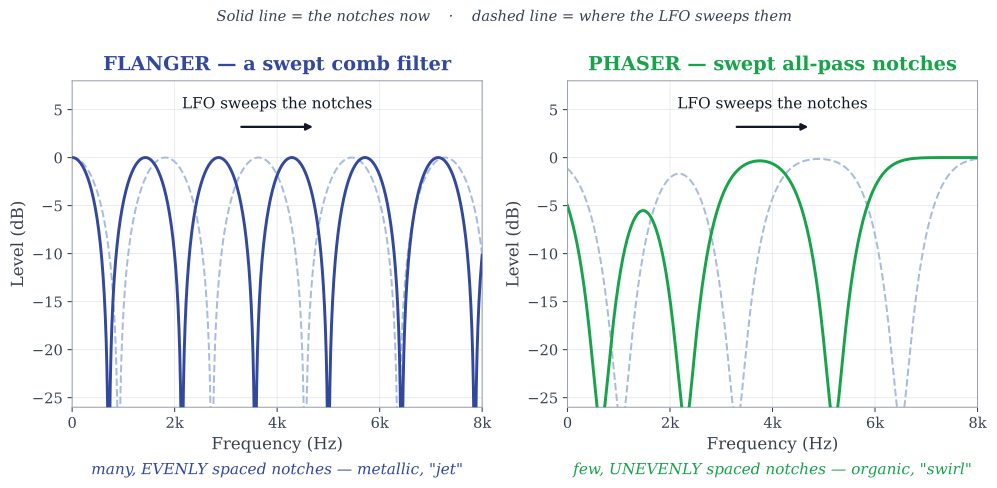
At the shortest delay times (under 1 ms), the delayed copy is so close to the original that their waveforms interfere directly. Some frequencies reinforce each other (peaks align) and others cancel (peaks meet troughs). The result is a series of sharp notches in the frequency response called a comb filter. A phaser plugin creates a similar effect using all-pass filters, sweeping the notches up and down the spectrum to create the swirling, jet-engine effect you hear on countless psychedelic rock records.
Flanging is phasing's more dramatic cousin. The delayed copy is set slightly longer (1–15 ms), feedback is turned up, and the delay time modulates—sweeping slowly back and forth. The result is an intense, metallic sweep that sounds like a jet flying overhead. The name comes from the original technique: engineers would record the same signal onto two reel-to-reel machines playing simultaneously, then press a finger against the flange (the rim of the tape reel) on one machine to slow it down. Because the finger pressure was never perfectly even, the delay time wobbled, creating the modulating sweep we now associate with the effect. The term itself is studio folklore: producer George Martin reportedly coined it as a joke, telling John Lennon that ADT—Artificial Double Tracking, a related Abbey Road tape effect—had been made with a “double-bifurcated sploshing flange.” The nonsense word stuck, and migrated to the tape-reel technique described above.
A relative worth knowing by name: the frequency shifter. A pitch shifter multiplies every frequency by the same ratio, so harmonics stay locked in tune; a frequency shifter adds a fixed number of hertz to everything instead, which breaks the harmonic ratios apart—shift a note up 5 Hz and its overtones land where no musical interval lives. At large amounts that is an inharmonic, bell-like mangling (a sound-design tool); at very small amounts (a few hertz) it produces an eerie, never-repeating motion that chorus cannot make, and a shifted copy panned against the dry signal creates stereo width with none of a chorus's pitch wobble. Live engineers quietly use a few hertz of shift on monitor feeds to break up feedback. It is a niche tool—but when a part needs movement and every chorus and flanger sounds too familiar, this is the drawer to open.
Chorus and Doubling
Setting the delay time from 15 ms to 35 ms and slightly detuning the pitch of each copy creates chorus—one of the most useful and underappreciated effects in mixing. Your brain hears these slightly offset copies and perceives them as multiple voices or instruments playing together, even though it is a single source. That is why it is called chorus—it makes one voice sound like many.
Chorus is your go-to tool for thickening a thin vocal, widening a narrow guitar, or making a synth pad feel lush and expansive. Unlike reverb, which pushes sounds back in the mix, chorus makes sounds bigger and wider while keeping them upfront. A stereo chorus panned wide can turn a mono source into something that fills the entire stereo field. Classic chorus plugins include the UAD Studio D Chorus (modeled after the legendary Roland Dimension D), the TC Electronic TC2290 (a delay unit equally prized for its chorus and modulation), and Soundtoys MicroShift.
A doubler is a close cousin of chorus—it uses a slightly longer delay (20–35 ms; push much past that and it starts reading as slapback) with less modulation, simulating the effect of a performer recording the same part twice. Doublers are less obviously “effected” than chorus and are a staple on lead vocals.
Haas Effect
Named after Helmut Haas, this psychoacoustic phenomenon occurs when a short delay (roughly 1–30 ms, with 15–25 ms the usual sweet spot) is panned opposite to the dry signal. The brain perceives both as a single sound coming from the direction of the earlier arrival (Howard & Angus, 2017), but the delayed copy adds width and size. For example, duplicate a mono guitar track, delay the copy by 15–25 ms, and pan the original hard left and the delayed copy hard right. The guitar will sound massive and wide while still appearing to come from the left. Be careful—the Haas effect can cause phase cancellation when summed to mono, so always check your mix in mono when using this technique.
Long Delays: 35 ms and Above
suggest a correctionOnce the delay time crosses approximately 35 ms, your brain starts hearing the repeat as a separate event—a distinct echo. This is where delay becomes a rhythmic and spatial tool.
Slapback Delay
A single repeat at 40–120 ms with no feedback—the delay plays once and stops. This is the signature sound of 1950s rockabilly and early rock and roll. Elvis Presley's vocals at Sun Studio, John Lennon's voice on countless Beatles tracks, and the classic sound of surf guitar all rely on slapback. It adds energy and presence without the wash of reverb or the rhythm of longer delays. Slapback sits in the gap between short delays (which thicken) and rhythmic delays (which create patterns)—it simply makes a sound feel more alive. Try it on vocals, snare, and guitar—it is one of the most useful and underused effects in modern mixing.
Tempo-Synced Rhythmic Delays
This is where delay becomes a musical instrument. By syncing the delay time to the song's tempo, the repeats land on or between the beats, creating rhythmic patterns that move with the music rather than fighting it. Most delay plugins let you set the time in note values:
1/4 Note Delay — The repeat lands on the next beat. Clean, simple, and musical. This is the most common rhythmic delay—a vocal phrase followed by a quarter-note echo fills the gap naturally. It is also one of the most-used delays on guitar for ambient and atmospheric parts.
1/8 Note Delay — The repeat lands on the upbeat (the “and”). Faster and more rhythmic than a quarter note. It can turn a simple guitar riff into something that feels busier and more complex.
Dotted 1/8 Note Delay — Slightly longer than a straight 1/8th, the repeat falls between the upbeat and the next beat—creating a bouncing, syncopated rhythm that sits in the spaces between notes. This is the signature delay of The Edge (U2) and is heard in countless ambient, post-rock, and electronic productions. It sounds more musical and less mechanical than straight note values because the repeats never land on the beat.
1/8 Note Triplet Delay — Divides the beat into three, producing a waltz-like echo that adds swing and shuffle to straight rhythms. Try it on percussive elements for a Latin or jazz-influenced feel.
1/16 Note Delay — Very fast repeats that create a stuttering, machine-gun effect. At low feedback, it subtly thickens. At high feedback, it builds into a dense, rhythmic cascade. Common in electronic and hip-hop production.
1/2 Note and Whole Note Delays — Long, spacious echoes that let the repeat ring out over an entire bar or more. These are atmospheric tools—use them sparingly for big moments, transitions, or ambient textures. They work best when automated to appear only where needed.
Ping-Pong Delay
A stereo delay where each repeat alternates between the left and right speakers. This creates a sense of width and movement that a mono delay cannot achieve. A 1/8 note ping-pong delay on a vocal can make the echoes bounce across the stereo field, adding excitement and space. Waves H-Delay and Soundtoys EchoBoy both have excellent ping-pong modes.
A related technique: pan two different mono delays hard left and hard right with different note values—a 1/4 on the left and a dotted-1/8 on the right, for example. The two delays interlock rhythmically, create polyrhythmic stereo without the ping-pong's predictable bounce, and clear the center for whatever instrument is panned there.
Ducking Delay
A delay that automatically reduces its volume when the source signal is playing and becomes audible only during pauses and gaps. The result is a delay that never competes with the dry signal—it fills the spaces between words or phrases and disappears when the performer is active. This is achieved using side-chain compression on the delay return, keyed by the dry signal. Many modern delay plugins include a built-in ducking control, making this technique simple to implement. Others, like Soundtoys EchoBoy, have no internal ducking—route the delay to an aux return and duck it with a side-chain compressor keyed by the dry signal. Ducking delays are especially effective on vocals—they add depth and movement without cluttering the mix.
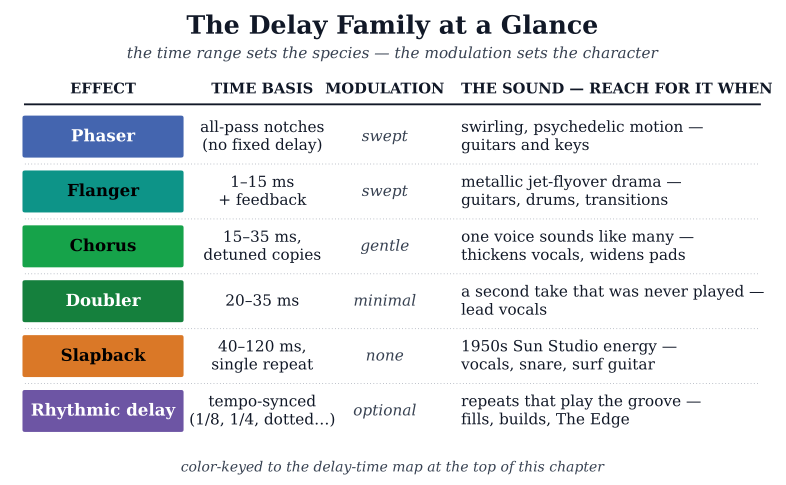
Six tools, one family. The chart below collects the whole delay family in one view—when you know the time range and the character, you know which drawer to open.
Reverb
suggest a correction“To me, reverb is not coming from where the voices are. I really enjoy spreading the effects around.”
—Bob Clearmountain (Sound on Sound, 2022)
Close your eyes and clap your hands. In a small bathroom, the sound bounces back almost instantly—tight, bright, and close. In a cathedral, the clap rings out for seconds, filling the space with a wash of overlapping reflections. In an open field, you hear almost nothing back at all. That difference—the way a space shapes and sustains sound—is reverb. It is the most natural audio phenomenon in the world, and replicating it artificially is one of the most complex challenges in audio engineering.
Where delay produces discrete repeats, reverb produces millions of densely packed reflections that blur together into a continuous decay. When sound hits a wall, ceiling, floor, or any surface, it bounces back. That reflection hits another surface and bounces again. And again. The result is a complex wash of energy that tells your brain everything about the space: how big it is, what it is made of, how far away the source is. There are three components:
Direct Signal — The sound that travels straight from the source to your ear, arriving first. It is the dry, unaffected original.
Early Reflections — The first bounces off nearby surfaces, arriving 5–100 ms after the direct signal. These give your brain its strongest cues about the size and shape of the space. A small room has fast, dense early reflections; a large hall has slower, more spread-out ones.
Reverb Tail — The dense wash of reflections that have bounced multiple times before reaching your ear. This is what you hear sustaining after the direct sound stops—the “ring” of a room, the sustain of a hall. Think of the sound of a basketball bouncing in a gymnasium, or clapping in a stairwell.
Reverb Controls
Every reverb plugin gives you controls that shape how the virtual space behaves. Here are the ones that matter most and when to use them:
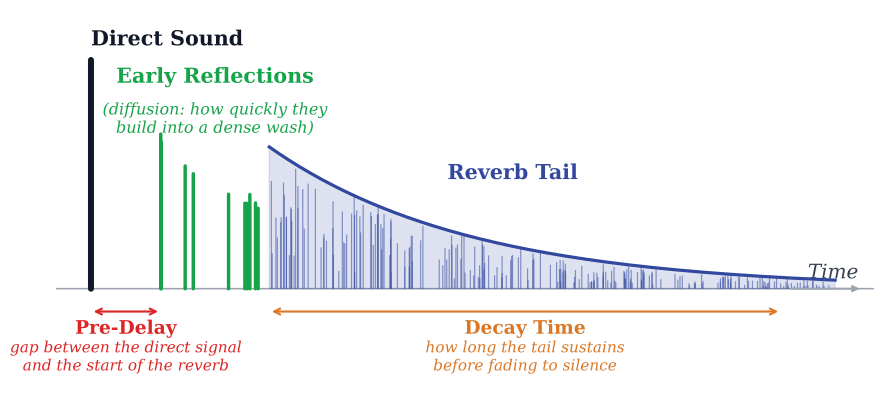
Hear the Reverb
A dry pluck into a convolution reverb. Grow the space from a booth to a hall and balance dry against wet — the anatomy above, audible.
Pre-Delay — The gap between the direct signal and the start of the reverb. This is one of the most powerful and underused controls. A short pre-delay (0–20 ms) blends the reverb into the source seamlessly. A longer pre-delay (40–100 ms) lets the dry attack cut through before the reverb blooms—essential for keeping vocals and snare drums upfront while still adding space. Time your pre-delay to the song's tempo for the most musical results.
Decay Time — How long the reverb tail sustains before fading to silence. Short decays (under 1 second) simulate small, tight spaces. Long decays (3+ seconds) create cathedrals and concert halls. Match the decay to the tempo—if the reverb tail is still ringing when the next note hits, it will create mud.
Size — How large the virtual room is. Larger sizes mean reflections travel further before returning, creating a more spacious feel. Small sizes create intimacy.
Diffusion — How quickly the early reflections build into a dense wash. High diffusion creates smooth, lush tails. Low diffusion leaves the individual reflections more audible, which can sound more natural but also more grainy.
EQ / Damping — Shapes the frequency content of the reverb. On most mixes this matters: roll off the low end of your reverb. Bass reverb creates mud—it fills the low end with undefined wash that fights your kick and bass. A high-pass filter at 200–400 Hz on the reverb return is standard practice on dense pop, rock, and hip-hop. On sparse or cinematic material—an ambient pad, a gospel or jazz ballad, an orchestral hall—a warmer, lower-extended tail is part of the sound, so high-pass only enough to stop the mud. You can also roll off the highs to create a darker, warmer tail, or boost the highs for shimmer and air.
Mix — When using reverb on a send (which you almost always should), leave this at 100% wet. The send level controls how much of each track enters the reverb.
Reverb Types
suggest a correctionBefore digital reverbs existed, engineers had to get creative. The history of reverb technology is a story of ingenuity—people building increasingly clever machines to simulate the natural behavior of sound in a room. Each generation of technology has its own sonic character, and all of them are still used today.
I keep templates loaded with plate, hall, room, and convolution reverbs because each one solves a different problem. The plate makes vocals sit. The hall opens up backgrounds. The convolution drops you into a real space. The room glues a kit. Choosing the right reverb is choosing the right room for the song.
Chamber Reverb
The original reverb effect. Studios built dedicated rooms—sometimes tiled bathrooms, sometimes concrete basements—and placed a speaker at one end and a microphone at the other. The sound played through the speaker, bounced around the room, and the microphone captured the result: real reverb from a real space. Capitol Records' famous echo chambers beneath the building have been used on records since the 1950s and are still in use today. The limitation is obvious—you need a dedicated room, and you cannot easily change the reverb time.
Plate Reverb
In 1957, the EMT 140 solved the room problem. A large sheet of metal (typically 1m x 2m) is suspended in a frame. A transducer vibrates the plate, and pickups capture the vibrations as they scatter across the metal surface. The result is a bright, smooth reverb with a distinctive shimmer that has defined the sound of vocals for decades. Plate reverb has a density and musicality that algorithmic reverbs still struggle to match. The Soundtoys Little Plate and Universal Audio EMT 140 are excellent emulations.
Spring Reverb
A simpler, more affordable mechanical reverb. A transducer sends vibrations down a metal spring, and a pickup captures them at the other end. The result has a characteristic “boing” quality—darker and more lo-fi than a plate. Spring reverb is the signature sound of surf guitar, vintage guitar amplifiers, and lo-fi production. It is limited in fidelity but has a character that nothing else can replicate.
Convolution (Impulse Response) Reverb
The most accurate digital reverb technology available. A convolution reverb uses a pre-recorded impulse response (IR)—a short burst of sound (a starter pistol, a balloon pop, or—most common for clean results—a sine-wave sweep) recorded in a real space. The plugin analyzes how that space shaped the impulse and applies the same characteristics to your audio. The result is a reverb that sounds exactly like being in that specific room, hall, cathedral, or studio. Altiverb, Waves IR-1, and Logic's Space Designer are industry-standard convolution reverbs.
You can also create your own impulse responses—it is one of the most rewarding parts of running a studio:
- Pick a space worth capturing—a stairwell, a parking garage, a church, a tile bathroom, a grain silo, anywhere with interesting reflections.
- Set up a stereo mic pair (X/Y or ORTF) at the listening position.
- Generate an excitation: a balloon pop, a starter pistol, or a sine sweep played through a speaker. Sine sweeps from a PA give the cleanest IR but require deconvolution software (Room EQ Wizard's sweep-and-deconvolve tools are free; Reaper's bundled ReaVerb also has a free deconvolution mode).
- Record the captured response—typically two seconds is enough for medium spaces, longer for large halls.
- Trim the file to start at the impulse and end when the tail decays to silence.
- Load the trimmed audio into a convolution plugin (Altiverb, Waves IR-1, Space Designer) as a custom IR.
Free IR libraries (OpenAir from the University of York, EchoThief, and Voxengo's free IR collection) give you cathedral, gymnasium, opera house, and outdoor IRs at no cost. And a free pack of impulse responses captured at OC Recording is at ocrecording.com/resources—load them into Altiverb (or any convolution reverb) and you are mixing in my studio's spaces. Once you start collecting and capturing your own, you build a personal sonic vocabulary—spaces nobody else in your genre is using.
Algorithmic Reverb
Most modern reverb plugins are algorithmic—they use mathematical models to simulate the behavior of reflections in a virtual space rather than sampling a real one. Algorithmic reverbs are more flexible than convolution (you can adjust size, decay, and diffusion independently) and less CPU-intensive. FabFilter Pro-R, Valhalla VintageVerb, and Valhalla Room have become industry staples for their lush sound and intuitive controls. The trade-off is that algorithmic reverbs approximate rather than replicate—they sound great, but they do not capture the exact character of a specific real room the way convolution does.
Shimmer Reverb
Shimmer is not new—Brian Eno and Daniel Lanois were folding pitch-shifted reverb back on itself on records as far back as the 1980s. What is recent is how accessible it has become: nearly every reverb plugin now ships a shimmer mode. The effect is a long algorithmic or convolution reverb with pitch-shifted feedback (typically up an octave or two) folded back into the tail. The result is an ethereal, ascending wash that climbs slowly through the harmonic series. You hear it on every U2 record from the past twenty years (The Edge has built his guitar sound around it), most modern ambient and post-rock, cinematic film scores, and worship music's pad textures. It is the sound of transcendence more than place.
Reach for shimmer when you want a sound to feel otherworldly: a held vocal note, a sustained synth pad, a solo guitar in a slow ballad. Use it sparingly—a little bit pushes a moment into the heavens; too much makes the entire mix sound like a prayer service. Plugins to know: Valhalla Shimmer (the affordable and ubiquitous standard), Eventide Blackhole (deeper and weirder), and LiquidSonics Cinematic Rooms (high-end, layered).
Gated Reverb
suggest a correction“Phil was playing the drums one day, I opened this microphone to speak to him while he was still playing the drums and out came the most unbelievable sound.”
—Hugh Padgham (MusicRadar, 2020)
If you have ever heard Phil Collins' “In the Air Tonight,” you have heard gated reverb. The technique was discovered by accident in 1979 when engineer Hugh Padgham was recording drums for Peter Gabriel's third album. A talkback microphone with heavy compression picked up the room sound, and when the compressor's noise gate clamped shut, the reverb tail cut off abruptly instead of decaying naturally. The result was an explosive, larger-than-life drum sound that defined an entire decade of music.
On a rock mix recently, the snare needed presence and size at the same time, but every reverb I tried was washing the dry transient out. The ride cymbal was already filling the high end, so I could not give the snare a long bright tail without muddying everything. Gated reverb solved it in one move—a long hall keyed to a tight gate, set to slam shut at 350 ms. The snare cracked dry, bloomed into a massive room for a third of a second, then disappeared cleanly before the next hit. The drum sat upfront and felt enormous at the same time. That is the gated trick: size without sustain.
To set up gated reverb in Pro Tools:
- Insert a long-decay reverb (3+ seconds, hall or plate algorithm) on a stereo AUX track.
- Send the snare drum (or whichever percussive source you are treating) to that AUX, post-fader.
- On the same AUX, after the reverb plugin, insert a noise gate (the Avid Dyn3 Expander/Gate plug-in, or Waves C1 Gate).
- Key the gate from the dry snare so each hit opens it—the smooth reverb tail cannot trigger it reliably on its own.
- Then set the gate's hold time: the hold, not the threshold, sets the 200–500 ms tail, and a fast release makes it slam shut—short for tight, longer for cavernous.
Most modern reverb plugins (Valhalla VintageVerb, FabFilter Pro-R) include a built-in gate or envelope control that bypasses the AUX-with-external-gate workflow—one knob and you are there. Gated reverb is most commonly used on snare and toms but can produce dramatic results on any percussive source.
Reverse Reverb
suggest a correctionReverse reverb creates an eerie, swelling effect where the reverb tail builds up before the sound instead of decaying after it. You hear it constantly on vocal intros, transitions, and horror film sound design—a ghostly wash that crescendos into the first word or hit.
I used reverse reverb to save the opening of a ballad once. The lead vocalist's first word felt like it just appeared—no setup, no arrival, no breath. The artist wanted something to lead the listener into the line. I built a manual reverse plate using the steps below: duplicated the vocal, reversed it, hit it with a four-second hall, bounced it, reversed the bounce, aligned the end of the swell to land exactly on her first syllable. The intro had narrative arc instantly. Reverse reverb is a one-trick effect, but when the trick lands, it is unforgettable.
The classic manual technique:
- Duplicate the source audio clip onto a new track (e.g., the lead vocal you want to swell into).
- Reverse the duplicated clip (AudioSuite arrow Other arrow Reverse).
- Insert a long reverb (3+ seconds, hall or plate) on that track.
- Bounce or print the reversed clip with reverb to a new audio clip.
- Reverse the printed clip again so the reverb plays forward in time.
- Position it so the end of the reversed reverb aligns with the start of the original (un-reversed) clip—the swell crescendos into the first word.
Some reverb plugins now include a reverse mode that automates this process—but understanding the manual method gives you full control over the timing and character of the swell.
Using Time-Based Effects in Mixing
suggest a correctionWhen mixing, I set up all the delay types covered in this chapter on separate AUX tracks so they are ready to go: 1/2 note, 1/4, 1/8, dotted 1/8, 1/8 triplet, 1/16, plus a chorus/doubler. Having them pre-built means I can send any track to any delay instantly without stopping to create a new one. I also add a ping-pong delay for stereo movement.
My typical reverb setup:
- Short Reverb (under 1 sec decay, room or plate, small room size)
- Medium Reverb (1–2 sec decay, room/plate/hall, medium room size)
- Long Reverb (greater than 2 sec decay, hall, large room size)
I will use other time-based effects like flange and doublers in special circumstances. The temptation with this many AUXes available is to bus everything to everything; resist. Each track should pass through only the effects that serve it. The cleanest mixes have the fewest sends. In practice I lean on short delays far more than long ones—doublers, choruses, flangers, slaps, and Haas wideners, track after track. One tool worth naming that this chapter has not yet: the harmonic exciter (Aphex Aural Exciter, BBE Sonic Maximizer, Brainworx bx_enhancer, Slate Fresh Air), which adds high-frequency harmonics for presence and “air” the way saturation adds body—complementary to the short-delay width tools.
Mid/Side Time-Based Effects
Modern reverbs and delays let you process the mid and side channels independently, and time-based effects benefit enormously from this. Mid-only reverb keeps the center information (lead vocal, kick, snare, bass) tight and upfront while letting the sides bloom in space—you get depth without losing focal-point clarity. Side-only delay adds rhythmic width on the edges of the stereo field without smearing the center. Some modern reverbs and delays support M/S routing natively—FabFilter's Pro-R (reverb) and Timeless (delay) among them—so use it on lead vocals when the chorus needs to bloom but the lyric needs to stay locked in the center.
Automating Sends for Arrangement Dynamics
Static effect sends are fine for set-and-forget tracks, but the most musical use of time-based effects is automation. Throw delays—turning a delay send on for one phrase, then off again—are a staple of vocal production: a dotted-1/8 delay on the last word of the chorus, off everywhere else, makes the hook land. Automate reverb sends to open up during choruses (more reverb = bigger) and pull back during verses (less reverb = clarity). Ride the reverb send up on transitions and breakdowns to create a bloom moment, then back to default. The reverb itself can stay set; it is the send that you automate.
Spillover and Reverb Tail Handling
This is mainly a concern when you print (commit) reverb to audio and then edit it. With reverb on a send/AUX—the normal setup—the tail just follows the mix and there is nothing to chop. If you do print reverb and then cut it, use Commit (Track → Commit) or Track Bounce on the AUX so you can trim or crossfade the tail past the chop. On final mixes, always check the tails at any chop boundaries—they are easy to miss until a careful listener hears the cliff.
Routing: Sends vs. Inserts
suggest a correctionMy first complete mix had eleven tracks, and I inserted a separate reverb directly on every single one. Eleven instances of D-Verb, eleven different settings, eleven small rooms that did not talk to each other. The mix sounded like the band had been recorded in eleven different studios on eleven different days. When my mentor heard it, he asked one question: “Why are these instruments not in the same room?” I had no answer because I had never thought of reverb as a place—I thought of it as an effect you put on each thing. That afternoon I learned about AUX sends, and every mix since has been built around shared spaces.
You now know what each effect does and when to reach for it. The last piece is how to wire it up. Time-based effects should almost always be placed on a separate AUX track and accessed via sends, not inserted directly on the audio track. Getting this wrong is the most common rookie mistake in mixing.
Here is why: when you insert a reverb directly on a track, the plugin processes 100% of that one track. Only that track can use that reverb, and the reverb settings are locked to it. When you place the reverb on an AUX and send signal to it, every track in your session can send a different amount to the same reverb (Owsinski, 2022). The drums can send a little, the vocal can send more, and the guitars can send a lot—all sharing one reverb, which creates a cohesive sense of space (everything in the same “room”). This is how professional mixes are built: shared reverbs and delays on AUX tracks, with individual send levels controlling how much of each element enters the effect. There is also an efficiency reason: reverb is one of the most CPU-hungry plugins, and one shared reverb on a send costs a fraction of a dozen separate instances. Modern machines make this less urgent than it was—back when I ran sessions on old Dells, a few too many reverb instances would bring the whole thing to its knees—but on big sessions it still matters.
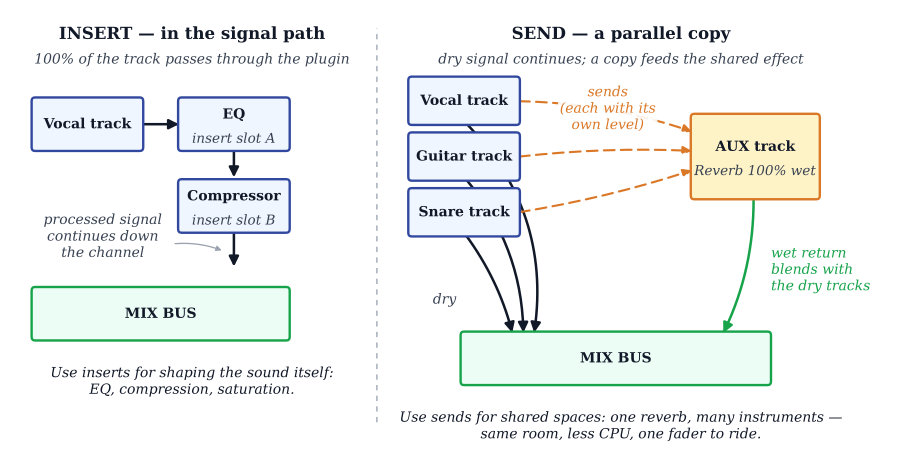
Post-fader sends (the default) are what you want for most mixing. When you lower a track's fader, the send level drops proportionally, so the effect follows the volume. Pre-fader sends are independent of the fader—even if you pull the fader all the way down, the signal still feeds the effect. This is useful for creating reverb-only effects: fade the dry signal out completely and let only the reverb play, creating ghostly textures and ambient washes.
Practical Tips
suggest a correctionThe biggest mistake students make with time-based effects is using too much. A mix with excessive reverb sounds like it was recorded in a swimming pool—washed out, distant, and lacking definition. The goal is depth and dimension, not a wall of wash. Here is my rule: pull the send level up until you can just barely hear the effect, then back it off slightly. If a listener can point to a track and say “that has reverb on it,” it is probably too loud. The best time-based effects are felt, not heard.
That said, rules are meant to be broken. Some of the most iconic productions in history feature time-based effects that you absolutely do hear—the gated reverb on Phil Collins' “In the Air Tonight” is a feature, not a problem. The Edge's dotted-eighth delay on “Where the Streets Have No Name” is the riff. Dub reggae built an entire genre on extreme echo as compositional material. Trent Reznor's distorted reverbs on Nine Inch Nails are the texture of the song. When the effect IS the sound, push it. The discipline of “invisible glue” applies to mixing for clarity; the discipline of “be the effect” applies to mixing for character. Knowing which mode you are in on a given song is the skill.
Always EQ your reverb returns. This is one of the most important mixing techniques and one of the least taught. Insert an EQ on your reverb AUX track and roll off everything below 200–400 Hz with a high-pass filter. Low-frequency reverb is mud—it fills the bottom of your mix with undefined wash that fights your kick and bass. You can also roll off the very top (above 8–10 kHz) for a darker, warmer tail, or leave it open for shimmer and air. Some reverb plugins have built-in EQ for this purpose, but an external EQ on the AUX gives you more control.
Genre awareness matters. A lead rap vocal is usually way upfront—keep it dry. Short delays like a chorus or slap can fatten it without pushing it back, but reverb on a lead rap vocal tends to bury it. If you must use reverb on a lead, keep the decay short and use a generous pre-delay so the dry attack cuts through first. Background vocals and surrounding instruments can be treated with longer reverbs and delays to push them back and create separation from the lead. A pop ballad, on the other hand, might want the vocal swimming in a lush plate reverb—it is all about what the song needs.
The snare drum in rock music is a unique case—usually upfront but also drenched in reverb. This is achieved with pre-delay, allowing the attack to cut through dry while the reverberated sustain and release bloom behind it. Time the pre-delay and decay to the BPM—the reverb tail should completely die before the next snare hit, or it will smear into the next beat.
Experiment with chaining effects. Put a flanger or chorus after your reverb for a shimmering, modulated tail. Run a delay into a reverb for cascading echoes that dissolve into space. Add distortion or saturation after a reverb for an aggressive, lo-fi character. Some of the most iconic sounds in music history came from engineers breaking the rules and chaining effects in ways nobody had tried before.
Finally, train your ear. Listen to your favorite records and pay attention to what is upfront and what is further back. Which sounds are heavily reverberated? Which are bone dry? Can you hear the delays? Can you tell whether it is a plate, a room, or a hall? The more critically you listen, the faster your instincts develop—and in mixing, instinct is everything.
Plugin Recommendations
For delays, Soundtoys EchoBoy remains one of the most popular and versatile plugins, offering analog echo emulations with extensive tone-shaping. Valhalla Delay provides tape, analog, and digital modes with diffusion. FabFilter Timeless offers tape delay with filtering and modulation. For Pro Tools users, D-Verb and Mod Delay III come with every installation, and the Avid Complete Plugin Bundle adds Reverb One and Revibe II for more detailed control.
For reverb, Altiverb is the industry standard for convolution—if you need a specific real space (a famous studio, a concert hall, a cathedral, a cement stairwell), Altiverb's IR library is unmatched and is the reference every other convolution plugin gets compared against. FabFilter Pro-R and Valhalla VintageVerb cover algorithmic reverb with lush, modern sound and intuitive controls. Valhalla Shimmer is the affordable go-to for shimmer textures, with Eventide Blackhole as a deeper, weirder alternative. Soundtoys Little Plate gives you classic plate emulation in a single-knob interface. The hardware these plugins chase are the legends Chapter 9 introduced: the Lexicon 480L (the digital hall on three decades of records), the Bricasti M7 (the modern algorithmic benchmark), and the Roland RE-201 Space Echo (the tape delay)—when a plugin advertises a “480L hall” or a “Space Echo mode,” that is the lineage it is claiming.
The Sound of Space
suggest a correctionTime-based effects are the third dimension of a mix. Volume sets levels, pan sets left-right, EQ sets frequency space—but reverb and delay set place. They take a flat, dry recording and turn it into something that feels like a room, a hall, a stadium, a planet. The best mixes are not just louder. They are deeper. They have geography.
A few years back on a pop session, the chorus refused to lift. The vocal was good, the harmonies were tight, the drums were big—but every time the chorus hit, the energy stayed at the same altitude as the verse. I spent two hours pushing faders and EQing harder. Nothing worked. Then I sent the lead vocal to a long shimmer reverb only on the last word of the chorus, automated to bloom in for those four seconds and disappear afterward. The entire chorus suddenly opened upward. One word, one effect, four seconds of automation. The chorus had been waiting for the sky to open. That is what time-based effects do at their best: they do not add sound, they add space—and sometimes a single moment of space is the difference between a song that lifts and a song that stays grounded.
And print your settings. When a delay throw or a reverb tail finally sits right, screenshot the plugin, note the send level, and save the preset under the song's name. Six months from now, when the artist asks for “that sound from the last record,” you will open the session and have it in thirty seconds instead of chasing it for an hour.
Train the muscle. None of these tools are “effects” to the listener—they are the geography of the song. Listen to your favorite records and ask: what is upfront, what is back, what is dry, what is wet, what is the feature? The faster you can answer, the faster your mixes start to breathe. In the next chapter, all of these tools come together for a complete Pro Tools mix from setup to delivery.
Review Questions
Work these before moving on — every question is answerable from this chapter. Written answers live in the instructor Answer Key, available to course adopters.
- What are the two main categories of time-based effects?
- Flanging and delay
- Reverb and chorusing
- Phasing and combing
- Reverb and delay
- Setting a delay time of less than 1 ms and mixing it back with the original signal creates _______.
- How do you create a chorusing effect and what does it do?
- Setting a delay to be approximately _______ or more will result in distinct echoes.
- List and define the three parts of reverb.
- What is the difference between reverb and delay?
- List and define the common controls on digital reverb units.
- List and define the common controls on digital delay units.
- Describe early reverb designs: chamber, plate, and spring.
- What is an impulse response (convolution) reverb?
- A pop vocalist brings a song to your studio and wants the track to sound more “live.” Upon listening, you notice the song is very epic-sounding with many instruments and many doublings of the vocals on the chorus, and more basic on the verses and bridge. What reverb(s) would you use? Would you use any delays? If so, which ones and where?
- How would you set up your mixing template in terms of time-based effects?
- How can you manually create flanging and phasing effects?
- Why should time-based effects be placed on AUX sends rather than inserted directly on a track? Why should you EQ your reverb returns, and what frequencies should you typically roll off?
- Explain front-to-back depth in a mix. How do reverb and delay each contribute to placing a sound closer or further from the listener?
- Why do short delays make a sound bigger and wider while reverb tends to push a sound further back? How does this affect your choice of effects for a lead vocal versus a background vocal?
- A film composer asks you to add reverb to two elements in a cue: (1) a solo cello recorded in a dry studio that must sound as if it is performing in a specific concert hall the director has approved, and (2) an ensemble of strings and woodwinds whose decay time, diffusion, and damping must be adjusted in real time as picture edits change the scene length. Which reverb type (convolution or algorithmic) would you choose for each element, and why? What are the key trade-offs that drive your decision?
Studio Exercise: Track 6 — Add Time-Based Effects to Your Mix
Track 6 of the song-build pipeline. Open the dynamics-processed session you saved at the end of Chapter 16. You will now add reverbs, delays, and other time-based effects on AUX tracks, EQ the returns, automate the sends, and shape the song's depth and width. By the end of this exercise, your mix will breathe in three dimensions.
Setup
Open your Chapter 16 dynamics session and save it as “[Song Title]_v6_TBE.” Build out a dedicated FX section in your template (separate from your audio tracks) where every reverb and delay lives on its own AUX track.
Part A: Three Reverb Sends
Set up at least three reverb sends on AUX tracks:
- Short reverb (under 1 sec, room or plate, small)
- Medium reverb (1–2 sec, room/plate/hall, medium)
- Long reverb (2+ sec, hall, large)
Insert an EQ on every reverb return and high-pass at 200–400 Hz. Document: which reverb plugin, decay time, pre-delay, EQ settings, which tracks are sending and how much.
Part B: Tempo-Synced Delay
Set up at least one tempo-synced delay AUX (1/4, 1/8, dotted-1/8, 1/8 triplet, or 1/16). Apply it to a vocal or instrument where it serves the song. Specify the note value chosen and the musical reason. Then either automate the send (a “throw” on one phrase) or set up ducking on the delay return so it sits behind the dry vocal—and run the delay on an AUX send, not an insert.
Part C: Short Delay for Thickening
Apply at least one short delay (chorus, doubler, slapback, or Haas-panned widener) on a track that needs to feel bigger or wider without being pushed back. Document the delay time, modulation if any, and what changed musically.
Part D: Snare Pre-Delay Reverb
Treat the snare drum with the upfront-yet-spacious technique from this chapter: a long-decay reverb with substantial pre-delay so the dry attack cuts through before the wash blooms behind it. Tempo-time the decay so the tail dies before the next hit. Document pre-delay (ms), decay (sec), and gate setting if used.
Part E: Document Submission
Submit:
- FX-processed stems (every track bounced individually, post-effects).
- A routing diagram showing every AUX, every send path, and the EQ on each return.
- One paragraph describing the depth and width decisions you made: what is upfront and dry, what is back and wet, what is wide, what stays narrow.
Optional Stretch
- Pick one “rules-meant-to-be-broken” moment in your mix—an audible reverb or delay that IS the effect, not invisible glue—and document why it serves the song.
Common Pitfalls
- Too much reverb on the lead vocal. If the lead feels distant when the chorus hits, you are over-wet. Pull back.
- Forgetting to EQ the reverb return. Bass reverb is mud. High-pass at 200–400 Hz, every time.
- Inserting effects directly on tracks instead of using sends. You lose cohesion. Send to a shared AUX.
- Reverb tail smearing into the next beat. Decay too long for the tempo. Time it to the BPM.
What You Are Building Toward
You now have a session with depth, width, and dimension. The lead vocal sits upfront. The backgrounds bloom behind. The drums punch and breathe. The guitar fattens out the sides without pushing back. Save this session as your starting point for Chapter 18, the Pro Tools mixing chapter—this is the session you will mix down to a final stereo bounce.