Chapter 5 · Capturing Sound: Microphones, Acoustics & Gear
Microphone Basics
“Despite all the technical improvements, it still boils down to a man or a woman and a microphone, playing music, sharing stories, talking about issues—communicating with an audience.”
—Casey Kasem
By the end of this chapter, you will be able to:
- Describe the microphone as a transducer that converts acoustic energy into an electrical signal, and explain its role as the first link in the recording chain
- Distinguish moving-coil dynamic microphones from other types by explaining electromagnetic induction, high-SPL handling, and the studio and stage roles of the SM57, SM58, and SM7B
- Identify the key characteristics of ribbon microphones—thin aluminum element, natural warmth, and native figure-8 polar pattern—and apply the phantom-power destruction warning when routing signal
- Compare condenser microphone designs by explaining the electrostatic operating principle, phantom-power requirement, large-diaphragm versus small-diaphragm trade-offs, and tube versus solid-state character
- Select an appropriate polar pattern—cardioid, supercardioid, hypercardioid, bidirectional, or omnidirectional—for a given recording scenario by describing each pattern's pickup behavior and rear-lobe trade-offs
- Apply key microphone specifications—maximum SPL, self-noise, sensitivity, frequency response, and transient response—to predict how well a given microphone will match a specific source
- Explain the preamp's function in raising mic level to line level, distinguish color from transparency in preamp character, and apply the three-question framework for selecting the right microphone for a source
- Explain how pressure and pressure-gradient transducer principles produce the omnidirectional and figure-8 polar patterns, and describe how dual-diaphragm architecture enables a multipattern condenser to access any pattern between them
I once spent an entire afternoon auditioning microphones on a vocalist—a $3,000 Neumann, a $5,000 vintage tube mic, a $200 Rode. The singer had a bright, cutting voice with a lot of natural presence. Every expensive condenser made her sound harsh and sibilant. Then we tried a Shure SM7B—a $400 moving coil dynamic microphone. It was perfect. The SM7B tamed the highs, warmed the midrange, and let her natural tone come through without a fight. That session taught me something I tell every student: the right microphone is not the most expensive one. It is the one that sounds best on the source in front of you.
That lesson is the foundation of this entire chapter. We are going to learn how microphones work—the physics inside every capsule, the differences between dynamic and condenser designs, the polar patterns that determine what a mic hears and what it ignores. But none of that knowledge matters unless you internalize the principle underneath it all: every microphone has a personality, and your job is to match that personality to the source.
What a Microphone Actually Does
suggest a correction“To me, the microphone is the entryway to sound; it's how we capture what we do. I have a lot of respect for microphones.” —Bruce Swedien (engineer for Michael Jackson's Off the Wall, Thriller, Bad, and Dangerous)
A microphone is a transducer—a device that converts one form of energy into another. In this case, it converts acoustic energy (sound waves moving through air) into an analog electrical signal: voltage and current proportional to the original sound. That electrical signal travels down a cable to a preamp, then to a converter, then into your DAW—but the microphone is where the entire recording chain begins. If the mic captures the wrong character, no amount of processing downstream can truly fix it.
One of the first practical microphones was developed by Emil Berliner in the late 1870s as an improvement to Alexander Graham Bell's telephone. By the 1920s, microphones had entered recording studios and radio stations, and by the 1930s ribbon microphones were defining the golden age of broadcast. Today, microphone technology is embedded in virtually everything we hear—phone calls, podcasts, film soundtracks, concert recordings, voice assistants. Without microphones, the studio would be limited to electronically generated sound, unable to capture a human voice or an acoustic instrument.
I have heard sessions sabotaged at the very first link in the chain—a brilliant performance recorded through a microphone that flattered nothing about the source, and no amount of EQ, compression, or mastering could rescue what was lost in those first few inches between the singer and the diaphragm. Conversely, I have heard recordings made with the right mic on the right source where almost no processing was needed at all. The signal arrived at the preamp already great. Mic choice is that decisive.
Microphones are classified into two broad families based on how they convert sound into electricity: dynamic microphones (which use electromagnetic induction) and condenser microphones (which use the electrostatic principle). Within those families, there are important subtypes that behave very differently in practice. Let's start with the workhorses.
Dynamic Microphones: Moving Coil
suggest a correctionDynamic microphones are self-powered through electromagnetic induction—the production of an electrical current when a conductor moves through a magnetic field. No phantom power, no batteries, no power supply. Plug them in and they work.
How a Moving Coil Mic Works
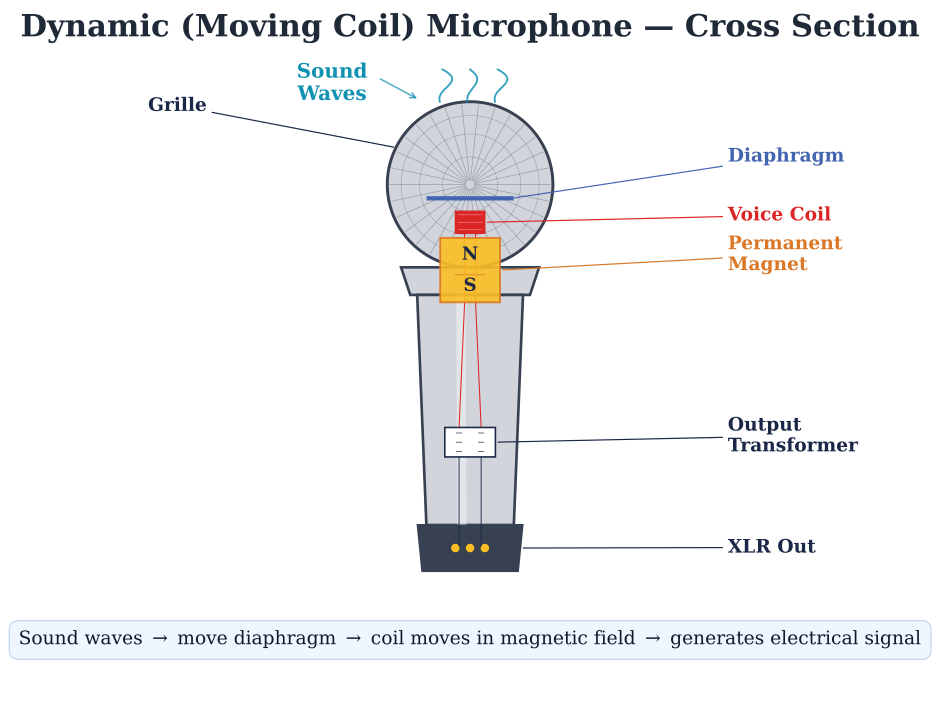
The moving coil dynamic microphone is the most common type of microphone in professional recording and live sound. The practical moving-coil dynamic arrived in 1931—the Western Electric 618A, built by Wente and Thuras (patented 1928)—and Shure's 1939 Unidyne Model 55, the first single-element directional dynamic, made the rugged, directional dynamic a stage and broadcast staple. Inside the capsule, a thin diaphragm—typically made of Mylar or lightweight metal—is attached to a small wire coil suspended within a permanent magnet's field. When sound pressure enters through the windscreen, the diaphragm vibrates, the coil moves, and electromagnetic induction generates a small electrical current that mirrors the original sound wave.
That is the entire trick. A coil. A magnet. A diaphragm. No phantom power, no amplifier circuit, no charged plates—almost nothing to fail when a band loads in cold and humid, when a coffee spills off the console and runs down to the floor, when an over-enthusiastic singer grabs the mic and swings it. Pour enough liquid directly into the capsule or hit it hard enough and of course it will die—it is not magic—but short of real abuse, there is very little in this design to break. I have used the same SM57 for fifteen years on hundreds of sessions and never replaced it. Drop it from six feet onto a concrete slab and it still tracks a vocal. The simplicity of this design is exactly what makes it indestructible in a working studio.
Strengths
The result is a microphone that is robust, affordable, moisture-resistant, and does not require phantom power or any external power source. Moving coil dynamics are also more resistant to feedback than condensers, which is why they are the undisputed standard for live performance. But studios use them constantly too: on snare drums, guitar amplifiers, brass instruments, and vocals. The Shure SM57 has been the default snare drum microphone in professional studios for over fifty years. Walk into any session, anywhere in the world, and you will almost certainly see one aimed at the snare.
One of the greatest strengths of the moving coil dynamic is its ability to handle extremely high sound pressure levels without distorting internally. Because there are no active electronics inside the capsule—no amplifier, no charged plates, no tube—there is very little to overload. The diaphragm and coil simply move in proportion to the sound pressure across an enormous range. At truly extreme levels even a dynamic can distort—the diaphragm reaches the limit of its travel, or the output transformer saturates—but that threshold is far higher than the level at which a condenser's electronics give out. This is why you can stick an SM57 directly in front of a cranked Marshall amplifier or two inches from a snare drum being hit as hard as humanly possible, and the microphone will not distort. A condenser microphone in the same position may overload its own internal electronics before the signal even reaches the preamp. This distinction matters enormously in the studio: when you are recording loud sources, a moving coil dynamic is often the safest and best-sounding choice.
Trade-offs
The trade-offs are real, though. The diaphragm-and-coil assembly is heavier than a condenser's diaphragm, which means the frequency response is less linear—especially above 15 kHz, where high frequencies start to roll off. Moving coil dynamics are often tailored with a presence peak in the midrange, which is an advantage for vocals and guitars but a limitation when you need a flat, full-range capture. The output level is also low: the magnet and coil produce only a small current, so quiet sources may require significant preamp gain, which can introduce noise. And because of that heavier diaphragm, transient response is slower than a condenser's—moving coil dynamics capture the energy of a sound but may miss the finest details of a fast attack.
The Workhorses
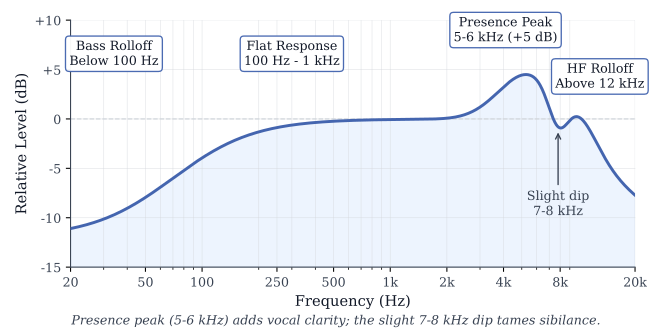
Here is where personality matters. The Shure SM57 has a midrange presence peak that makes snare drums crack and guitar amps bite—that is not a flaw, it is the reason engineers reach for it. The Shure SM58, its sibling, is built on the same Unidyne III cartridge design—fitted with a ball-grille pop filter and voiced with a slightly different top end—and has been the world's default live vocal microphone for decades. You can drop it, step on it, spill beer on it—it keeps working. Look at the SM58's published frequency response: a high-pass roll-off below 100 Hz, a presence peak at 5–6 kHz that gives vocals their cut, a slight dip near 7–8 kHz that tames sibilance, and a roll-off above ~12 kHz. That is not a flat measurement microphone. It is a vocal microphone, deliberately tuned to make a singer sound great with no EQ.
The Shure SM7B—the mic from our opening story—was originally the SM7, used to record Michael Jackson's vocals on Thriller, the best-selling album of all time. Its warm, smooth character tames sibilance and harshness, which is why it has also become the default microphone for professional podcasting and broadcasting. The Sennheiser MD 421 is the tom mic you will see in every major drum booth. The Electro-Voice RE20 is a broadcast legend with excellent rejection of proximity effect—the bass buildup that occurs when a directional mic gets very close to a source. And the Shure Beta 52A is tuned specifically for kick drums and bass instruments, with a low-frequency presence that standard dynamics cannot match.
I have engineered shootouts where we tested a $3,000 condenser against an SM57 on a guitar amplifier. The SM57 won every time. Not because it was technically superior—because it was right for the source. Engineers reach for the SM57 not in spite of its midrange peak but because of it; that peak is exactly what cuts a snare crack or a guitar attack through a dense mix, no EQ required. Every one of the workhorses listed above costs under $500. Every one of them has recorded hit records. Price does not determine quality—application does.
Dynamic Microphones: Ribbon
suggest a correctionThe first time I recorded a horn section through a Coles 4038 ribbon, I had to stop the session and walk into the live room to make sure the players had not switched instruments. The microphone made the brass sound like it was happening four feet from my face, in three dimensions, with no harshness anywhere. That is what a great ribbon does. It steps out of the way and hands you the room.
How a Ribbon Mic Works
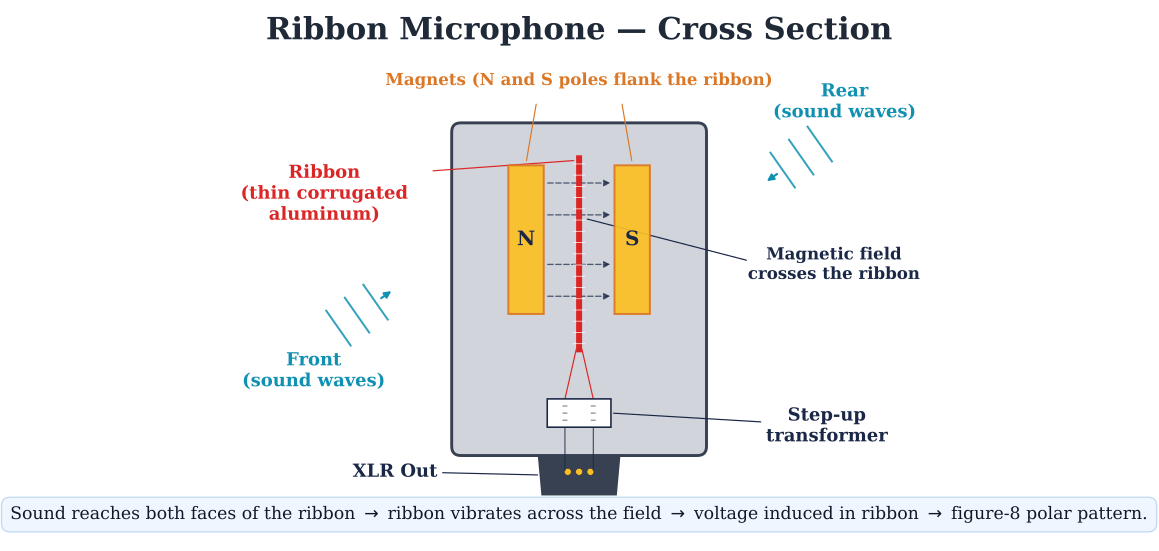
The dynamic ribbon microphone operates on the same electromagnetic principle as the moving coil, but the design is radically different. Instead of a coil attached to a diaphragm, a ribbon mic suspends an extremely thin, corrugated strip of aluminum—the “ribbon”—between two opposing magnetic poles. Sound pressure causes the ribbon to vibrate within the magnetic field, generating a corresponding electrical voltage. Because the ribbon is so thin and lightweight, it responds to sound with remarkable naturalness. But the output is extremely low, so a step-up transformer inside the mic boosts the signal before it leaves.
From the Golden Age to the Renaissance
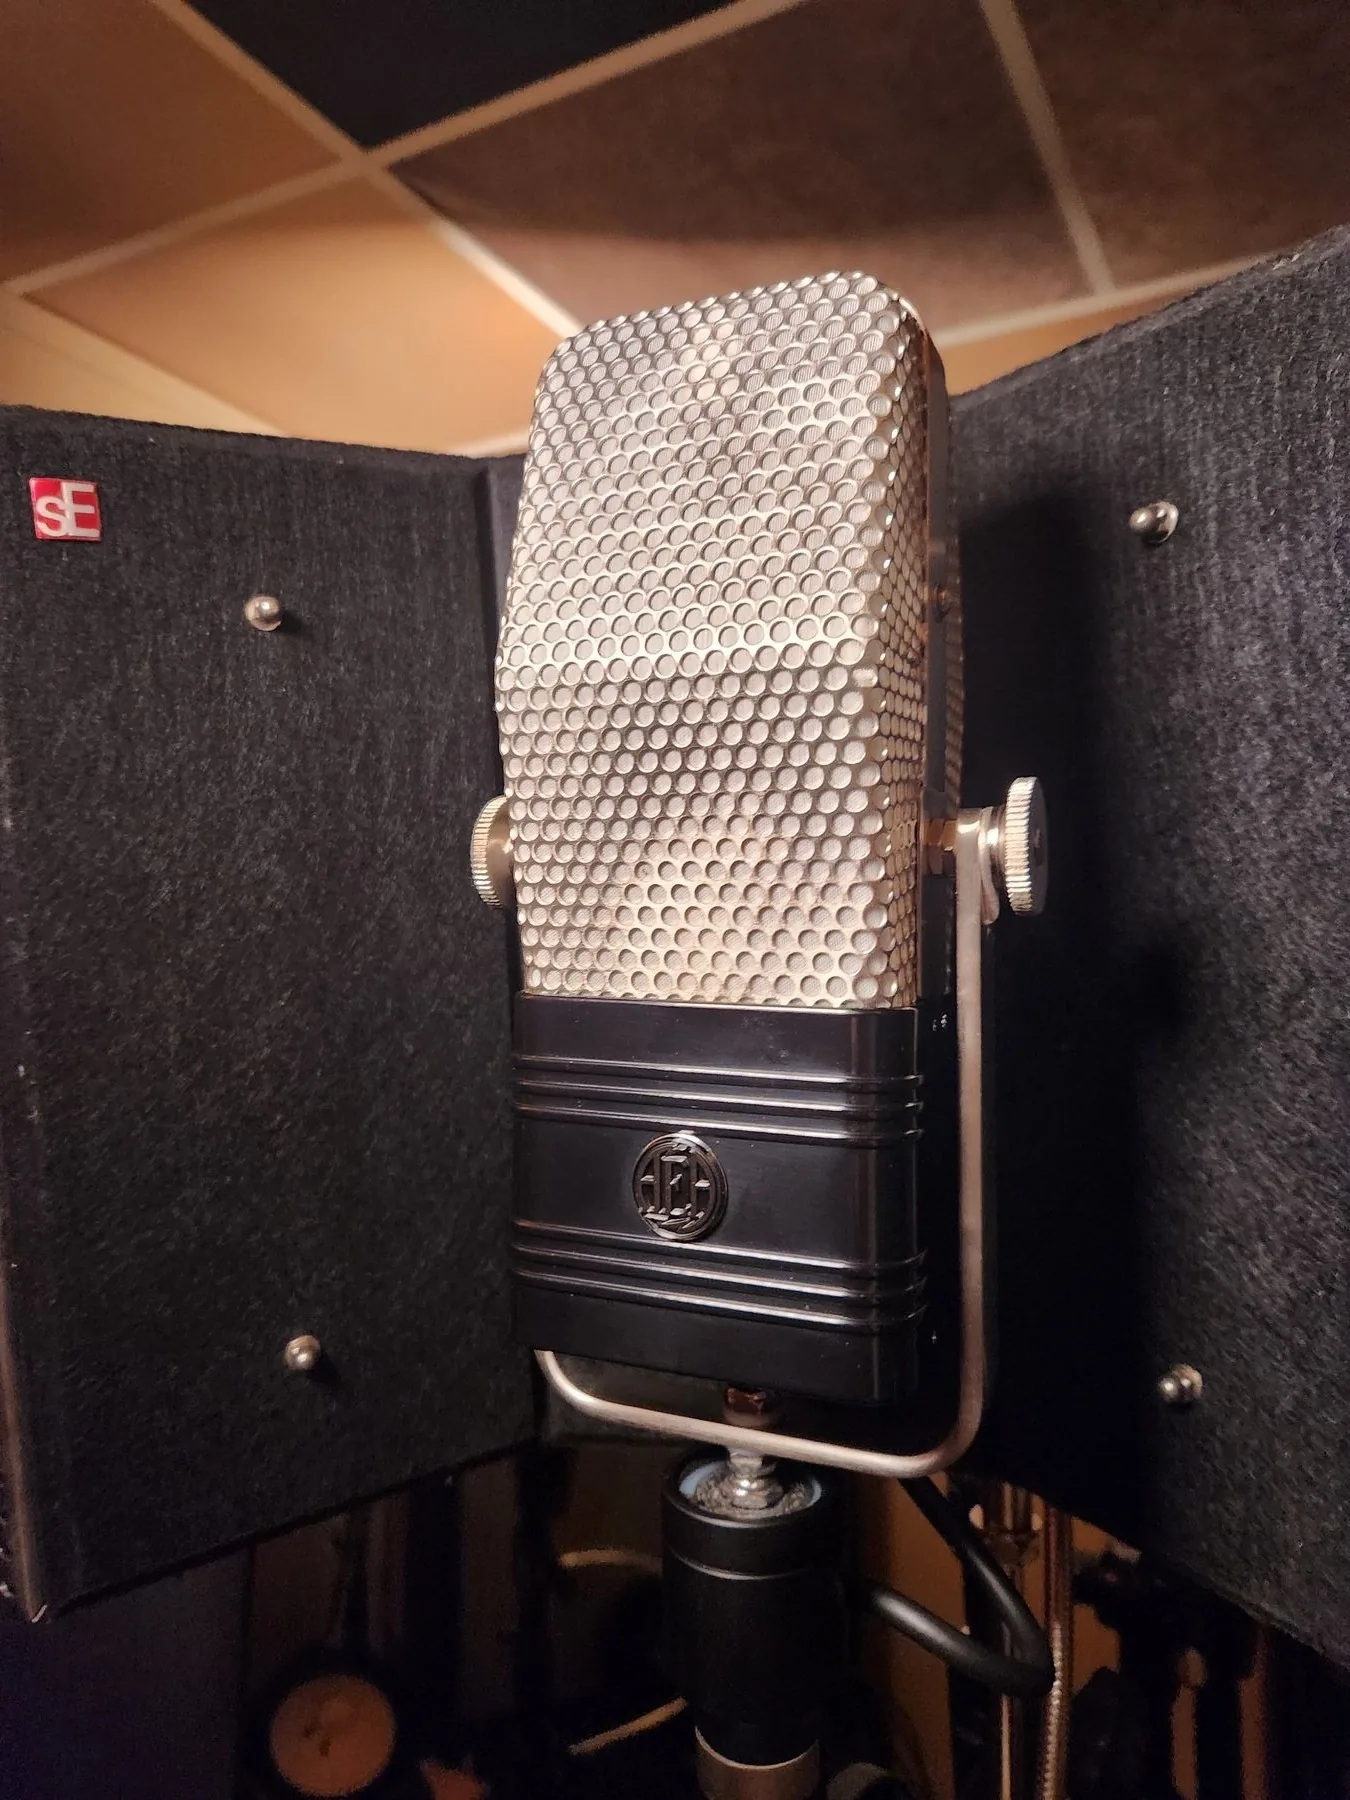
Ribbon microphones were a studio and broadcast standard from the early 1930s through the 1960s, alongside rugged moving-coil dynamics for live and field work. Then condensers got cheaper and more capable, and ribbons fell out of fashion for decades. The renaissance came in 1998 when David Royer introduced the Royer Labs R-121—a modern ribbon mic that could handle the SPL of a cranked guitar amplifier without the fragility of vintage designs. The R-121 became an instant classic and sparked a global ribbon revival. Today, the Coles 4038 (a BBC broadcast legend, now a studio standard for orchestral recording and brass), the AEA R84 (a modern recreation of the classic RCA 44 ribbon sound, popular for vocals and voiceover), and the Beyerdynamic M 160 (an unusual hypercardioid ribbon, excellent on strings and guitar cabinets) are all widely used in professional studios.
Character: The Painter
Ribbon microphones are renowned for their warm, smooth, natural sound—an extended low end with gently rolled-off highs that never sounds harsh or brittle. Of all microphone types, ribbons generally produce the cleanest signal with the least harmonic distortion. The thin ribbon element vibrates so naturally within the magnetic field that it introduces almost no coloration of its own—what you hear is the source, not the microphone. If a moving coil dynamic is a workhorse and a condenser is a microscope, a ribbon is a painter. They excel on acoustic instruments, guitar amplifiers, jazz ensembles, drum overheads, horns, strings, vocals, and upright bass. When engineers talk about a mic that sounds “like being in the room,” they are often describing a ribbon.
Trade-offs and the Phantom-Power Warning
The trade-offs are significant. Ribbon mics produce an extremely low output signal—even lower than moving coil dynamics—which means they require a high-quality preamp with plenty of clean gain. A noisy preamp paired with a ribbon mic will produce an audibly hissy recording. The gently rolled-off high frequencies that give ribbons their smoothness also mean they lack the “air” and sparkle of a condenser—on sources that need brightness or sizzle, a ribbon can sound dark and muffled. Most ribbon microphones are locked into a bidirectional (figure-8) polar pattern due to the physics of the ribbon element, which limits their versatility—you cannot switch to cardioid for isolation. They can also be relatively expensive—quality ribbon mics typically start around $500 and vintage models command thousands—though the genuinely most expensive microphones in the world are vintage tube condensers like the Telefunken ELA M 251 and the Neumann U 47, not ribbons. And they are fragile: the thin ribbon can be damaged by strong air blasts (never blow into a ribbon mic), physical shock, or rough handling. A drop that a moving coil dynamic would shrug off can end a ribbon mic's life.
One critical warning: phantom power can destroy many ribbon microphones. A sudden DC current from that +48 V can physically stretch or tear the delicate ribbon element. Always check the manufacturer's specifications before applying phantom power to any ribbon mic. Modern moving coil dynamics like the SM57 and SM58 are unharmed by phantom power: the balanced design of the coil—both ends connected through XLR pins 2 and 3, which carry equal and opposite signal—causes the equal +48 V on both pins to cancel out at the diaphragm, producing no net voltage across the coil. A ribbon's much thinner, lower-impedance element does not enjoy that protection, and a vintage passive ribbon connected to live phantom power can be stretched or torn in seconds. Modern active ribbon designs (such as the AEA N22) include onboard electronics that buffer the ribbon and tolerate phantom power safely—but you should still confirm in the manual before plugging in.
Condenser Microphones
suggest a correctionThe first time you hear a good condenser microphone after using only dynamics, the difference is startling. Suddenly there is air around the vocal. You can hear the room. Finger slides on guitar strings, the breath before a phrase, the subtle rattle of a snare wire—details that dynamics gloss over, condensers reveal.
How a Condenser Works
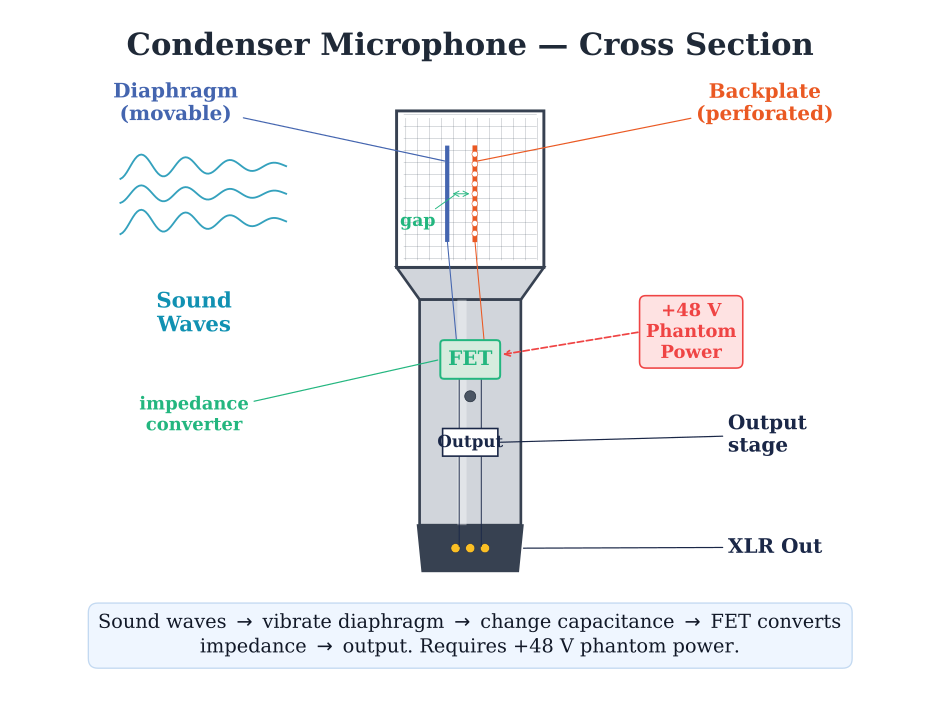
A capacitor (historically called a “condenser”) is an electrical component that stores charge between two conductive plates separated by a non-conductive gap. The condenser microphone uses this principle: its capsule contains two closely positioned plates—a thin, movable diaphragm (front plate) and a rigid back plate. An electrical charge is applied across the plates (Eargle, 2011). When sound pressure causes the diaphragm to vibrate, the distance between the plates changes, which varies the capacitance and produces a corresponding change in voltage—an electrical representation of the sound wave.
Because condenser microphones use the electrostatic principle rather than electromagnetic induction, they require an external power source. This is most commonly phantom power (+48 V DC supplied from the mixing console or preamp through the XLR cable), though some condensers use internal batteries or dedicated external power supplies.
Strengths
Condenser microphones generate a much stronger output signal than moving coil dynamics or ribbons, making them significantly more sensitive to quiet sounds, subtle nuances, and distant sources. This is exactly why condensers excel on soft material: their strong output and low self-noise give an excellent signal-to-noise ratio, so a whispered vocal, a fingerpicked guitar, or a distant room mic comes back clean instead of buried in hiss. A quiet source forces a dynamic to lean on preamp gain (and the noise that comes with it); a condenser barely needs the help. They also tend to have a wider, more linear frequency response and faster transient response—the ability to capture the sharp attack of a drum hit or a plucked string with precision. Their high sensitivity and extended frequency range make them the first choice for studio vocals, acoustic instruments, and any source where detail and accuracy matter most.
Trade-offs
The trade-offs are the mirror image of a moving coil dynamic's strengths. Because condensers have active internal electronics—an amplifier circuit powered by phantom power—those electronics can distort internally when the sound source is too loud, even before the signal reaches the preamp. This is why many condensers include a pad switch: it attenuates the signal at the capsule to prevent the mic's own electronics from overloading. Condensers are also more expensive, more fragile, and more sensitive to moisture and humidity than moving coil dynamics. They are more susceptible to handling noise (vibrations transmitted through the mic body), which is why they are almost always used with a shock mount. They are more prone to feedback on stage, which—combined with their fragility—is why they are predominantly found in controlled studio environments rather than on live stages.
Large-Diaphragm Condensers (LDC)
The size of the diaphragm matters enormously. Large-diaphragm condensers (LDC), with diaphragms typically one inch or larger, are the standard choice for studio vocals and any application where a rich, warm, full-bodied sound is desired. When someone says “studio microphone,” they usually mean an LDC. The diaphragm size is the reason: a larger diaphragm captures low frequencies more fully and generates less self-noise than a small one, giving vocals the warm, full-bodied low-end weight we associate with a “studio” sound. That low-frequency authority is a big part of why LDCs are the default for lead vocals.
The Legends
The Neumann U 87 is the most widely used studio condenser in the world—a solid-state (FET) design with three selectable polar patterns (cardioid, bidirectional, omnidirectional) that works beautifully on virtually any source. Its predecessor, the Neumann U 67, is a tube (valve) design with the same capsule lineage but warmer, more harmonically rich electronics—highly prized for vocals and acoustic instruments. Then there is the Neumann U 47—a legendary tube vocal microphone pictured extensively in Beatles recording sessions. Its warm, smooth character makes it one of the most coveted lead-vocal microphones in the world. Originals are no longer manufactured and command staggering prices; many companies now produce faithful recreations.
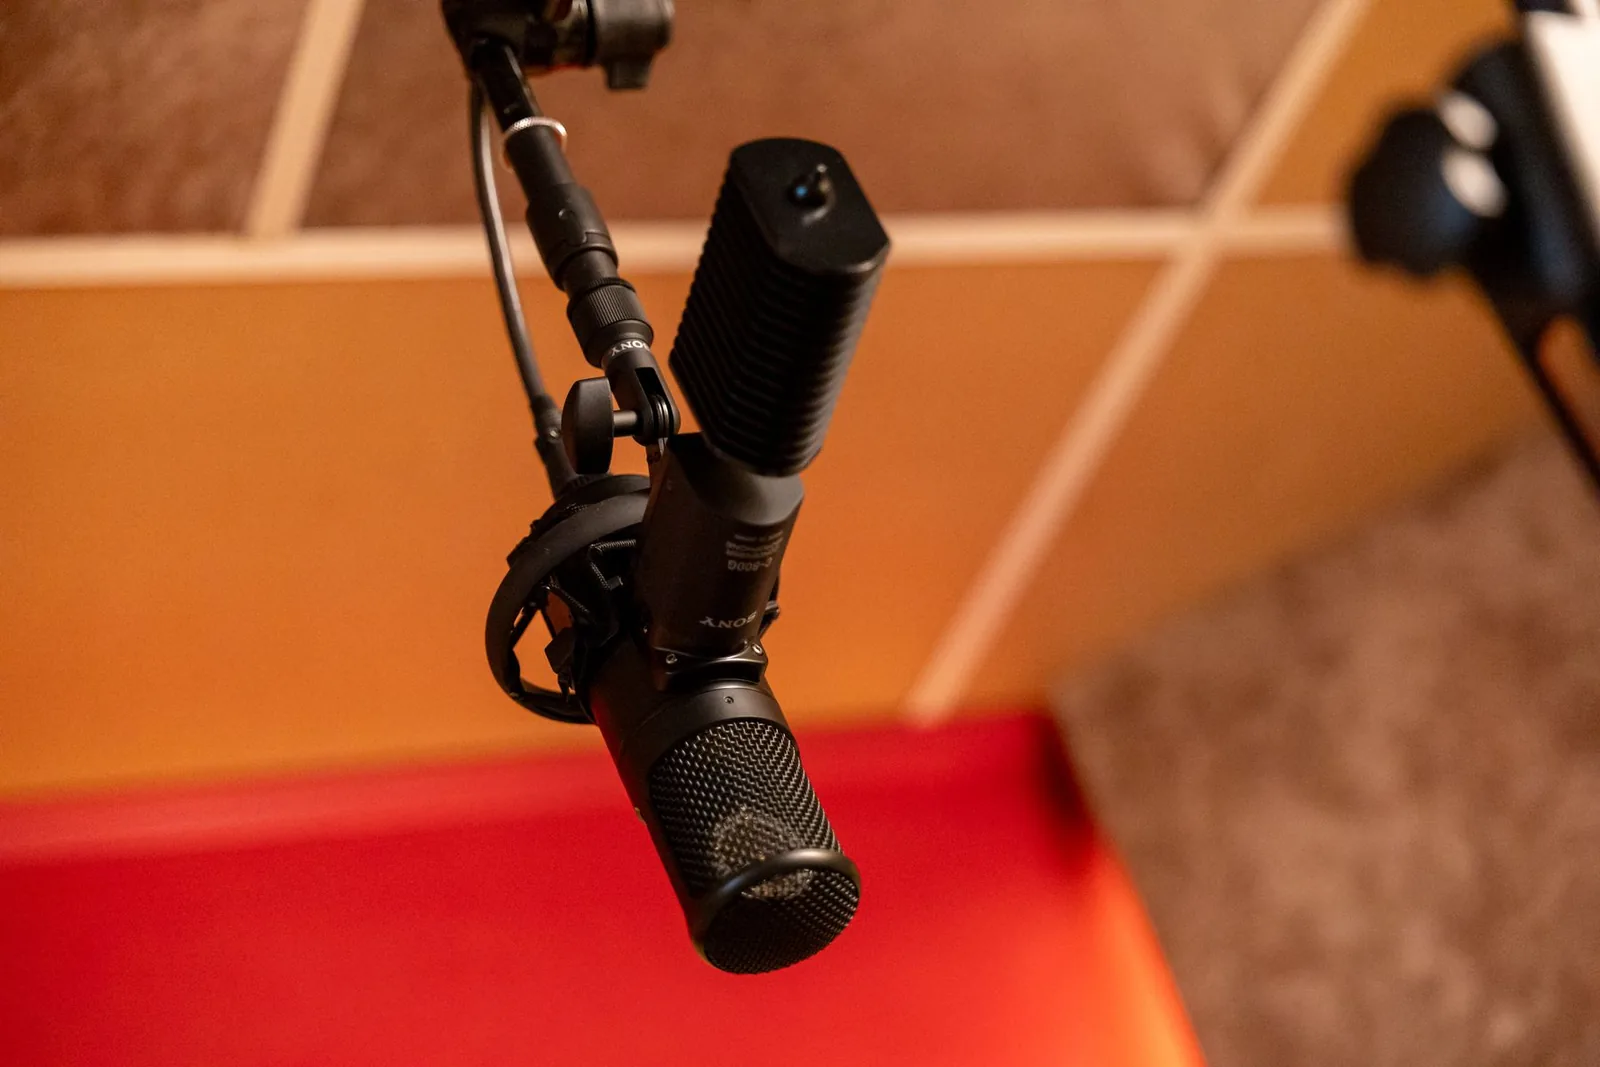
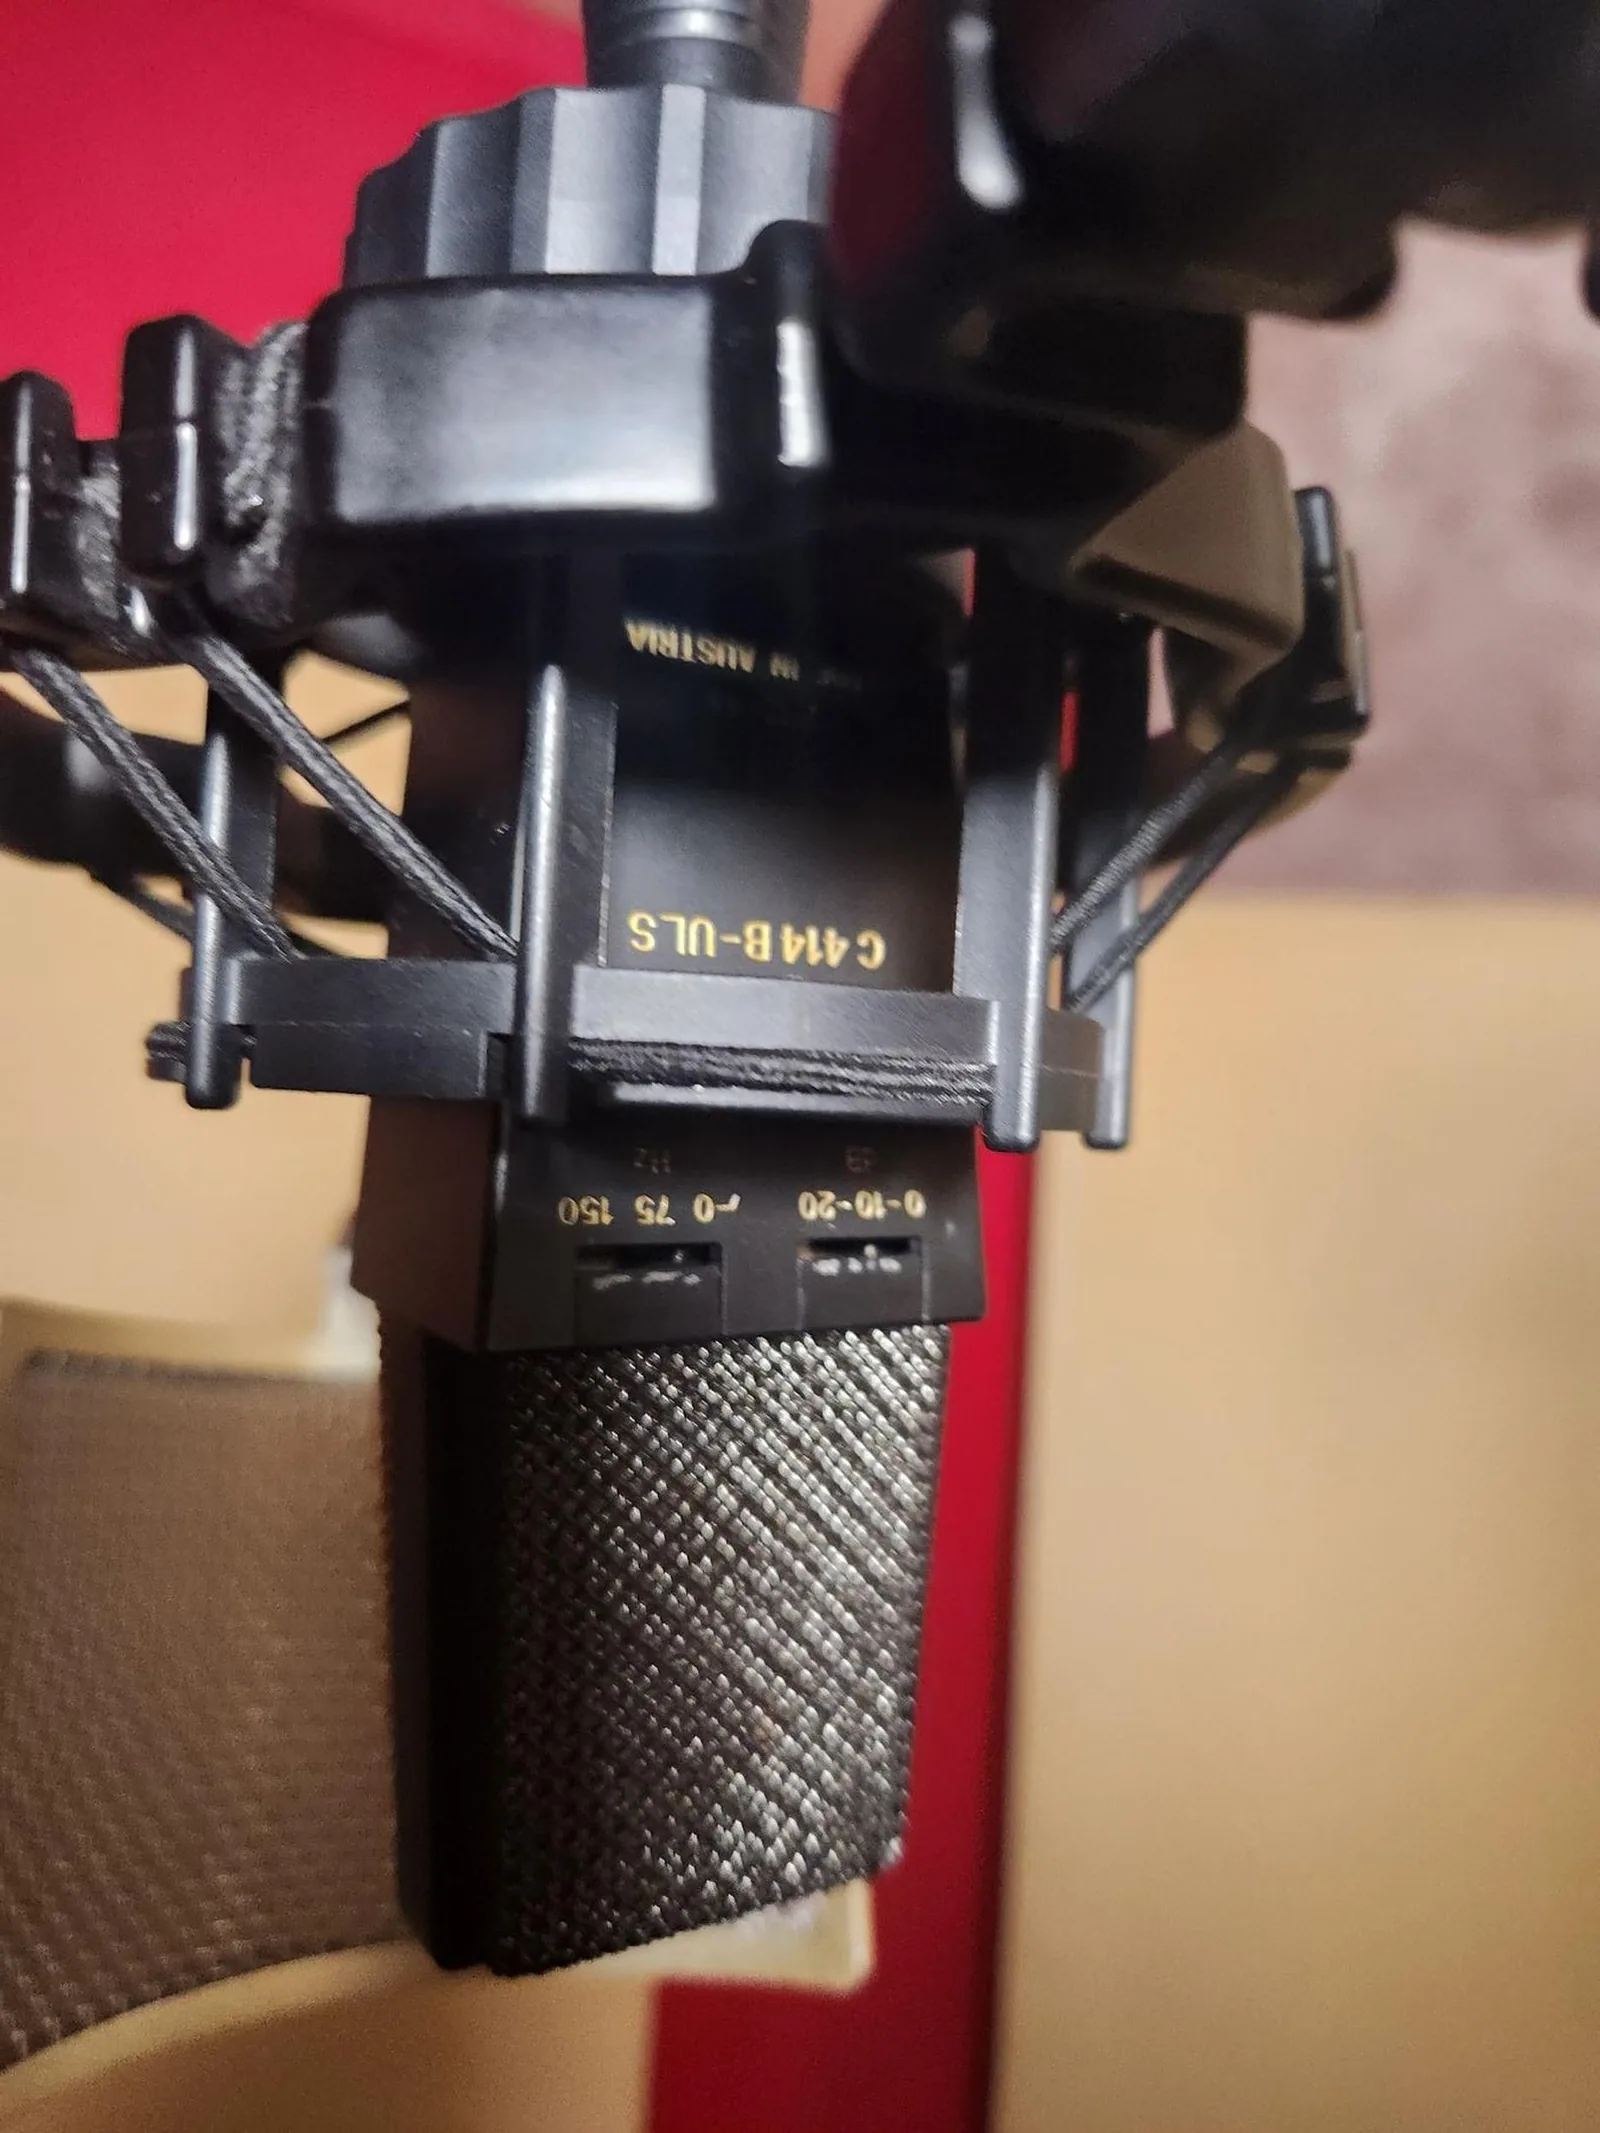
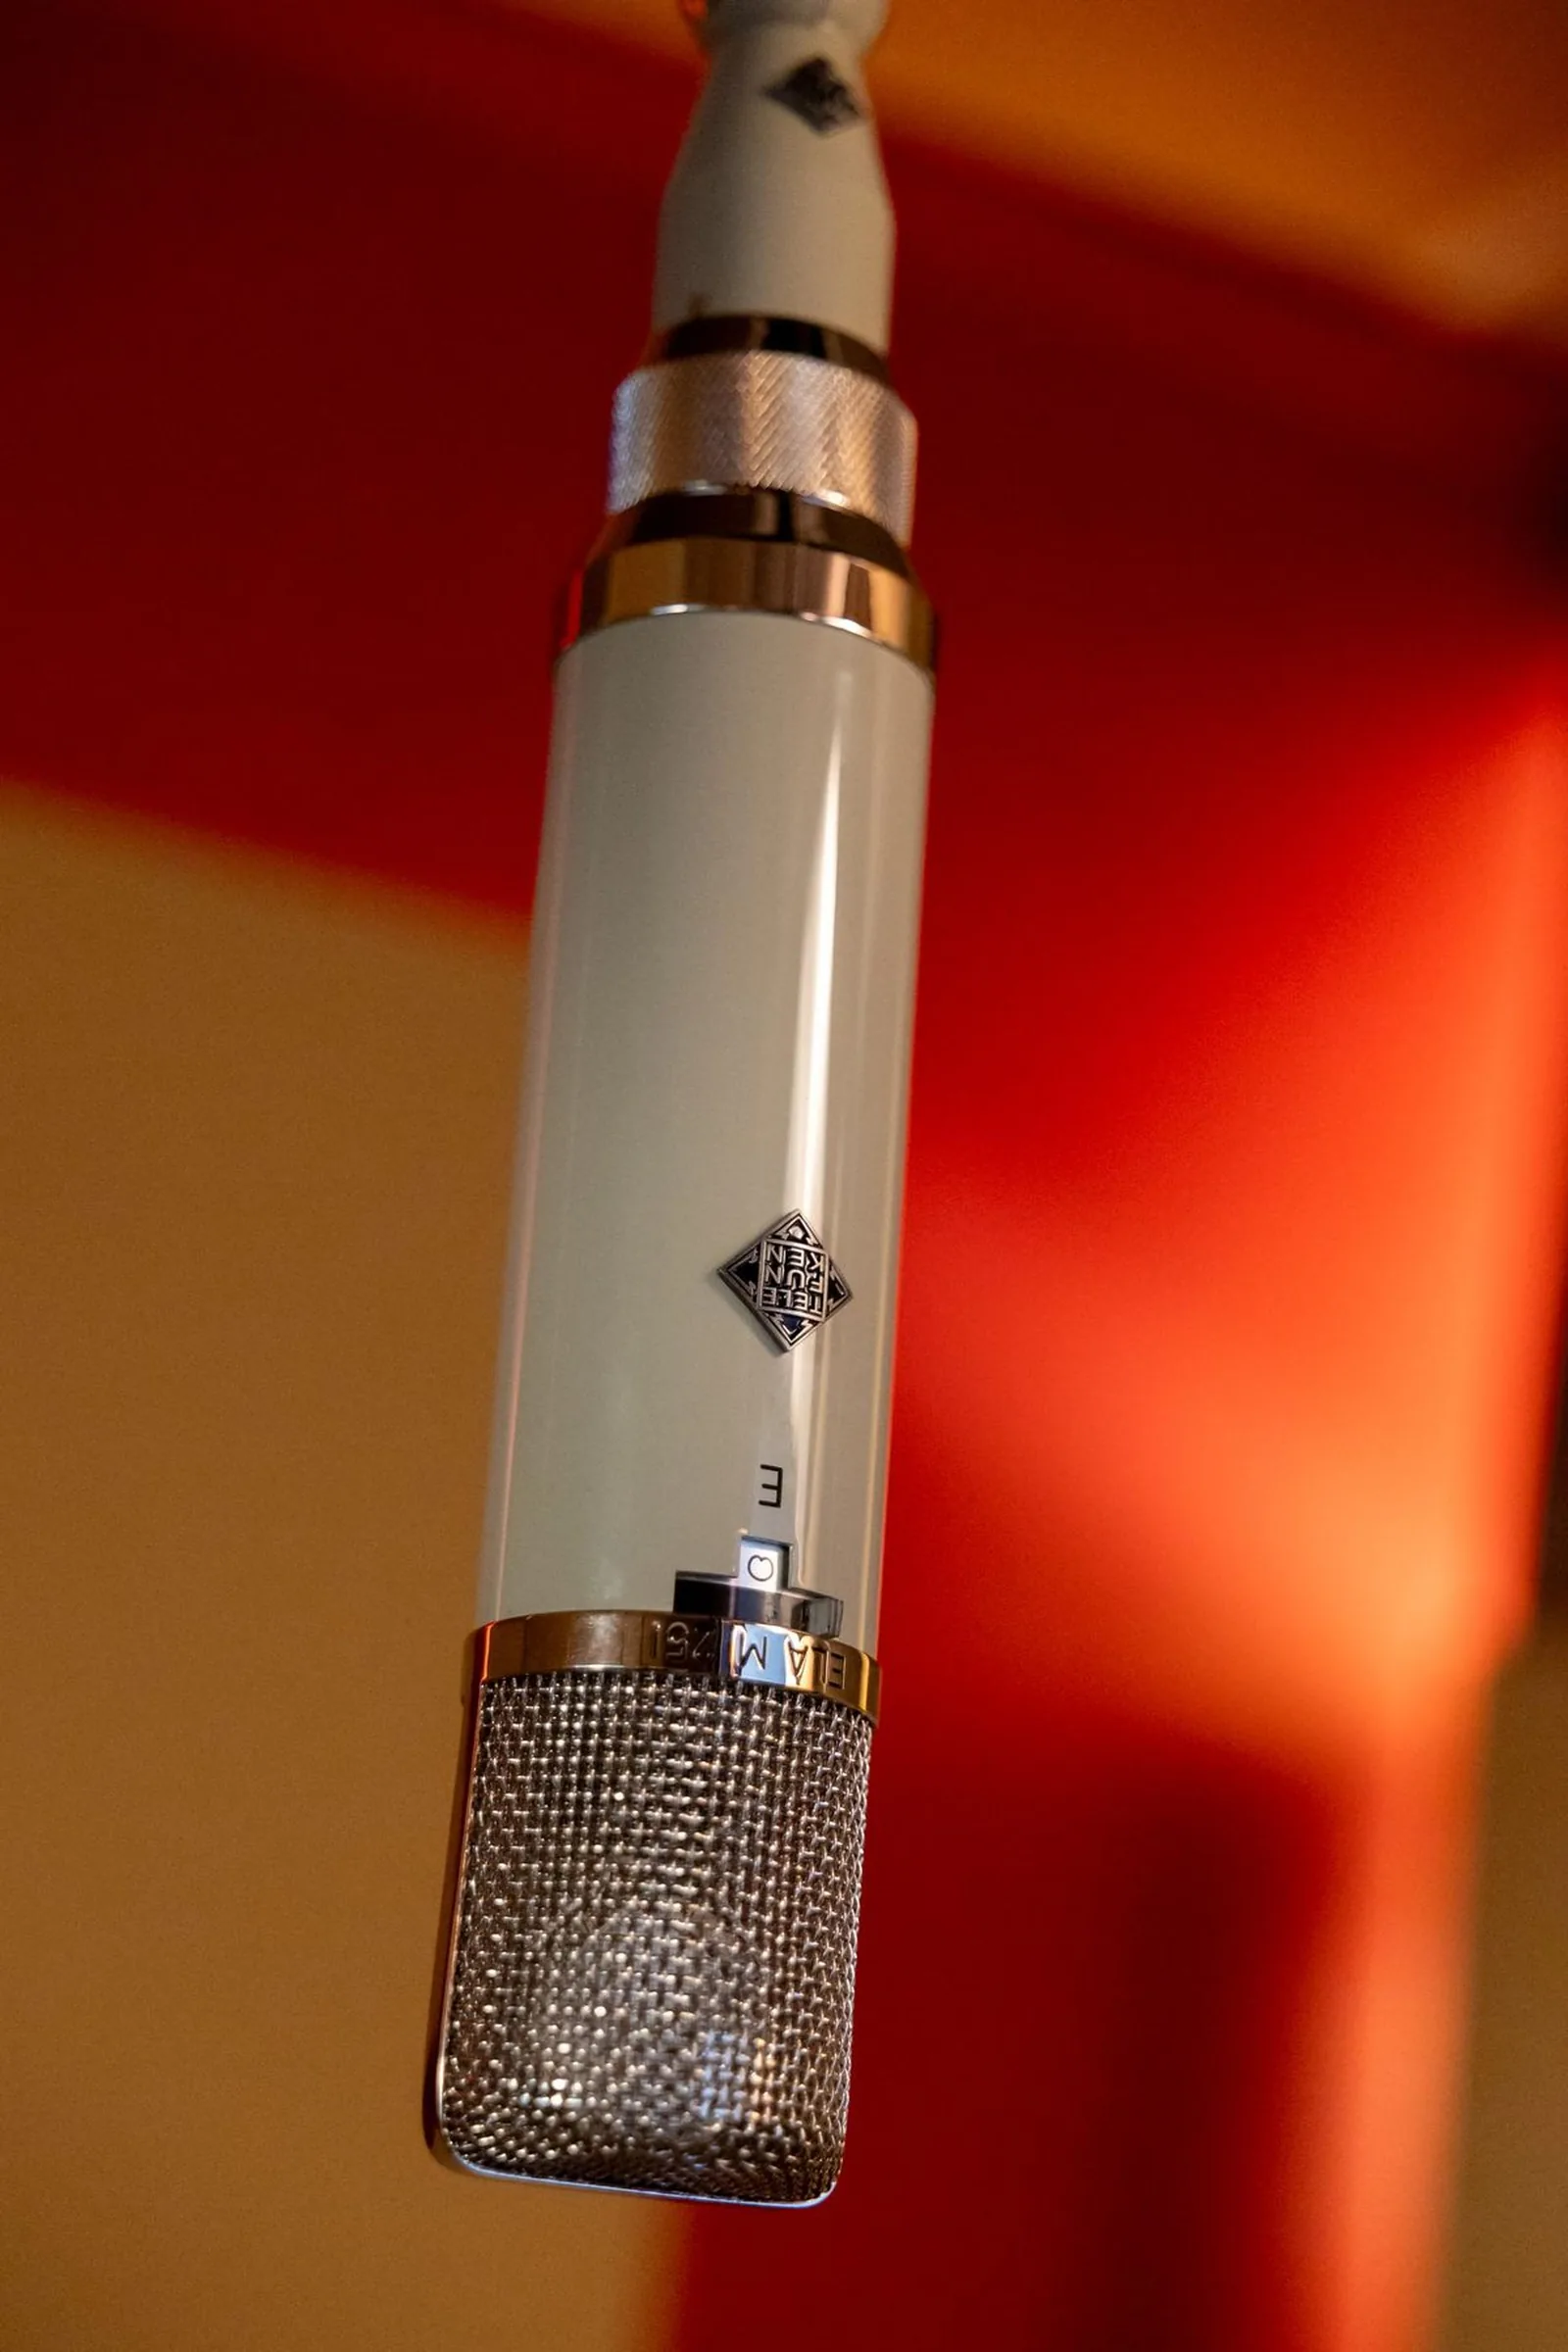
The Sony C-800G was designed for the highest possible sound quality and was the first microphone with a built-in tube cooling system to reduce noise and distortion—a design since imitated by various clones, though the C-800G remains the original. Made widely popular by Dr. Dre and Mariah Carey, it became a standard for polished pop and R&B vocal recordings. The AKG C 12 is one of the most famous tube microphones in recording history—prized for its airy, silky, open top end (the sound of its CK12 capsule), which flatters vocals and strings without ever turning harsh. Originals are extraordinarily expensive and sought after. The AKG C 414, first introduced in 1971, is one of the most versatile large-diaphragm condensers ever made, excelling on vocals, drums, and piano with selectable polar patterns, a switchable pad, and a high-pass filter. Its sound is clean, fast, and slightly forward—more modern and neutral than the vintage tube classics. And the Telefunken ELA M 251—designed by AKG, built around the legendary CK12 capsule—is one of the most coveted vintage vocal microphones in existence. Built on the same CK12 capsule as the C 12, it pairs that airy top with tube warmth and bloom—lush and three-dimensional on vocals, which is why it is so coveted.
It's Often the Capsule
Much of a classic mic's character lives in one component: the capsule. A handful of capsule designs recur across the legends because they sound extraordinary, and clones are often really capsule clones. The K47 (and its descendants) is the warm, full-bodied capsule behind the Neumann U 47. The K67/K870 is the brighter, more open capsule in the U 67 and U 87. The CK12 is the airy, silky capsule that defines the AKG C 12 and the Telefunken ELA M 251. When you read that a modern mic is “K47-style” or “CK12-style,” the maker is telling you which legendary voice it is chasing. Two mics with the same electronics but different capsules will sound like different microphones; two mics with the same capsule and different electronics will sound like cousins.
What You Can Actually Afford
These are the legends. But here is what matters for your studio right now: the condenser market has exploded. Today, excellent large-diaphragm condensers are available at a fraction of vintage prices. The Rode NT1 is known for its exceptionally low self-noise. The Audio-Technica AT2020 is one of the most popular entry-level studio condensers in the world. The Aston Origin is a modern British design with a built-in pop filter and shock mount. All of them deliver professional-quality results, and all of them are found in home and commercial studios worldwide. You do not need a $10,000 microphone to make a great record. You need the right microphone for the source.
My first LDC was a Rode NTK I bought used for $150 in college. I tracked vocals through it for two years before I could afford anything better, and you can still hear those takes on early demos buried in my archive somewhere. It is not the same caliber as a $5,000 U 87—of course it is not—but a nineteen-year-old kid with a Rode NTK and a quiet bedroom can record a vocal that sounds professional. That has been my answer to every student who asks “which condenser should I buy?” for the last fifteen years: pick the best one you can actually afford, learn it inside and out, and only upgrade when you have outgrown it. Most people never outgrow a decent LDC. The microphone is rarely the limiting factor in a recording—the room is, the source is, the performance is. Spend on those first.
What you do get when you spend more is consistency. A $200 condenser will sound great on some sources and middling on others. A $3,000 condenser sounds great on almost everything you put in front of it—less variance from source to source, more forgiving placement, more pleasant character even when the room is imperfect. At the high end you are paying for the sound on sources the budget mic would have struggled with—and, just as important, for how the recording behaves once you process it. Here is the part nobody tells you: a cheap mic often sounds great at the moment of tracking, sometimes even brighter and more “finished” than an expensive one, because budget mics are frequently voiced bright to flatter on first listen. The difference shows up later. Push a cheap mic hard with compression and EQ and it tends to get brittle and fall apart; an expensive mic stays composed—it takes processing gracefully, and that is where it earns its price, often not until you are deep into the mix or the master.
Small-Diaphragm Condensers (SDC)
Small-diaphragm condensers (SDC), with diaphragms typically under one inch, trade the warmth and body of an LDC for superior transient response and accuracy. Their lighter diaphragms need less air pressure to move, which means they react faster to sharp attacks and capture extended high frequencies with precision. This makes them ideal for acoustic guitars, percussion, hi-hats, drum overheads, and any source where you need to hear every detail of the attack. The Neumann KM 184 is a studio standard SDC for acoustic guitars and cymbals. SDCs are commonly used in matched stereo pairs for overhead and ambient recording. When buying SDCs for serious stereo work, look for factory-matched pairs that hold their frequency response and sensitivity within roughly ±1 dB of each other across the audible spectrum—unmatched pairs introduce subtle phantom-image shifts and frequency-dependent panning artifacts that no plugin can fully repair after the fact. (More on stereo techniques in Chapter 6.)
Electret Condensers
A subcategory worth understanding is the electret condenser microphone. Instead of requiring an external charge, the electret uses a permanently charged material embedded in the capsule. Most lavalier microphones and the small condenser capsules built into smartphones, laptops, and field recorders are electret designs. They still require a small amount of power for their internal amplifier (often supplied by phantom power or a battery), but the capsule itself carries a permanent charge. Electret technology is why you have a working microphone in your phone right now. Lavalier (lapel) mics in particular are the workhorse of film, television, broadcast, and ADR—the tiny clip-on you see on every interview subject and actor is almost always an electret condenser, chosen for its size, low cost, and consistency.
Polar Patterns
suggest a correctionA microphone's polar pattern describes how sensitive it is to sound arriving from different directions. A polar diagram is a two-dimensional map showing the mic's output level at each angle relative to the front of the capsule. The farther the plot extends from the center at a given angle, the more sensitive the mic is to sound from that direction. Some microphones have a fixed polar pattern; others can switch between patterns via a selector on the mic body or its power supply.
Understanding polar patterns is not academic—it is one of the most practical skills in recording. Choosing the wrong pattern means picking up sound you did not want, or rejecting sound you did.
Where Polar Patterns Come From
Every polar pattern in the catalog—cardioid, supercardioid, hypercardioid, figure-8, omni—descends from exactly two primitive transducer behaviors. Once you understand them, the patterns stop being a memorization exercise and start being a physics payoff.
Pressure microphones seal the back of the diaphragm so only the front face is exposed to the air. The diaphragm responds to instantaneous pressure at a single point—the same pressure regardless of which direction the wave arrives from—so the sensitivity is identical at every angle: a perfect sphere, which is the omnidirectional pattern. Two practical consequences fall out of this geometry. First, because a pressure mic responds to a scalar quantity (pressure has no direction), it exhibits no proximity effect—the bass buildup that plagues directional mics is absent. Second, the omni's low-frequency extension is the most natural of any transducer type; with no acoustic delay network in the signal path, there is nothing to disturb the wave below a few hundred hertz. This is why omni condensers remain the first choice for wide, uncolored room capture, classical ambience, and any application where honest low-end matters more than isolation.
Pressure-gradient microphones expose both faces of the diaphragm to the sound field, so the element responds to the difference in pressure between front and back—a gradient quantity that has direction built in. A wave arriving from the side applies equal pressure to both faces simultaneously: the difference is zero, and the output is zero. That is the deep null at 90 degrees that defines the bidirectional (figure-8) pattern. A wave arriving head-on maximizes the pressure difference; one arriving from directly behind creates the same difference in the opposite polarity, producing the rear lobe. Because the gradient is proportional to distance from the source as well as to frequency, pressure-gradient transducers exhibit maximum proximity effect—deeper and stronger than any cardioid, which is why ribbon microphones demand extra attention to working distance when you are close-micing. That same property is also the figure-8's greatest tool: the sharpest nulls of any pattern, which is what makes it indispensable in M/S and Blumlein stereo work (see Chapter 6).
Mixed pattern — Every pattern between omni and figure-8 is a recipe: a weighted sum of a pressure response and a pressure-gradient response. A cardioid is approximately half-and-half. An acoustic delay network—a labyrinth of ports, tunnels, and resistive materials behind the capsule—introduces a frequency-dependent phase shift in the rear-entering sound, so that the rear signal arrives at the diaphragm equal in amplitude but opposite in phase to the front signal and cancels. Tighten the weighting toward the gradient side and the rear lobe disappears, the front narrows, and a rear lobe smaller than the main lobe emerges: supercardioid, then hypercardioid.
Multipattern condensers: two back-to-back diaphragms. The Neumann U 87 and AKG C 414 can switch between cardioid, omni, and figure-8 without any moving parts. The reason is a dual-capsule architecture: two back-to-back cardioid diaphragms, each with its own backplate, stacked inside a single body. The front capsule faces forward; the rear capsule faces backward. By summing the two signals at varying relative levels and polarities, any combination along the omni-to-figure-8 continuum becomes available. Front only, rear muted arrow cardioid. Both in phase at equal level arrow the two cardioid responses add in all directions, collapsing to omni. Front and rear at equal level but with the rear polarity inverted arrow the front lobes reinforce, the rear lobes cancel, and a figure-8 emerges. Every pattern in between is a blend. That is why the U 87 pattern switch exists at all—it is not a mechanical iris, it is an analog sum.
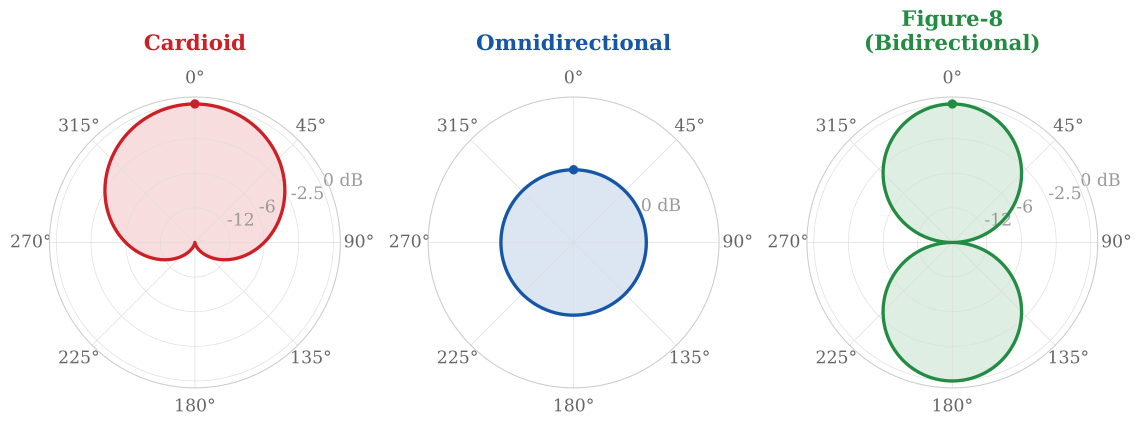
Cardioid
Cardioid is the most common polar pattern, named for its heart-shaped pickup area (from the Greek cardi, meaning “heart”). A cardioid microphone picks up primarily from the front, partially from the sides, and rejects sound from the rear. This makes it the default choice when you need isolation—recording one instrument without picking up everything else in the room. Cardioid microphones exhibit proximity effect (an increase in bass response when the source is very close) and off-axis coloration (high-frequency attenuation of sound arriving from the sides or rear).
Variations include supercardioid and hypercardioid. Both offer a tighter front pickup angle than standard cardioid and stronger rejection from the sides—but both also introduce a small rear lobe: a pocket of renewed sensitivity directly behind the microphone, where it starts picking sound up again even as it rejects the sides. Hypercardioid has a noticeably larger rear lobe than supercardioid, with an even narrower front pattern. The practical implication: when you point a hypercardioid at a singer in front of you and there is a loud monitor or guitar amp directly behind the mic, that source will leak into the recording from the rear lobe. Supercardioid splits the difference—tighter than cardioid, less rear sensitivity than hypercardioid. Both are excellent for close work in tight stages or studios with bleed problems, as long as you stay aware of what is directly behind the capsule.
Shotgun (Lobar)
Shotgun microphones are the most directional cousin in the cardioid family. They use a long interference tube in front of the capsule to create an extremely narrow forward pickup pattern called a lobar pattern—tighter than hypercardioid, with very strong rejection of off-axis sound. The trade-off is uneven off-axis frequency response: sound that does leak in from the sides arrives colored and unnatural-sounding, because the interference tube does not cancel all frequencies equally. Shotguns are the de facto standard for film, video, and location work, where a boom operator needs to isolate dialogue from a noisy environment without using a lavalier. The Sennheiser MKH 416 has been the film/TV boom microphone for decades; the Sennheiser MKH 8060 and the Rode NTG series are popular modern alternatives. In the studio, shotguns occasionally appear on hard-to-isolate sources or for capturing ADR-style dialogue, but cardioid and hypercardioid almost always serve studio work better. If you are tracking music, you will rarely reach for a shotgun—but the moment you start working in video, post, or location audio, the shotgun becomes the most important pattern in your kit.
Bidirectional (Figure 8)
Bidirectional (Figure 8) microphones pick up equally from the front and the back while rejecting sound from the sides. That strong side rejection is the key to understanding when and why you would choose this pattern.
A single bidirectional microphone can record two sources at once—two vocalists standing on opposite sides of the mic, or two acoustic instruments facing each other across the capsule. The front picks up one source, the rear picks up the other, and the dead sides reject everything else. This was standard practice in early radio and recording studios, and it still works beautifully today.
The figure-8 pattern becomes even more powerful when you use two bidirectional microphones together. A singer-songwriter who sings and plays acoustic guitar simultaneously is one of the most common recording scenarios—and one of the hardest to capture with good separation. The solution: place one bidirectional mic on the vocal and one on the guitar, with each mic's null side (the dead side) aimed at the other source. Because figure-8 mics reject sound from the sides so strongly, the vocal mic picks up much less guitar and the guitar mic much less voice—noticeably better separation than two cardioids would give you in the same position. You will still hear some bleed; the figure-8 null is strong, not perfect. But the improvement is real and often the difference between usable and not.
I once recorded a singer-songwriter who refused to track voice and acoustic guitar separately—she said her timing fell apart when she could not feel both at once. Two cardioids gave us bleed in every direction; the vocal mic heard the guitar, the guitar mic heard the voice, and nothing was clean. We swapped to two figure-8 ribbons with the dead sides aimed at each other and the bleed dropped dramatically—not to silence, but enough that each mic was finally usable on its own. The album version is that take, recorded in a single afternoon. The polar pattern made the session possible.
Because the rear lobe picks up as much as the front, bidirectional microphones also naturally capture more room sound than cardioid mics—which can be a powerful tool in a great-sounding room, adding depth and dimension to the recording. And the figure-8 pattern is essential to the Blumlein stereo technique: two bidirectional microphones placed at the same point with their capsules angled 90° apart, creating a remarkably natural and immersive stereo image with accurate localization (more on stereo techniques in Chapter 6).
Most ribbon microphones are naturally bidirectional due to the physics of their ribbon element. The figure-8 pattern exhibits the strongest proximity effect of all directional patterns—even more than cardioid—because the mic is equally pressure-gradient sensitive on both sides. When close-micing with a bidirectional ribbon, expect a significant bass boost that may need to be managed with distance or EQ.
Three more figure-8 moves belong in your toolkit. First, aim the null at the problem: the pattern's rejection is surgical enough to point at a click-bleeding headphone, a noisy computer fan, or the loudest cymbal in the room—think of the null as a beam of silence you can steer, and remember it works in three dimensions (above and below the mic too, since the null is a full plane around the ribbon's sides). Second, the two-hosts-one-mic trick: a single figure-8 captures two people facing each other across it—each speaks into a hot lobe, and the nulls reject the room to the sides. Podcasters and interviewers have used this since the radio era, and it guarantees both voices share identical tone. Third, the figure-8 is the engine of Mid/Side: the entire M/S technique (Chapter 6) depends on a figure-8's symmetrical, out-of-phase lobes serving as the Side channel—one more reason a good bidirectional ribbon earns permanent shelf space. A placement discipline runs through all three: degrees matter. Rotate a figure-8 ten degrees and the null moves off its target entirely—set it by ear with the source playing, not by eye.
Omnidirectional
Omnidirectional microphones pick up sound equally from all directions. Because they have no directionality, they add very little coloration, respond better to plosives (hard “p” and “b” sounds), do not exhibit proximity effect, and are less prone to phase issues than directional mics. The trade-off: they pick up everything—room sound, background noise, bleed from nearby sources. In a well-treated room, omnidirectional mics can sound stunning. In a poorly treated room or a situation requiring isolation, cardioid is almost always the better choice.
| Microphone | Electronics | Polar Pattern(s) |
|---|---|---|
| Shure SM57 | None (passive dynamic) | Cardioid |
| Shure SM7B | None (passive dynamic) | Cardioid |
| Neumann U 87 | Solid State (FET) | Cardioid, Bidirectional, Omnidirectional |
| Neumann U 47 | Tube | Cardioid, Omnidirectional |
| AKG C 12 | Tube | Nine patterns (omni to figure-8) |
| Royer R-121 | Passive (no electronics) | Bidirectional |
| Sony C-800G | Tube | Cardioid, Omnidirectional |
Microphone Specifications
suggest a correctionI used to read mic spec sheets the way a teenager reads sports stats—obsessively, with no real idea which numbers actually predicted how the mic would sound on a source. Then I started running A/B sessions and learned which specs matter for which jobs. Here is what those numbers actually mean once you have lived with them in the studio.
Loudness and Noise Specs
Max SPL (Maximum Sound Pressure Level) is the loudest sound the mic can handle before its output distorts or clips, measured in dB SPL. A mic rated at 130 dB SPL can handle a snare drum at close range; one rated at 148 dB SPL can handle virtually anything. Higher is better for loud sources.
Self-Noise is the amount of noise the microphone generates on its own, measured in dBA. Lower is better, especially for quiet sources—whispered vocals, distant room ambience, classical recording. An LDC with 7 dBA self-noise is exceptionally quiet; one at 20 dBA will be noticeably hissy on delicate sources.
Dynamic Range is the usable range between self-noise and max SPL. A wider dynamic range means the mic can accurately capture both very quiet and very loud sounds.
Signal-to-Noise Ratio (SNR or S/N) is the difference between a reference signal level and the self-noise floor, measured in dB. Higher is better. This tells you how much useful signal the mic produces relative to its own noise.
Sensitivity is how much voltage the mic produces for a given sound pressure level, expressed in millivolts per pascal (mV/Pa) or in dBV per pascal. A higher sensitivity means more output, which means less preamp gain is required to reach a usable recording level. Typical ranges:
- Moving coil dynamics: 1–6 mV/Pa (low output—needs significant preamp gain)
- Passive ribbon mics: 0.5–6 mV/Pa (very low output—needs a high-quality, low-noise preamp; active ribbons run much higher, like condensers)
- Condenser microphones: 8–32 mV/Pa (highest output—needs the least gain; small-diaphragm models typically sit in the lower half of the range, large-diaphragm models toward the top)
This is why a quiet source on a moving coil dynamic forces you to crank the preamp into noisy territory while the same source through an LDC arrives strong with the preamp barely working. When you see sensitivity on a spec sheet, you are reading a prediction of how hard your preamp will have to work.
Quality and Character Specs
Frequency Response describes how sensitive the mic is to different frequencies across the audible spectrum. No microphone has a perfectly flat response; each emphasizes or attenuates certain ranges. A dynamic vocal mic like the SM58 rolls off bass below 100 Hz, peaks in the 5–6 kHz presence range for vocal clarity, dips near 7–8 kHz to control sibilance, and rolls off above 15 kHz. That tailored response is not a limitation—it is exactly why it sounds great on vocals. Understanding frequency response is key to selecting the right microphone for each source.
Transient Response is the microphone's ability to accurately reproduce rapidly changing sound—the attack of a drum hit, the pluck of a string, the crack of a snare. Lighter diaphragms (small-diaphragm condensers) generally have faster transient response than heavier ones (moving coil dynamics).
Total Harmonic Distortion (THD) measures the harmonic distortion the microphone introduces. Less THD means a cleaner, more transparent sound; more THD can add warmth, fullness, and character. Ribbon mics generally have the least THD; tube condensers often have the most—which is precisely why engineers choose tube mics when they want that extra warmth.
Practical Specs
Durability varies dramatically by type. Dynamic moving coil mics are nearly indestructible. Condensers require more care—moisture, physical shock, and mishandled phantom power can cause damage. Ribbon mics are the most fragile: strong air blasts, rough handling, and phantom power (on many models) can end their lives.
Pad Switch—Many condenser microphones include a built-in attenuation pad (typically −10 dB or −20 dB) that reduces the signal level before it reaches the mic's internal electronics. If you notice distortion even with the preamp gain turned all the way down, the problem is not the preamp—it is the mic's own capsule or amplifier overloading. Engage the pad. This is one of the most commonly missed troubleshooting steps in recording.
High-Pass Filter—Many condensers also carry a switchable on-mic roll-off (typically 40–80 Hz, sometimes 100–160 Hz) that cuts rumble at the capsule, before the signal ever reaches the preamp. It is distinct from the high-pass filter on your preamp or channel strip, and it is the right tool when stage rumble or footfall is polluting the capture itself.
Choosing the Right Mic
suggest a correction“I'm of the philosophy that everything is an EQ. Change the mic, change the sound. Move the mic, change the sound.”
—Al Schmitt (20-time Grammy winner; engineered Frank Sinatra, Ray Charles, Steely Dan, Paul McCartney, Diana Krall)
You now have the full vocabulary you need: transducer types, polar patterns, and the specifications that describe them. Time to put it all together. When you walk into a session and reach for a mic, start by asking three questions:
1. How loud is the source? Extremely loud sources—snare drums, guitar amplifiers cranked to stage volume, brass instruments at full blast—favor moving coil dynamic microphones, which can handle high SPL without distorting internally. If you are recording a screaming vocal through a sensitive condenser and the signal is distorting even with the gain turned down, the microphone's own capsule may be overloading. Switch to a moving coil dynamic, or engage the condenser's pad switch. On the other end of the spectrum, very quiet sources—a whispered vocal, a soft fingerpicked guitar, distant room ambience—favor condenser microphones. Because condensers produce a much stronger output signal, they require far less preamp gain to reach a usable recording level. Less gain means less preamp noise, which means a cleaner, quieter recording. A moving coil dynamic on that same whispered vocal would need the preamp cranked so high that you would hear hiss competing with the performance. Ribbon microphones fall in the middle: they handle moderate to high SPL well but their very low output means quiet sources will require a high-quality, low-noise preamp with plenty of gain.
2. How much detail do you need? If you need to capture every nuance—the breath before a vocal phrase, the finger noise on an acoustic guitar, the shimmer of a cymbal's decay—reach for a condenser. Small-diaphragm condensers are especially accurate with fast transients; large-diaphragm condensers add a flattering fullness along with the detail. If you want to capture the essence of the source without microscopic detail (which can sometimes be a liability in a dense mix), a moving coil dynamic or ribbon may be the better choice. Ribbons will give you a natural, three-dimensional image with rolled-off highs; moving coil dynamics will give you a focused, midrange-forward sound.
3. What character do you want? This is the most important question, and it is the one that takes years of experience to answer instinctively. A ribbon mic will smooth out a harsh guitar amplifier with its natural warmth and low harmonic distortion. A large-diaphragm condenser will add presence and air to a vocal. A moving coil dynamic will give you a punchy, midrange-focused sound that cuts through a mix without needing much EQ. The goal is not to find the “best” microphone—it is to find the mic whose personality complements the source.
There is one more character variable layered on top of all this: tube vs solid-state electronics. Tube condensers (the U 47, U 67, C 12, C-800G, ELA M 251) add warmth, harmonic richness, and a softer top end—they flatter sources that lean clinical or harsh. Solid-state condensers (the U 87 and the C 414) are cleaner, faster, and more transparent—they reveal a source as it really is, for better or worse. Neither is a default; the choice depends on what you want to add to the source, or what you want to leave alone. We will return to the tube/solid-state question in depth when we discuss preamps later in this chapter, because the same warm-vs-clean trade-off plays out at every stage of the signal chain.
The only way to develop this instinct is to listen. Record the same source with three different microphones. Compare. Over time, you will start to hear these personalities before you even plug in. After a few hundred sessions, you will walk into the live room, see the source, and reach for the right mic without thinking. That instinct—knowing that every mic choice is really an EQ decision, that changing the mic changes the sound—is what Al Schmitt meant in the quote that opened this section.
Tubes, Transistors, and Preamps
suggest a correctionBefore transistors became widely available, microphone electronics used vacuum tubes (valves). Tube microphones tend to have a warmer, more colored sound with pleasant harmonic distortion, while modern solid-state (transistor/FET) designs offer wider, flatter frequency response and lower noise. Neither is inherently “better”—the choice depends entirely on the sound you are after. Want transparency and accuracy? Solid-state. Want warmth and character? Tube. The best engineers keep both options available.
Here is what that tube (or transistor) is actually doing. A condenser capsule is a capacitor with an enormously high impedance and a vanishingly small output—far too weak and too high-impedance to drive a cable on its own. So every condenser puts an active component right behind the capsule to convert that signal down to a low impedance that can travel down the line without losing level or picking up noise. In a tube mic, a vacuum tube does that job, adding its characteristic harmonic warmth in the process. In a solid-state mic, a FET (field-effect transistor) does the same job more cleanly and with lower noise. Same function—impedance converter for the capsule—two different flavors. That is the whole tube-versus-solid-state story in a single component.
I once did a side-by-side comparison session where we tracked the same vocalist through a tube U 47 and a solid-state U 87 with identical preamp, identical chain, identical performance window. Both sounded great. Both sounded different. The tube mic added a bloom in the lower midrange and a softness on top that the solid-state did not have; the solid-state was cleaner, faster, more honest, more revealing of every detail—the good and the bad. There is no contest between them, only different tools for different jobs. That session is why our mic locker has both.
The Preamp: Where the Signal Comes Alive
The signal a microphone produces is called microphone level—extremely weak, typically around −60 dBu. Line level is the standard signal strength of professional audio equipment: +4 dBu for professional gear, −10 dBV for consumer electronics. To bridge that enormous gap—to bring a mic-level signal up to line level so it can interact with the rest of your studio—you need a microphone preamplifier (mic preamp, or simply preamp). A professional microphone always connects to a preamp. This is the preamp's sole purpose: to boost the microphone's output to a usable level. Without one, the recorded signal in your DAW would be barely visible on the meter.
Here is what most beginners do not realize: the preamp can make as much of a difference in sound quality as the microphone itself. I have done sessions where we kept the same mic on the vocalist but swapped preamps three times. Each one changed the character of the recording dramatically—the same voice sounded punchy through a Neve, tight and aggressive through an API, and clean and detailed through an SSL. A low-quality preamp introduces excessive noise at high gains, exhibits poor distortion characteristics, and does not reproduce all frequencies equally. A great preamp either disappears entirely—or adds exactly the color you want.
This is especially true with microphones that require a lot of gain. A condenser with a strong output signal may only need 20–30 dB of preamp gain—at those levels, almost any decent preamp sounds fine. But a ribbon microphone or a moving coil dynamic on a quiet source might need 50–60 dB of gain or more. At those levels, every weakness in the preamp is amplified along with the signal: noise, distortion, frequency imbalances. This is why preamp quality matters most with low-output microphones—and why ribbon mic owners in particular tend to invest heavily in their preamps.
The Neve 1073 is the studio classic—warm, punchy, with musical harmonic saturation from its transformer-coupled design. Many faithful recreations exist from BAE, Heritage Audio, and AMS Neve itself. The API 512 delivers a tighter, more aggressive character. The Avalon VT-737sp is a tube channel strip combining preamp, EQ, and compressor in one unit—widely used in professional vocal chains for its warm, soft, almost pillowy character. The Universal Audio 610 is a tube preamp based on a classic 1960s design; it can run clean, but it is prized for the thick, aggressive tube distortion it produces when you drive its input hard. And the SSL Alpha represents Solid State Logic's clean, transparent preamp philosophy.
When setting preamp levels, always ensure the loudest moment from the performer does not cause the preamp to distort—unless that is your creative intent. It is always better to set levels conservatively than to discover distortion halfway through a perfect take. Preamp distortion cannot be undone in the mix.
Common Preamp Controls
Most preamps share a familiar set of controls, though not every preamp has every one. The standard set includes:
- Input gain (sometimes labeled “trim”)—the primary level control, raising mic-level signal toward line level. On preamps with both controls, pushing input gain harder drives the input stage into saturation for a grittier, more colored sound
- Output gain—a secondary level control on some designs. Back the input down and bring the output up for a cleaner sound; push the input and ride the output down to tame a deliberately overdriven one. Input drives the grit; output keeps it clean
- Phantom power (+48 V)—toggles condenser power on or off; engaged before the singer is at the mic, never with a ribbon plugged in unless the manual confirms it is safe
- Polarity (phase invert)—flips the polarity of the output by 180°, used to align mics that are out of phase with each other
- High-pass filter—rolls off low frequencies (typically 75–120 Hz) to remove rumble, AC handling noise, and proximity-effect bass buildup before it hits the preamp
- Pad—attenuates the input signal (typically −10 to −20 dB) to prevent the preamp's own input stage from overloading on hot sources
- Variable impedance—changes the electrical load presented to the microphone, altering tonal character (most dramatic on ribbons)
- DI input—a 1/4” jack for connecting instrument-level sources directly
Some preamps also include onboard EQ or compression—these are technically channel-strip features rather than pure preamp controls, and they will be covered in the dynamics and EQ chapters later.
Variable Impedance
Some preamps include variable impedance controls. As discussed in Chapter 4, impedance is the opposition to electrical flow in an AC circuit. Every analog device has input and output impedances. The microphone's output impedance is low (allowing more current to flow), while the preamp's input impedance is high (to develop a reasonable voltage). Variable impedance controls on a preamp alter the tonal character of the microphone: lower impedance settings can produce a warmer, darker sound, while higher settings produce a brighter, more open sound. Impedance changes affect ribbon microphones the most dramatically, because a ribbon's extremely low output and transformer-coupled design make it highly sensitive to the electrical load the preamp presents. Changing the impedance on a ribbon mic can transform it from dark and thick to open and airy—a much bigger shift than you would hear with a condenser or moving coil dynamic on the same preamp. If your preamp has a variable impedance control, experiment with it on every ribbon mic you use.
The DI (Direct Injection)
Most preamps also feature a DI (Direct Injection)—typically a TRS or TS (1/4”) jack used to match the impedance of unbalanced, high-impedance instruments like electric guitars and basses (a passive DI attenuates the signal rather than boosting it; an active DI adds modest gain). The DI matters for any session where you want a clean, dry electric guitar or bass signal in the DAW—usually for reamping later, or for layering with a mic'd amp. Standalone DI boxes (active and passive) handle this same job and are covered in detail in Chapter 9.
Cabling and Phantom Power Safety
The standard cable connecting microphones to preamps is the XLR cable—a balanced, three-pin connector that carries the audio signal plus ground, providing excellent noise rejection. Tube microphones typically use a dedicated multi-pin cable connecting the mic to an external power supply; the power supply then connects to the preamp via XLR.
Never connect or disconnect a condenser microphone while phantom power is engaged—this can damage both the microphone and the preamp. Turn phantom power off first, wait a few seconds, then connect or disconnect. And never send +48 V phantom power to a ribbon microphone unless the manufacturer's documentation specifically confirms the mic accepts it—on a passive ribbon design, phantom power can stretch or tear the ribbon element in seconds. If you are unsure, leave phantom power off until you have read the manual.
Modeling and USB Microphones: The New Rules
suggest a correctionThis chapter has built up a long list of rules. Condensers need phantom power. Every microphone needs a preamp. Character comes from the capsule and the electronics. Vintage tones come from vintage gear. We end with two modern developments that quietly break almost every one of them.
Modeling microphones use a high-quality neutral reference capsule paired with digital signal processing (DSP) to emulate the sonic characteristics of classic vintage microphones. The Slate Digital VMS (Virtual Microphone System) and the Universal Audio Sphere DLX (which began life as the Townsend Labs Sphere L22) both capture audio through a transparent, wide-range capsule and then apply precise digital models of legendary microphones—the U 47, C 12, SM7B, and dozens more—in software. The Sphere's dual-capsule, dual-output design can even change the polar pattern after recording, which means a decision that used to be irreversible at the moment of capture can now be revisited during mixdown. Instead of purchasing a locker full of vintage microphones, a single modeling system provides convincing approximations of dozens of classic sounds. They are not perfect replicas—purists will note differences—but for many applications, the results are remarkably close. The first time I heard a Sphere L22 in a blind A/B against a real U 87 on a vocal, I picked the wrong one. The model was not identical, but it was close enough that for everything except a critical mastering reference, the difference would not survive the mix bus. For engineers who cannot afford a vintage locker, modeling mics are a remarkable equalizer.
USB microphones have become ubiquitous in the era of podcasting, streaming, and home recording. A USB microphone is typically a small condenser microphone with a built-in analog-to-digital converter (ADC) and preamp, allowing it to connect directly to a computer without an external audio interface—no preamp, no XLR, no separate hardware. Plug it into a laptop, open a DAW, and record. The Shure MV7 is a notable exception—a hybrid USB/XLR dynamic microphone that brings the SM7B sound profile to the USB world. Other popular choices include the Rode NT-USB Mini, the Blue Yeti (now a Logitech brand), and the Audio-Technica AT2020USB+. One limitation to understand before you buy: a USB mic cannot be routed through your audio interface—it shows up as its own separate audio device, which means you cannot blend it with other interface inputs on the same track or take advantage of your interface's preamps. For a generation of podcasters, streamers, and home recordists, this is what “the studio” looks like.
But USB mics have real limitations. Because the ADC and preamp are built into the microphone, you cannot upgrade them independently. The conversion quality and preamp headroom are typically lower than dedicated outboard equipment. USB mics cannot be used with professional mixing consoles or outboard preamps. For serious studio recording, a dedicated audio interface paired with a quality XLR microphone and preamp will always offer more flexibility and better results. USB microphones are a great entry point—not a destination.
These two developments do not replace the foundations this chapter has built. A modeling mic still has a capsule with real polar-pattern behavior; a USB mic still has a self-noise floor and a max SPL. Everything you have learned about transducer types, polar patterns, and specifications still applies—it just applies to a different shape of microphone than the one our parents recorded with. The rules bend; they do not break.
Where Everything Begins
suggest a correctionThe microphone is the first device in the signal chain, and every decision after it—preamp choice, EQ, compression, mixing, mastering—builds on what it captures. A great mic choice on a great source through a great preamp gives you a recording that almost mixes itself. A poor mic choice gives you a recording you will fight for the rest of the project.
Think about what you have learned in this chapter. You now know that a moving coil dynamic handles punishing SPL without flinching, but trades away high-frequency detail and transient speed. You know that a ribbon captures the most natural, harmonically clean sound of any microphone type, but demands a great preamp and careful handling. You know that a condenser reveals every nuance of a performance—for better and for worse—and that its internal electronics can overload on loud sources where a moving coil dynamic would not even blink. You know that polar patterns are not just diagrams on a spec sheet—they determine what the mic hears, what it ignores, and how much of the room ends up in your recording. And you know that the preamp is not just a gain knob: it is a creative partner that shapes the signal as much as the microphone itself, especially with low-output mics that need every decibel of clean gain they can get.
Remember the vocalist from the start of this chapter? The one who sounded harsh through every expensive condenser but perfect through a $400 moving coil dynamic? That recording went on the album. No EQ on the vocal. No de-esser. The SM7B captured exactly the right character, and nothing else needed to change. That is the power of choosing the right microphone. It is not about the price tag, the brand name, or the spec sheet. It is about listening—really listening—and matching the microphone's personality to the source in front of you. Master that skill, and you will make great recordings with any budget, in any room, on any day.
Review Questions
Work these before moving on — every question is answerable from this chapter. Written answers live in the instructor Answer Key, available to course adopters.
- What is a microphone and what does it do?
- What are the two main classifications of microphones?
- True or False: Dynamic mics operate on the electrostatic principle while condenser mics operate on electromagnetic induction.
- Name and describe the two types of dynamic microphones and how they operate.
- How does a condenser microphone work, and what does it need to operate?
- Define these microphone specifications:
- Frequency response
- Polar pattern
- Signal-to-noise ratio
- Max SPL
- Self-noise
- Dynamic range
- Transient response
- Durability
- Total harmonic distortion (THD)
- Pad switch
- Describe the frequency response of a typical moving coil dynamic vocal microphone (such as the SM58). What frequencies does it emphasize? What frequencies does it attenuate? Why is this useful for vocals?
- Name and briefly describe each of the three main polar patterns (cardioid, bidirectional, omnidirectional).
- What is a preamp and what does it do?
- What are some common controls found on a preamp?
- True or False: It is safe to connect or disconnect a condenser mic while phantom power or tube power is turned on.
- What type of cable is used to connect a mic to a preamp?
- True or False: A professional microphone always connects to a preamp.
- If you have $5,000 to spend and need at least 8 mics and preamps to record drums, guitars, bass and vocals, research and describe what you would buy and why.
- How can variable impedance be a useful option on a preamp?
- What is the difference between a tube (valve) microphone and a solid-state microphone? When might you choose one over the other?
- What is a USB microphone? What are its advantages and limitations compared to a traditional XLR microphone with an audio interface?
- Why can phantom power damage some ribbon microphones but not moving coil dynamic microphones? Explain the difference.
- What is the difference between a large-diaphragm condenser and a small-diaphragm condenser? When would you use each?
- Name at least two affordable condenser microphones suitable for a home studio and explain why they are popular.
- Watch IN THE STUDIO with Asaf Fulks: Episode 2 [Comparing Classic Signal Chains] on YouTube and list your favorite signal chain.
- What is a modeling microphone and how does it differ from a traditional microphone? Name two examples.
- When and why would you engage a microphone's pad switch?
- What is an electret condenser microphone, and where are electret designs most commonly found?
- What is the proximity effect, and which polar patterns exhibit it?
- How do supercardioid and hypercardioid patterns differ from a standard cardioid?
- You are setting up to record a singer-songwriter with a warm, mellow voice who will also be playing acoustic guitar. Which type of microphone would you choose for the voice and which for the guitar? Explain your reasoning based on the mic types, polar patterns, and decision framework discussed in this chapter.
- What is microphone sensitivity and why does it matter when choosing a preamp? Compare typical sensitivity ranges for moving coil dynamics, ribbons, small-diaphragm condensers, and large-diaphragm condensers.
- Why are factory-matched stereo pairs important for serious stereo recording? What can go wrong when you use unmatched microphones for a stereo pair?
- What is a shotgun (lobar) microphone, when is it most useful, and what are its trade-offs? Name at least one professional shotgun model.
- A producer has two options for tracking a solo jazz trumpet at moderate volume: Chain A—a passive ribbon microphone through a transformer-coupled Neve 1073 preamp; Chain B—a large-diaphragm condenser through a clean, transparent solid-state preamp. Using the chapter's discussion of transducer character, THD, preamp color, proximity effect, sensitivity, and the three-question decision framework, analyze the trade-offs of each chain and recommend one. Justify your recommendation with at least three specific characteristics discussed in this chapter.
Studio Exercise: The Three-Mic Test
The fastest way to develop a mic-selection instinct is to put three different microphones on multiple sources and listen carefully to how each mic interacts with each source. The same mic that sounds incredible on a vocal can sound flat on a snare; the mic that captures an acoustic guitar perfectly might exaggerate the harshness of a screaming singer. You only learn this by hearing it—and you only hear it by testing the same three microphones across different material. No-studio option: no mics of your own yet? Do the listening and the written analysis on a free online mic-comparison set—the same source captured through several microphones—and defend your picks the same way.
Setup. Gather three microphones with different transducer types:
- One moving coil dynamic (SM57, SM58, SM7B, MD 421, or whatever you have)
- One condenser (LDC or SDC—a Rode NT1, AT2020, KM 184, or even a USB condenser if that is your only option)
- One wild card—a ribbon if you own one, a different condenser, a USB mic, or your phone's onboard mic for contrast
Then prepare three different sources you can perform consistently:
- Vocal—read a paragraph or sing a short verse
- Guitar—a strummed acoustic pattern or a clean electric chord progression
- Percussion—a hand-percussion loop, a shaker pattern, or a snare hit at a consistent dynamic
Method. For each source, record a clean 30-second take through each of the three microphones—nine recordings total. Keep the mic in the same position relative to the source between takes (roughly six to twelve inches away, on-axis), and gain-match by ear or by meter so the loudest peaks are at the same level across all takes. No EQ, no compression, no plugins. Save each file with a label like vocal_mic1_dynamic.wav, guitar_mic2_condenser.wav, percussion_mic3_wildcard.wav.
Listen. For each source, A/B the three mics. Where does each microphone emphasize the source? Where does it pull back? Which one feels right for that material—and just as important, which one feels wrong? Then compare across sources: the dynamic that excels on percussion may sound dull on vocals; the ribbon that sweetens a guitar amp may sound muddy on shakers. The same microphone is not the right answer for every job.
Submit. The nine labeled audio files plus a 200-word written reflection. Name the best mic for each source and explain why in terms of the concepts in this chapter—transducer type, polar pattern, presence peak, transient response, sensitivity, character. Then name your overall “most versatile” mic of the three and your “one-trick pony.”
This exercise builds the listening instinct that no amount of reading can substitute for. With repetition, you will start hearing the answer before you press record.