Chapter 11 · Pro Tools
Pro Tools: Introduction
“When someone comes in to work, especially an MC or singer, they should be able to walk up to the microphone, make a couple of noises, and you should press record.”
—Bob Power (Tape Op #60, 2007)
By the end of this chapter, you will be able to:
- Identify the four Pro Tools subscription tiers—Intro, Artist, Studio, and Ultimate—and explain how iLok dongle and iLok Cloud authorization work
- Configure the four foundational session settings—audio file type (WAV), sample rate, bit depth, and I/O paths—and explain why each should be set correctly before recording (sample rate especially is costly to change later)
- Explain non-destructive editing and describe what happens to source audio files on disk when clips are cut, moved, pitch-shifted, or time-stretched in Pro Tools
- Describe the Pro Tools session folder structure, identify the role of the .ptx session file as a map rather than a container, and explain why the entire session folder must travel together when moving sessions between studios
- Distinguish among the three Pro Tools plugin formats—AAX Native, AAX DSP, and AudioSuite—and select the appropriate format for a given recording or mixing scenario
- Navigate the Edit Window and Mix Window, select the correct edit mode (Slip, Grid, Shuffle, or Spot) for a given task, and apply the Smart Tool to perform trimming, selecting, and moving without switching tools
- Set the Playback Engine hardware buffer size appropriately for tracking versus mixing, and configure Automatic Delay Compensation to correct plugin-induced timing offsets
- Apply professional session-management practices by implementing a consistent naming convention, saving a reusable session template, enabling auto-backup, and following the 3-2-1 backup rule to protect completed work
When I started with Pro Tools, I had sixteen tracks. That was it. To make a full production work, I had to comp and bounce constantly—printing effects, committing tracks, freeing up space just to add one more element. Then I landed a major R&B session that pushed the system to its absolute limit, and I was forced to upgrade to thirty-two tracks. At the time, that felt like an ocean of space. Today, Pro Tools can handle thousands of tracks on a laptop. The tools have evolved beyond anything I could have imagined in that first sixteen-track room, and what you are about to learn puts more power at your fingertips than entire studios had twenty years ago.
This chapter will walk you through everything you need to know to open Pro Tools, set up a session, and navigate the software like a professional. By the end, you will understand the interface, the tools, the settings, and the habits that separate a working engineer from someone who just clicks buttons and hopes for the best.
What Is a DAW?
suggest a correctionA DAW (Digital Audio Workstation) is an electronic system capable of recording, editing, and playing back digital audio. Pro Tools is a DAW that runs on Windows and macOS. Digidesign's Sound Tools arrived in 1989 as a two-channel digital recording and editing system for the Macintosh—the first “tapeless studio.” Two years later, Digidesign released Pro Tools, initially supporting four tracks of audio. Digidesign was later acquired by Avid Technology. Today, Pro Tools remains the industry standard for audio recording, music production, film scoring, and post-production.
Other professional DAWs exist and are widely used—Logic Pro, Ableton Live, Studio One, FL Studio, Reaper, and Cubase all have loyal followings and legitimate strengths. We will compare them in the DAW Comparison boxes at the end of this chapter and throughout the book. The fundamental concepts taught here—session setup, editing, signal flow, buffer settings—apply across all DAWs. Learn Pro Tools to speak the industry's common language, then explore others to find the workflow that best suits your creative process.
I still remember the first time I opened Pro Tools. By college I was making music on Cool Edit Pro and Fruity Loops, and when it came time to go pro, I stood in a Guitar Center torn between a MOTU Digital Performer rig and a Pro Tools 003. I wanted the MOTU—it did 192 kHz. The rep talked me out of it: “When are you ever going to use 192k? The most important thing you can do right now is learn Pro Tools.” That was some of the best advice I ever got. I bought the 003, spent my last two years of college living in Pro Tools, and walked out with the single most marketable skill I had. Digital Performer is a fine program—but there is no job market for it. Learn the industry standard first. Forty years of recording history had compressed into a window I could fit on a laptop. Decades later, I still get that feeling on day one of a fresh session—the white screen, the cursor blinking on Track 1, the artist tuning up in the next room—like the work has not started yet but everything is poised to begin.
Pro Tools Versions and Pricing
suggest a correctionAvid offers Pro Tools in four tiers, and choosing the right one depends on your needs and budget. Most working engineers I know came up on older systems (Pro Tools LE, Mbox rigs, TDM) and moved up as their work demanded. The tiers are still a roadmap of a working life: start where you can, move up when the work outgrows the tier.
The Certification Path
Alongside the software tiers, Avid offers a formal certification ladder for engineers who want documented credentials. The current structure runs through Avid Learning Partner institutions (schools and online providers authorized by Avid to deliver the curriculum). Two levels are recognized: Pro Tools User and Pro Tools Operator. The User level covers the foundations—session setup, recording, editing, basic mixing, the concepts this chapter introduces and the next several build on. Operator goes deeper into advanced editing, signal routing, HDX hardware, and post-production workflow. Music and Post Production tracks run in parallel, with the coursework and the exam questions weighted toward each discipline. The entry sequence runs Pro Tools 101 and 110 (Fundamentals I and II) for the User credential, then Pro Tools 201 and 210 (Production I and II, in a Music or Post track) for the Operator credential, though Avid periodically revises course numbers and names—check avid.com/learn for current offerings before enrolling.
Here is the honest framing: a Pro Tools certification gets your résumé past the first filter at a facility or educational institution that lists it as a requirement. It proves to a hiring coordinator that you know the vocabulary and can find your way around the software without hand-holding. That matters at the door. Past the door, what carries the hire is your reel and your references—the work you have actually done and the people willing to vouch for it. This is consistent with the portfolio-first stance the book takes throughout: credentials open rooms, but they do not fill them.
The chapters you are reading now map directly onto the User-level scope and reach further. Session setup (this chapter), recording (Chapter 12), editing (Chapter 14), mixing (Chapters 15–18), and post-production (Chapter 20) together cover more ground than the 101 curriculum, with the additional context of working in a real studio rather than a classroom demo session. If you complete this book and work through its studio exercises, you will be prepared for the User exam—and the Operator exam will require only the additional HDX and post-specific material that your specific track covers.
Think of certification as one documented data point among many. It is worth having. It is not worth chasing at the expense of the reel.
Pro Tools Intro is free. It has limited track counts and features, but it is fully functional for learning. If you are a student reading this chapter for the first time, download Intro right now. It costs nothing, runs the same interface as the professional versions, and lets you follow along with everything in this book until you hit the track limit. Pro Tools Artist is the next step—a subscription tier with expanded track counts and plugin support, sized for home and project studios. This is what you upgrade to when Intro's limitations start holding you back, and for most home studios it is more than enough.
Pro Tools Studio is the full professional version: high track counts, Dolby Atmos support, and the advanced features that working engineers reach for daily. This is what most professional studios run, and what I use every day.
Pro Tools Ultimate is the flagship (formerly Pro Tools HD)—up to 2,048 tracks, HDX hardware acceleration, full Dolby Atmos rendering, and the highest I/O counts. You will find Ultimate in major recording studios and post-production facilities, the kind of rooms where a single session might have 500 tracks and 200 plugins running simultaneously.
Avid uses a subscription model, though perpetual licenses are sometimes available. Pro Tools requires authorization through an iLok—either a physical USB dongle that holds your software licenses, or iLok Cloud (internet-based authorization without the dongle). Setting it up is straightforward: create a free account at iLok.com, download iLok License Manager, plug in your dongle (or sign in to Cloud), and your purchased Pro Tools license drops onto it automatically. From then on, every machine you authorize talks to that iLok. Keep your dongle safe—losing it is like losing the keys to every piece of software you own.
Hardware and Computer Requirements
suggest a correctionPro Tools really wants two things: a dedicated audio interface (AD/DA converter) for clean sound in and out, and a computer with enough horsepower to do the processing. Strictly speaking the interface is not mandatory—you can run Pro Tools off a computer's built-in sound card (on Windows, via ASIO4ALL), and it will work, just not well: higher latency, worse converters, fewer I/O options. The processing, on the other hand, is the computer's job. For real work, an interface is strongly recommended; to simply learn the software, your laptop alone can get you started. The interface can be an Avid-branded device or any compatible third-party unit (Universal Audio, Apogee, Lynx, etc.). Many interfaces include built-in preamps and DI inputs—for a home studio, a good interface with two to four preamps is often all you need to get started.
For professional systems, Avid offers HDX hardware—PCIe cards with onboard DSP processors that handle plugin processing independently of the computer's CPU. HDX systems can run hundreds of plugins without breaking a sweat. HDX supports AAX DSP plugins specifically designed for this hardware.
On the computer side, I have seen students buy Pro Tools only to discover their laptop cannot handle more than a dozen tracks without stuttering—the audio starts crackling, plugins drop out, and the session becomes unusable. Do not let this happen to you. Key recommendations: use an NVMe SSD for the operating system and a separate SSD for Pro Tools sessions and audio files. Maximize RAM (32 GB minimum, 64 GB recommended for large sessions). Use the fastest multi-core processor available. A modern GPU also makes a real difference—it accelerates waveform rendering and video playback for post-production sessions, and AI-powered plugins are increasingly offloading their heaviest math to the graphics card. A solid GPU also contributes to overall system stability under high session load. Check Avid's website for the full compatibility list before you buy anything.
Non-Destructive Editing
suggest a correctionBefore digital audio, recording studios ran on tape. If you made a bad edit on tape, you physically cut the tape with a razor blade and spliced it back together. If you recorded over a section, the original was gone forever. There was no undo. Engineers lived in constant fear of accidentally erasing a perfect take.
Pro Tools changed everything. Non-destructive editing means that changes made to recordings can always be undone—the original audio files remain intact on disk. You can cut, move, stretch, pitch-shift, and rearrange audio all day long, and the source files never change. This single concept is the foundation of modern audio production. It is why you can experiment fearlessly, why you can try ten different arrangements of a chorus without committing to any of them, and why a mistake is never permanent.
Plugins
suggest a correctionPro Tools runs internal programs called plugins that provide virtual signal processing (EQ, compression, reverb), function as virtual instruments, or serve as meters and analyzers. Pro Tools ships with a comprehensive plugin bundle, and thousands of third-party plugins are available.
AAX Native is the standard plugin format. AAX Native plugins run in real time using the computer's CPU and are compatible with all Pro Tools systems.
AAX DSP plugins run on HDX hardware's dedicated DSP processors, freeing the CPU for other tasks. Compatible with Pro Tools Ultimate + HDX, and with the Pro Tools Carbon interface. The big practical win of AAX DSP is near-zero-latency monitoring through plugins while recording—you can track a vocalist through an Auto-Tune or a compressor and they hear the processed sound in real time, which a CPU-based native plugin cannot do without distracting latency.
AudioSuite plugins are different—they render their processing to a new audio file (non-destructive by default, leaving the original intact; an optional mode can overwrite the clip's audio in place) rather than running in real time on a track insert. There is no real-time CPU load, since the processing happens once and is committed to disk. You can still undo within the session like any other action, and the original unprocessed audio still lives in your Clip List (you can drag it back from there if you need to)—it just is not as instant as bypassing a real-time plugin. AudioSuite is the right tool when you want to commit a sound—a tuned vocal, a reversed reverb, a cleaned-up dialog clip—and free the insert slot for something else. This also makes AudioSuite the smart choice for latency-heavy processors. Plugins like iZotope RX carry so much processing delay you would never track through them—and stacking several in a mix can exceed Pro Tools' delay-compensation limit. Rendering them via AudioSuite sidesteps the latency entirely.
Earlier versions of Pro Tools used RTAS and TDM plugin formats, both replaced by AAX starting in Pro Tools 11 (2013). You may encounter references to these legacy formats in older sessions or documentation. Plugin install paths vary by operating system: on macOS, AAX plugins live at /Library/Application Support/Avid/Audio/Plug-Ins; on Windows, they live at C: Program Files Common Files Avid Audio Plug-Ins. If a third-party plugin installs but does not appear in Pro Tools, those folders are the first place to check.
The frontier of studio technology is AI-powered processing. A new class of tools analyzes individual stems (drums, bass, vocals, guitars, keys, full mix) in real time and generates intelligent processing chains tailored to the source: EQ curves shaped to the spectral content, compression timed to the program material, saturation and stereo enhancement matched to the genre conventions of the input. Some run as standalone analysis tools that suggest a starting point; others as inserts that auto-adapt as the material changes. We explore AI-assisted production—including the author's own work in this space—in detail in Chapter 22.
Getting Started: Creating a Session
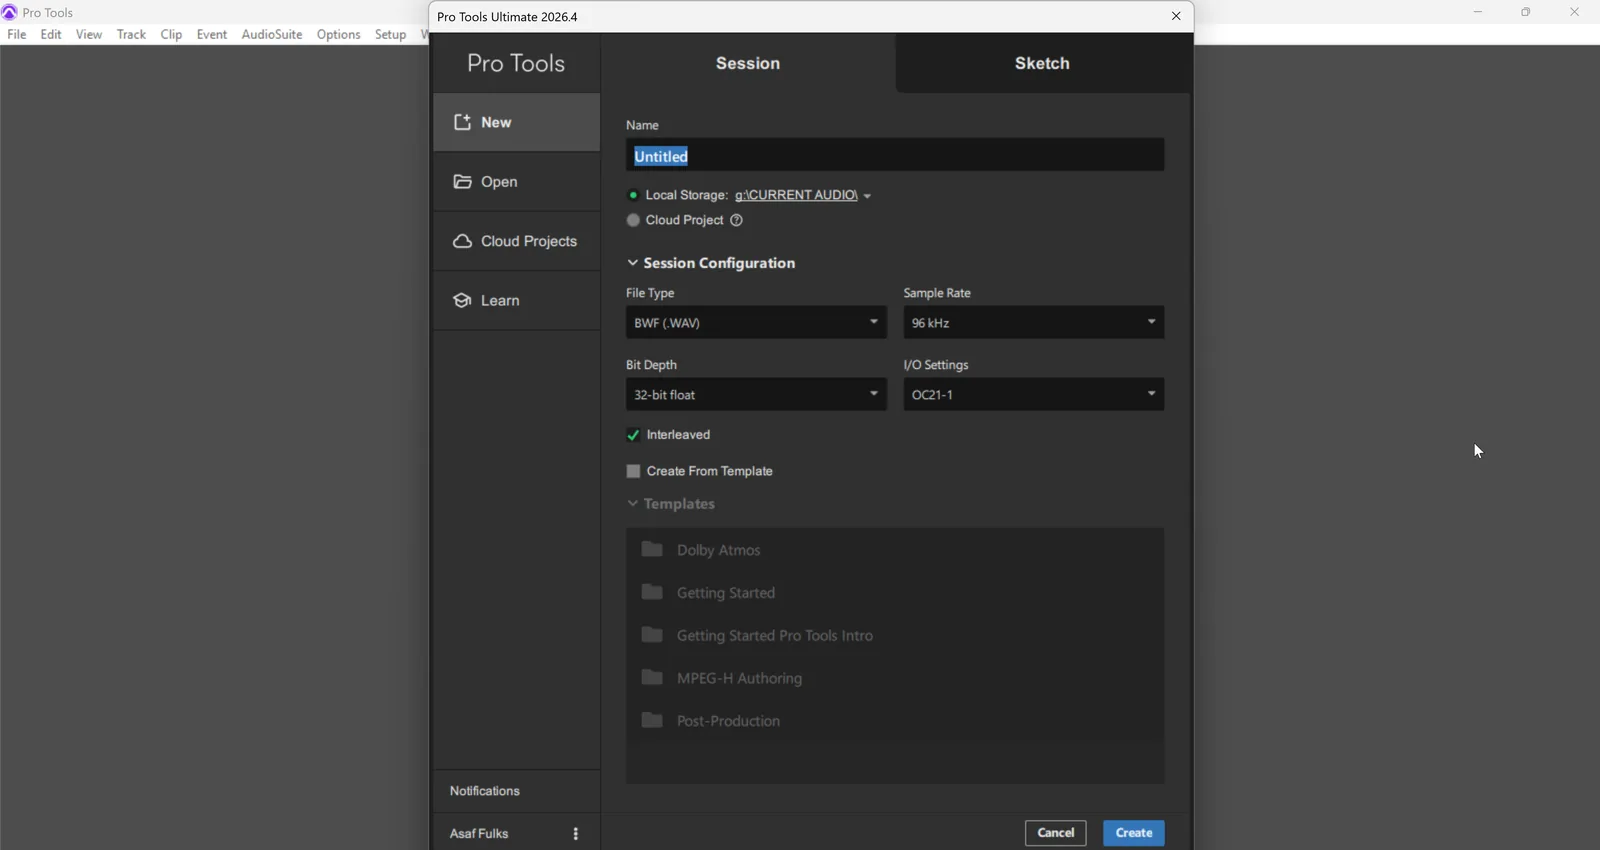
suggest a correctionWhen Pro Tools loads, its launcher opens with New, Open, and Cloud Projects tabs. The New tab lets you name the session, choose its storage location, set the file type, sample rate, and bit depth, and optionally start from a template; the Open tab lists your recent and saved sessions. When starting out, experiment with the included templates to see how professional sessions are structured—you can learn a lot by opening a template and studying how the tracks are named, routed, and organized. For most real work, create a blank session and build it yourself.
Templates are one of those features I ignored for my first two years and then suddenly could not work without. Once you build the right one—tracks pre-named, sends pre-routed, plugins pre-loaded, color coding done—a session that used to take fifteen minutes to set up takes thirty seconds. The Studio Exercise at the end of this chapter walks you through building your first one. Do it carefully, and the next eleven chapters move twice as fast.
Session Settings
suggest a correctionWhen creating a blank session, configure these four settings carefully—they affect every file you record. The first is audio file type. Pro Tools gives you a choice between .WAV (Broadcast Wave) and .AIFF. There is no quality difference between them; pick WAV. It is more universally compatible, and every studio you will ever send files to can open it without issue.
Next is sample rate. This determines audio quality and file size. Common choices are 44.1 kHz (legacy CD standard), 48 kHz (broadcast and video standard) (Pohlmann, 2010), and 96 kHz (high-resolution). For most music production, I work at 96 kHz—the high-resolution rate captures the cleanest detail and leaves the most headroom for processing—though Chapter 4's advice still holds: 48 kHz/24-bit is the safe universal fallback, and stepping down to it costs you very little. 48 kHz is the broadcast and video standard—it lines up cleanly with video frame rates—and 44.1 kHz is the legacy CD rate. For projects destined for hi-res streaming (Apple Music Hi-Res Lossless, Tidal), 96 kHz is a common target. Dolby Atmos is the exception—Atmos sessions run at 48 kHz, because the ADM BWF master Apple Music and Tidal accept is 48 kHz/24-bit (Dolby Atmos specifications) (Chapter 18 walks through the session setup). Higher sample rates eat more disk space and CPU power for diminishing returns at the listening end. I once delivered a production at 44.1 kHz to a video post house that needed 48 kHz. The sample-rate conversion on their end introduced a tiny artifact in the high frequencies that nobody could quite hear but everybody could feel. Because the session was built on virtual instruments and MIDI, we could re-render the whole thing natively at 48 kHz and the artifact never appeared—it was generated clean at the target rate. (If the tracks had been recorded audio, no re-render would have saved it; sample-rate conversion can't un-bake an artifact, and we would have had to re-record. That is exactly why you pick the rate at session start.) Conversion at the end is never as clean as printing it correctly the first time.
Set the session bit depth to 32-bit float for maximum headroom inside the DAW. It is worth understanding the chain: most A/D converters digitize at 24-bit, and that 24-bit stream is what arrives in Pro Tools—but the session stores and processes it as 32-bit float, whose enormous range means a level that would have squared off in a fixed 24-bit file can be pulled back intact. (Some modern interfaces now capture true 32-bit float at the converter too.) When delivering final masters, convert down to 24-bit (hi-res digital) or 16-bit (CD), applying dither during the conversion.
I/O settings are the last piece. The default (Stereo Mix) is fine to start, but every working engineer eventually builds their own I/O setup—named input/output paths, bus labels, and headphone routing that match their interface and their habits. Once you have one, you save it and load it on every session. (Import I/O settings when opening a session from another studio so the paths line up.) Click OK, choose a location on your dedicated audio drive, name the session, and click Save.
Session Folder Structure
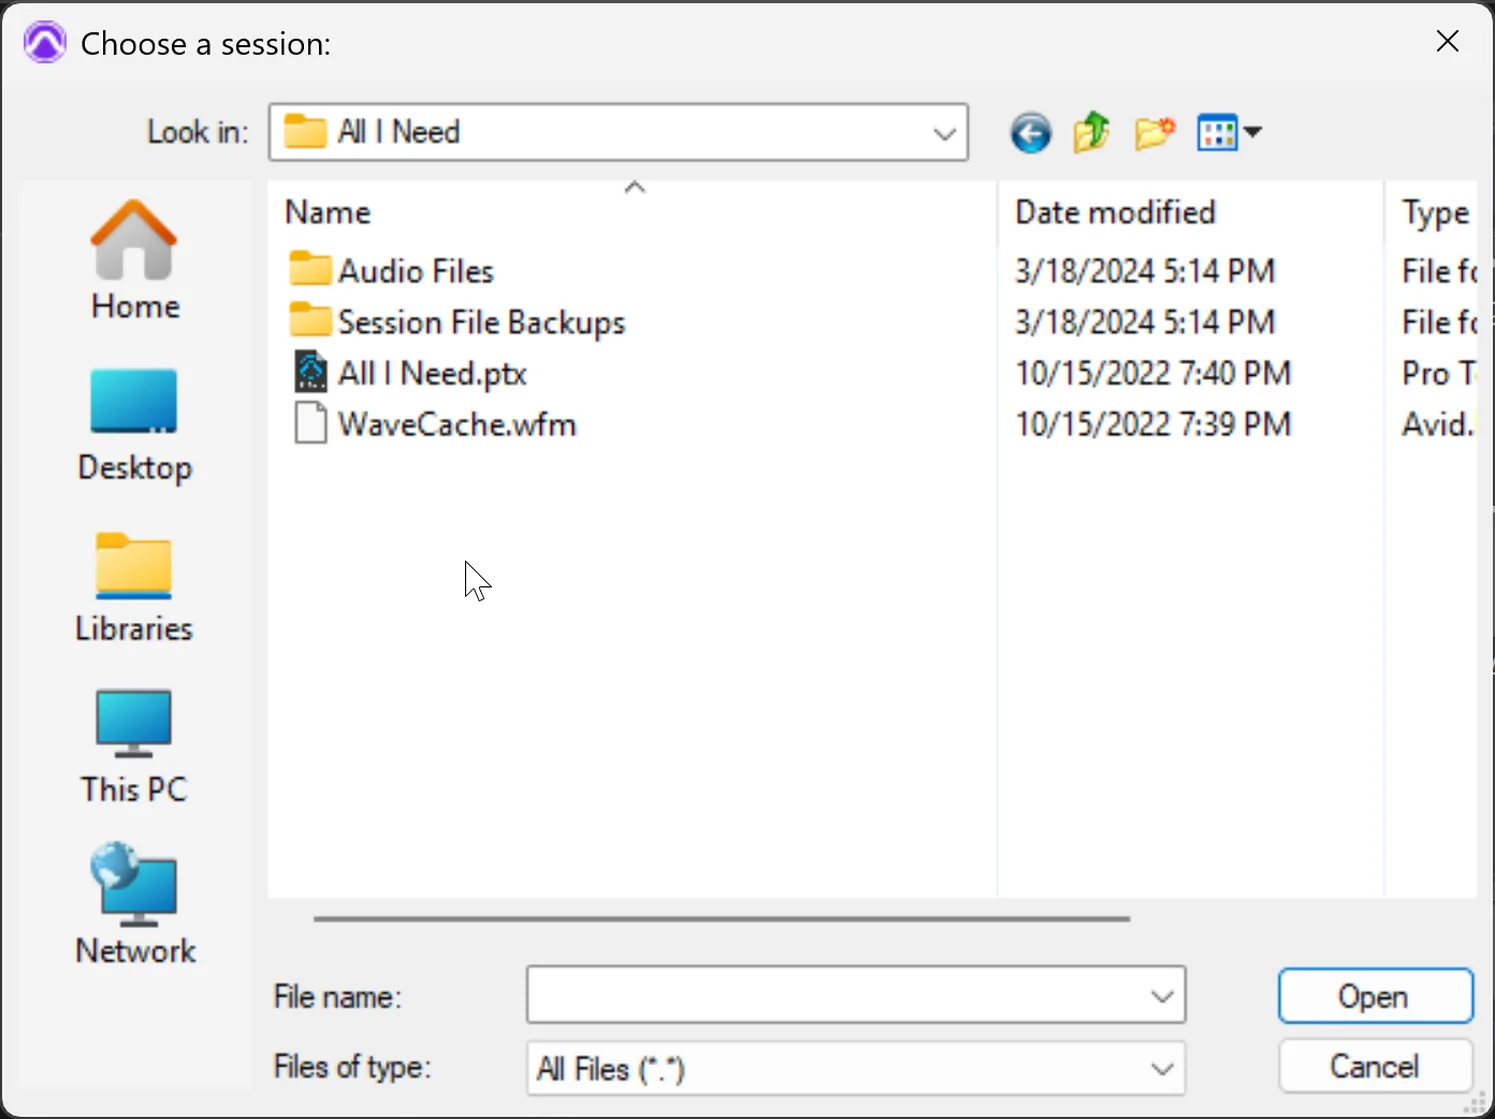
suggest a correctionPro Tools does not create a single file—it creates an entire folder structure for each session, and the session file at the top is only a map of where everything is. I once had a student drag the Audio Files subfolder to their desktop to “organize” their hard drive. When they opened the session the next day, every track was offline—italicized, sky-blue file names everywhere, no audio, pure panic. The session file is just a map; without the folders it points to, it is useless. Understanding this structure is non-negotiable.
The most important subfolder is Audio Files—all recorded and imported audio for the session lives here. Never move audio files out of it manually. Session File Backups hold automatic snapshots of the session file at intervals you configure (we set this up in Preferences in a moment). This feature has saved countless sessions; enable it immediately. Bounced Files is the default destination for exported mixes and bounces. Video Files stores video imported for dialog replacement, film scoring, or sound design. Clip Groups holds manually exported clips (formerly called Region Groups in older Pro Tools versions).
At the top sits the Pro Tools Session File itself, with the .ptx extension. This is the master file that ties everything together—a map referencing all audio, plugins, markers, tempo, settings, and layout. The session file is useless without its accompanying Audio Files folder. Always transfer the entire session folder when moving sessions between studios. The student who dragged the Audio Files folder learned this the hard way; you do not have to.
.ptx file with its Audio Files and Session File Backups subfolders.The Layout: Edit Window and Mix Window
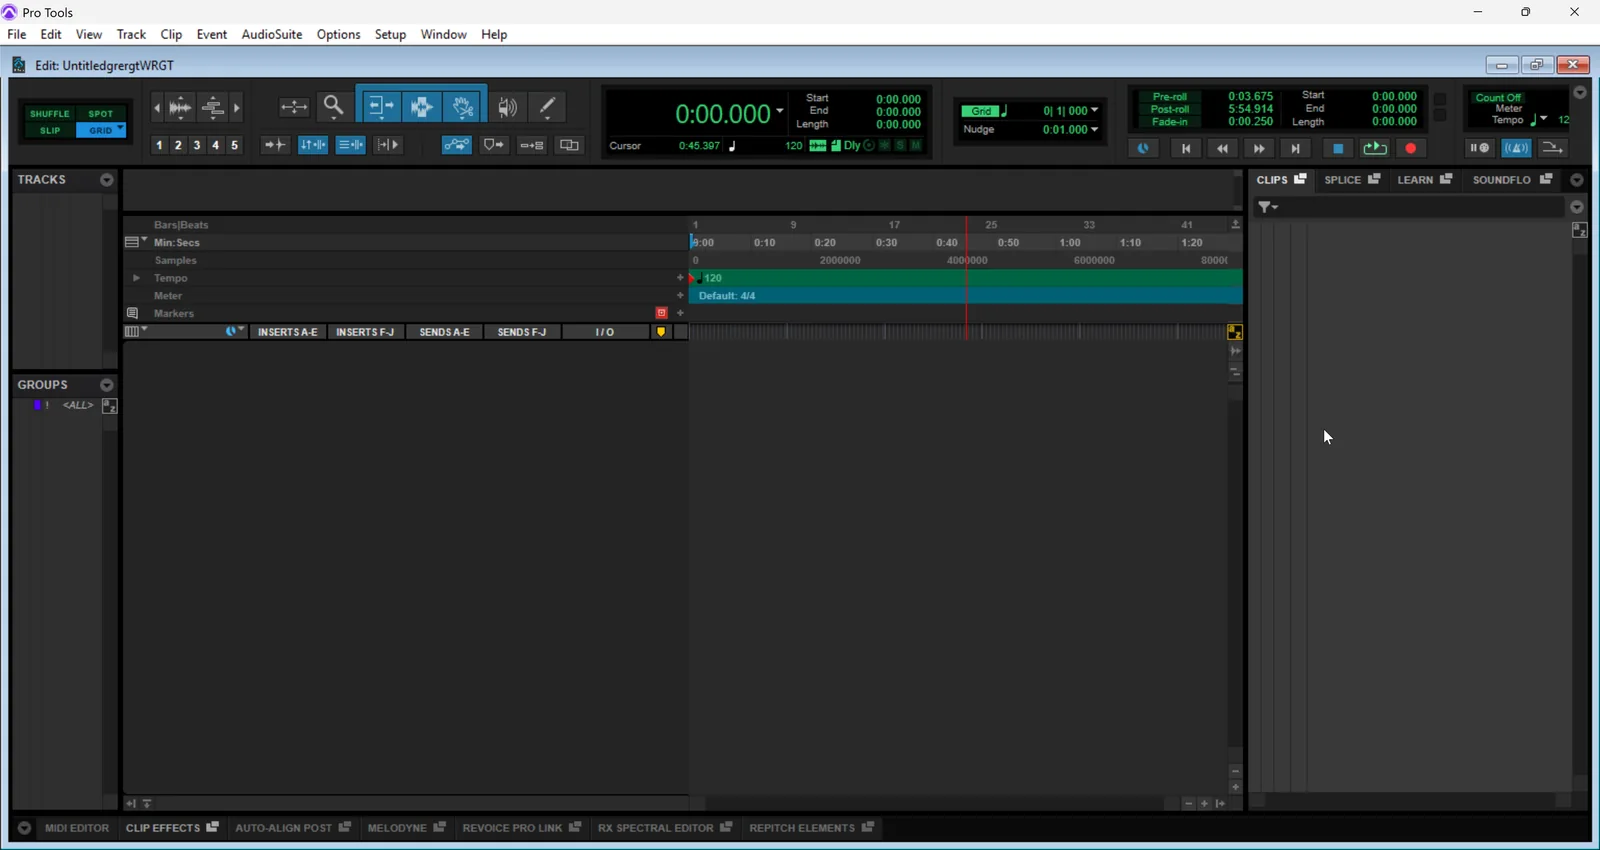
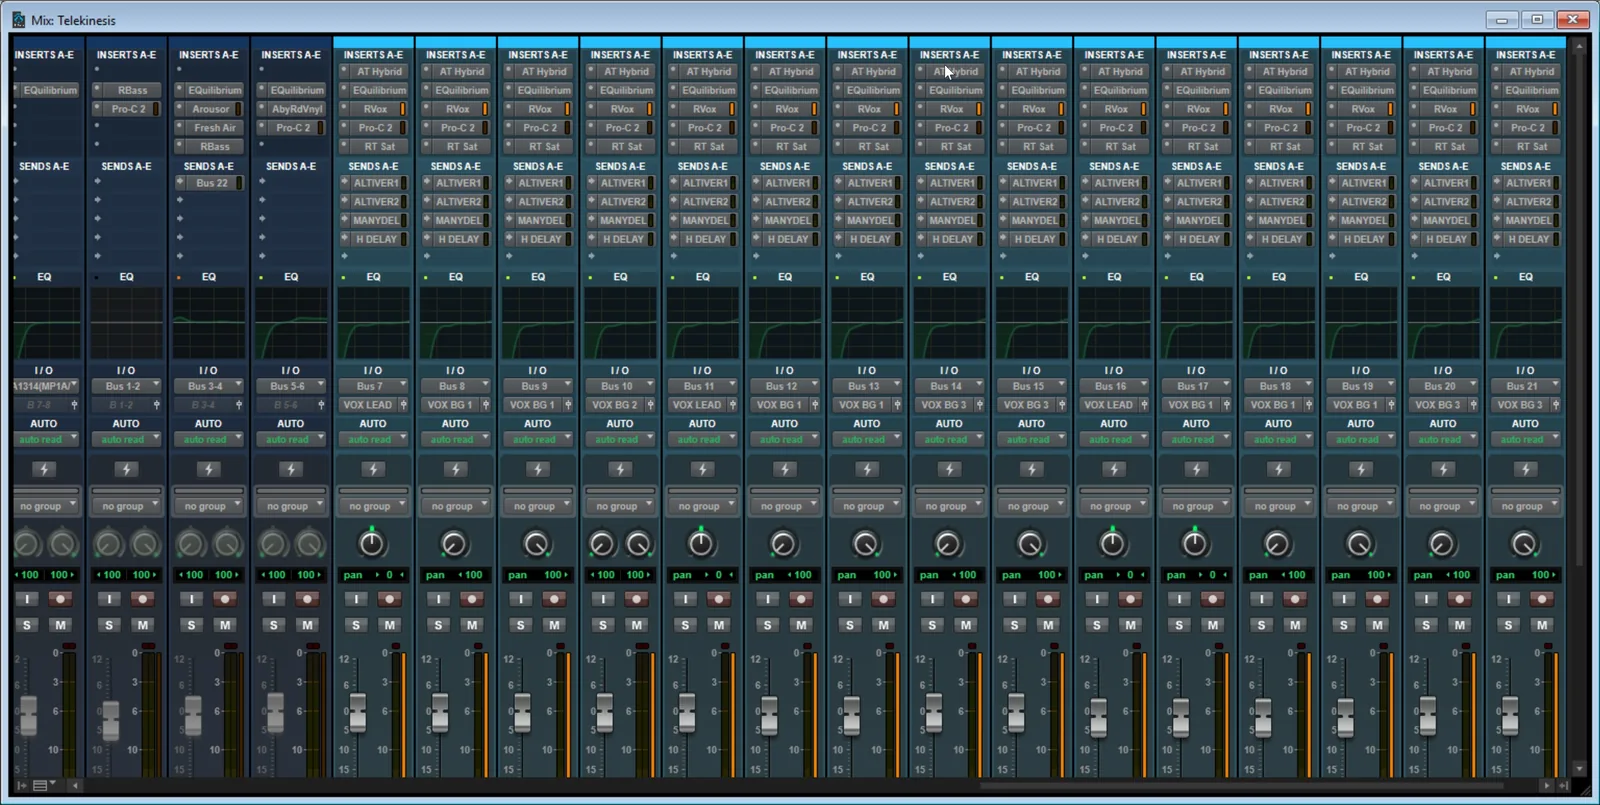
suggest a correctionPro Tools has two main windows. The Edit Window displays waveforms, clips, and the timeline—this is where you record, arrange, and edit. The Mix Window resembles a traditional analog console with vertical channel strips—this is where you balance levels, adjust panning, and route signal through plugins. Both windows provide access to faders, levels, plugins, sends, I/O, and panning, but the visual emphasis is different.
Use a dual-monitor setup to view both simultaneously—one screen for editing, one for mixing. It is one of those upgrades that, once you have it, you will never go back. I tried going back to a single monitor once when my second display died mid-session. It lasted about fifteen minutes before I drove to the store and bought a replacement. Switch between them with Ctrl+= (Windows) or Cmd+= (Mac).
Setting Up the Edit Window
suggest a correction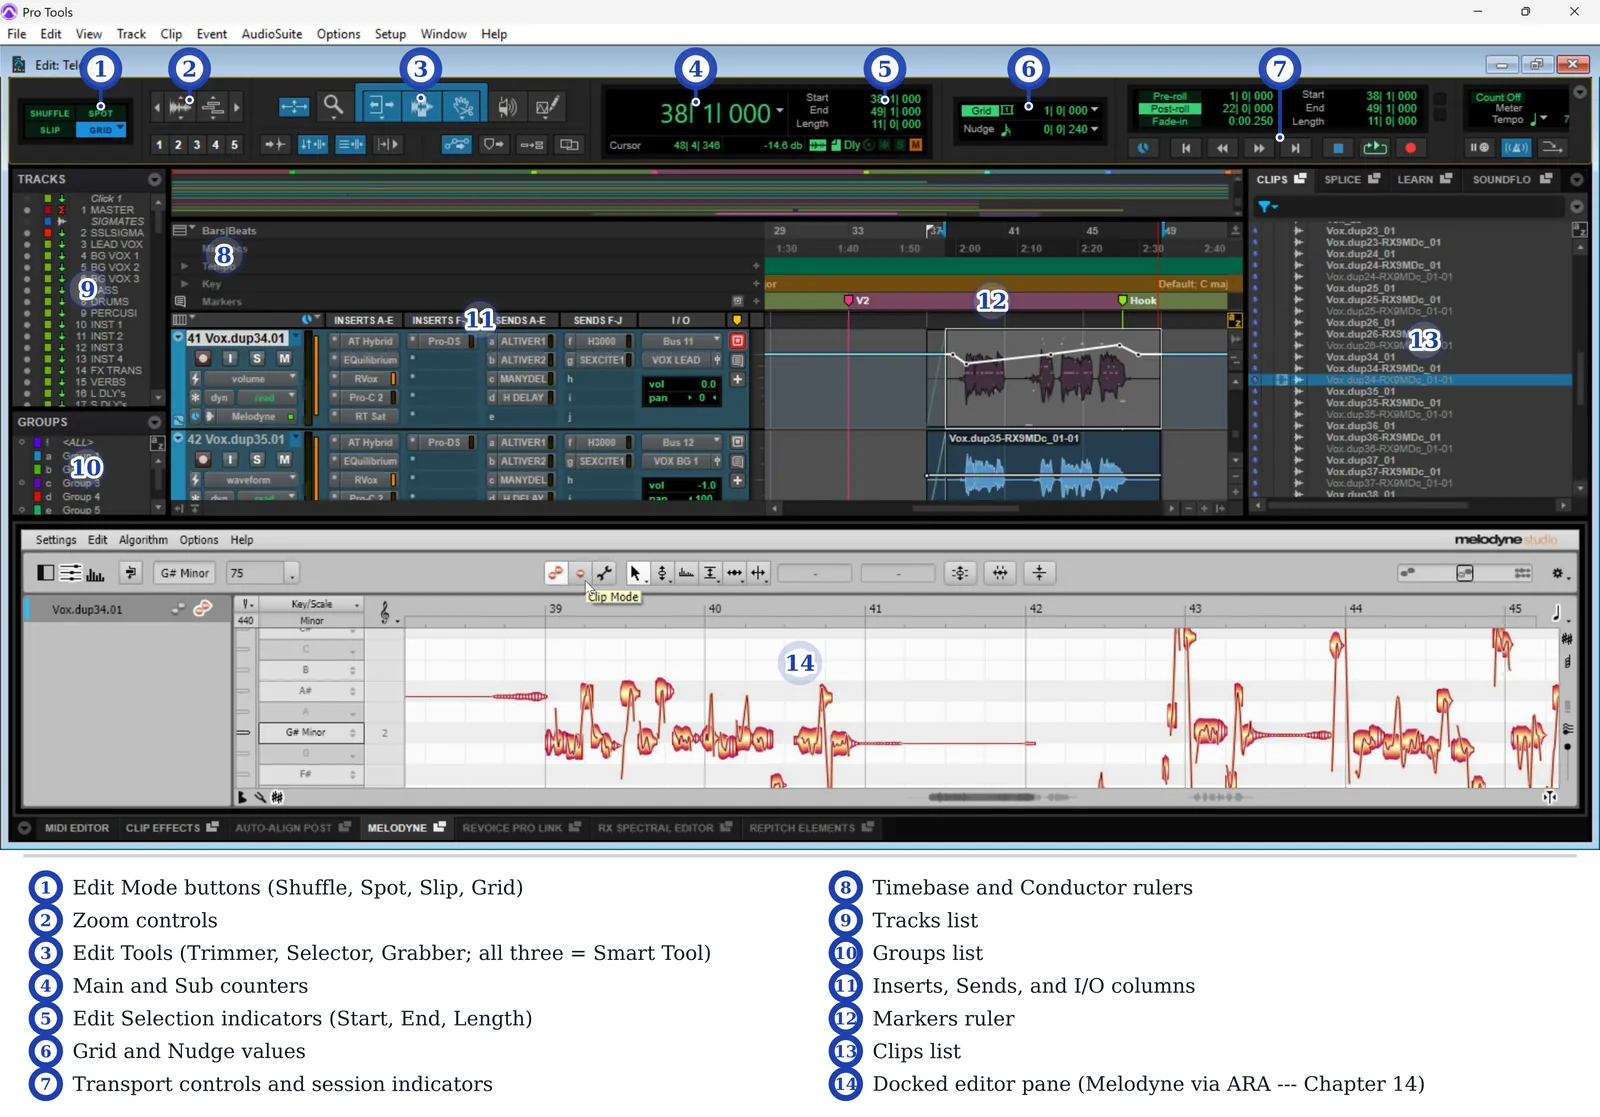
In the Timebase and Conductor Rulers, enable Bars|Beats, Markers, and Tempo. In the track view columns, enable Inserts A–E, Sends A–E, I/O, and Track Color. Add Inserts F–J and Sends F–J when needed, but keep the display minimal for screen space.
In the Grid and Nudge Values box, make sure the Grid button is enabled (it highlights when active). Click the triangle next to the grid values and select Bars|Beats (not Min:Sec) so the grid follows tempo. Set the Grid to 1/4 note and Nudge to 1/8 note as starting values.
The cleanest engineers I have watched all set up the Edit Window the same way every time. They reach for the same buttons in the same order; twenty seconds later the screen looks exactly how they want it, and they are ready to work. That repetition is the speed compounding—do the same setup a thousand times and your hands stop thinking about the layout and start thinking about the music.
Edit Modes
suggest a correctionPro Tools has four editing modes that control how clips behave when moved or edited, and choosing the wrong one at the wrong moment can ruin an edit in a single click. I have watched students accidentally shuffle an entire session out of alignment because they did not realize they were in Shuffle Mode. Always check which mode you are in before making a move.
Slip Mode is Pro Tools' default—pure freedom to place and edit clips at any time point with no snapping or constraints. Many engineers, though, live in Grid Mode for music: I almost never work in Slip, staying in Grid and holding Cmd/Ctrl to slip when I need a fine adjustment.
Grid Mode snaps clips and edit positions to the grid value (1/4 note, 1/8 note, and so on)—essential for copying parts, producing on the beat, quantization, and looping. Cmd-click (Mac) or Ctrl-click (Windows) temporarily suspends the grid inside Grid Mode, letting you make fine adjustments without switching out of it.
Shuffle Mode shifts clips to fill gaps when audio is deleted—useful for dialog editing and voiceovers where you want everything to close up after cuts. It is dangerous for music editing, though, because one accidental delete can cascade-shift every clip downstream of it. Glance at the toolbar before you delete anything in a music session; if Shuffle is active, switch to Slip first. Spot Mode places clips at a precise timecode location you type in. It is essential for sound design to picture, where effects must land at exact frame positions, and largely irrelevant for music work.
Edit Tools
suggest a correction
The Edit Tools are seven cursors you swap between to do different jobs. The Zoomer magnifies waveforms—draw a box around a region and Pro Tools zooms to fit. You can also zoom without switching tools using keyboard shortcuts: Option+scroll on Mac or Alt+scroll on Windows for horizontal zoom, Option+Shift+scroll or Alt+Shift+scroll for vertical waveform-amplitude zoom, and Shift+scroll for horizontal scroll. The Trimmer extends or shortens clip boundaries from either end; remember that you are not deleting audio, you are hiding it—the original file is untouched.
The Selector highlights time selections across one or more tracks—this is how you mark a region for editing, bouncing, or applying AudioSuite processing. The Grabber clicks and moves clips; in Grid Mode, clips snap to the grid as you drag. The Scrubber plays audio at the point you click and drag—like scrubbing tape across a playhead, useful for finding exact edit points by ear. The Pencil draws automation curves, edits waveforms at high zoom (for fixing clicks and pops sample by sample), and writes MIDI notes directly into the piano roll.
And then there is the Smart Tool—the most powerful and versatile of them all. The Smart Tool combines Trimmer, Selector, and Grabber into a single context-aware cursor based on where your pointer sits inside a clip. Hover above the midpoint and you get the Selector; below the midpoint gives you the Grabber; at clip edges you get the Trimmer; at clip corners you get Fade and Crossfade. The Smart Tool is the most-used tool in professional studios because it eliminates constant tool switching. The day I committed to staying on the Smart Tool and using cursor position instead of palette clicks, I literally edited twice as fast. Learn to use it instinctively and you will too.
One more navigation aid worth knowing now: Tab to Transient. Click the Tab to Transient button in the Edit Window toolbar (the icon with the arrow next to a clip), and the Tab key changes behavior—instead of moving by frames, it jumps the cursor to the next transient on the selected track. The next kick hit, the next vocal phrase, the next note attack. Option+Tab (Mac) or Ctrl+Tab (Windows) jumps to the previous one. Once you have it on, you stop dragging the cursor by hand and start hopping between musical events. We will use it heavily in editing chapters.
Preferences
suggest a correctionOpen Setup → Preferences and configure these essential settings:
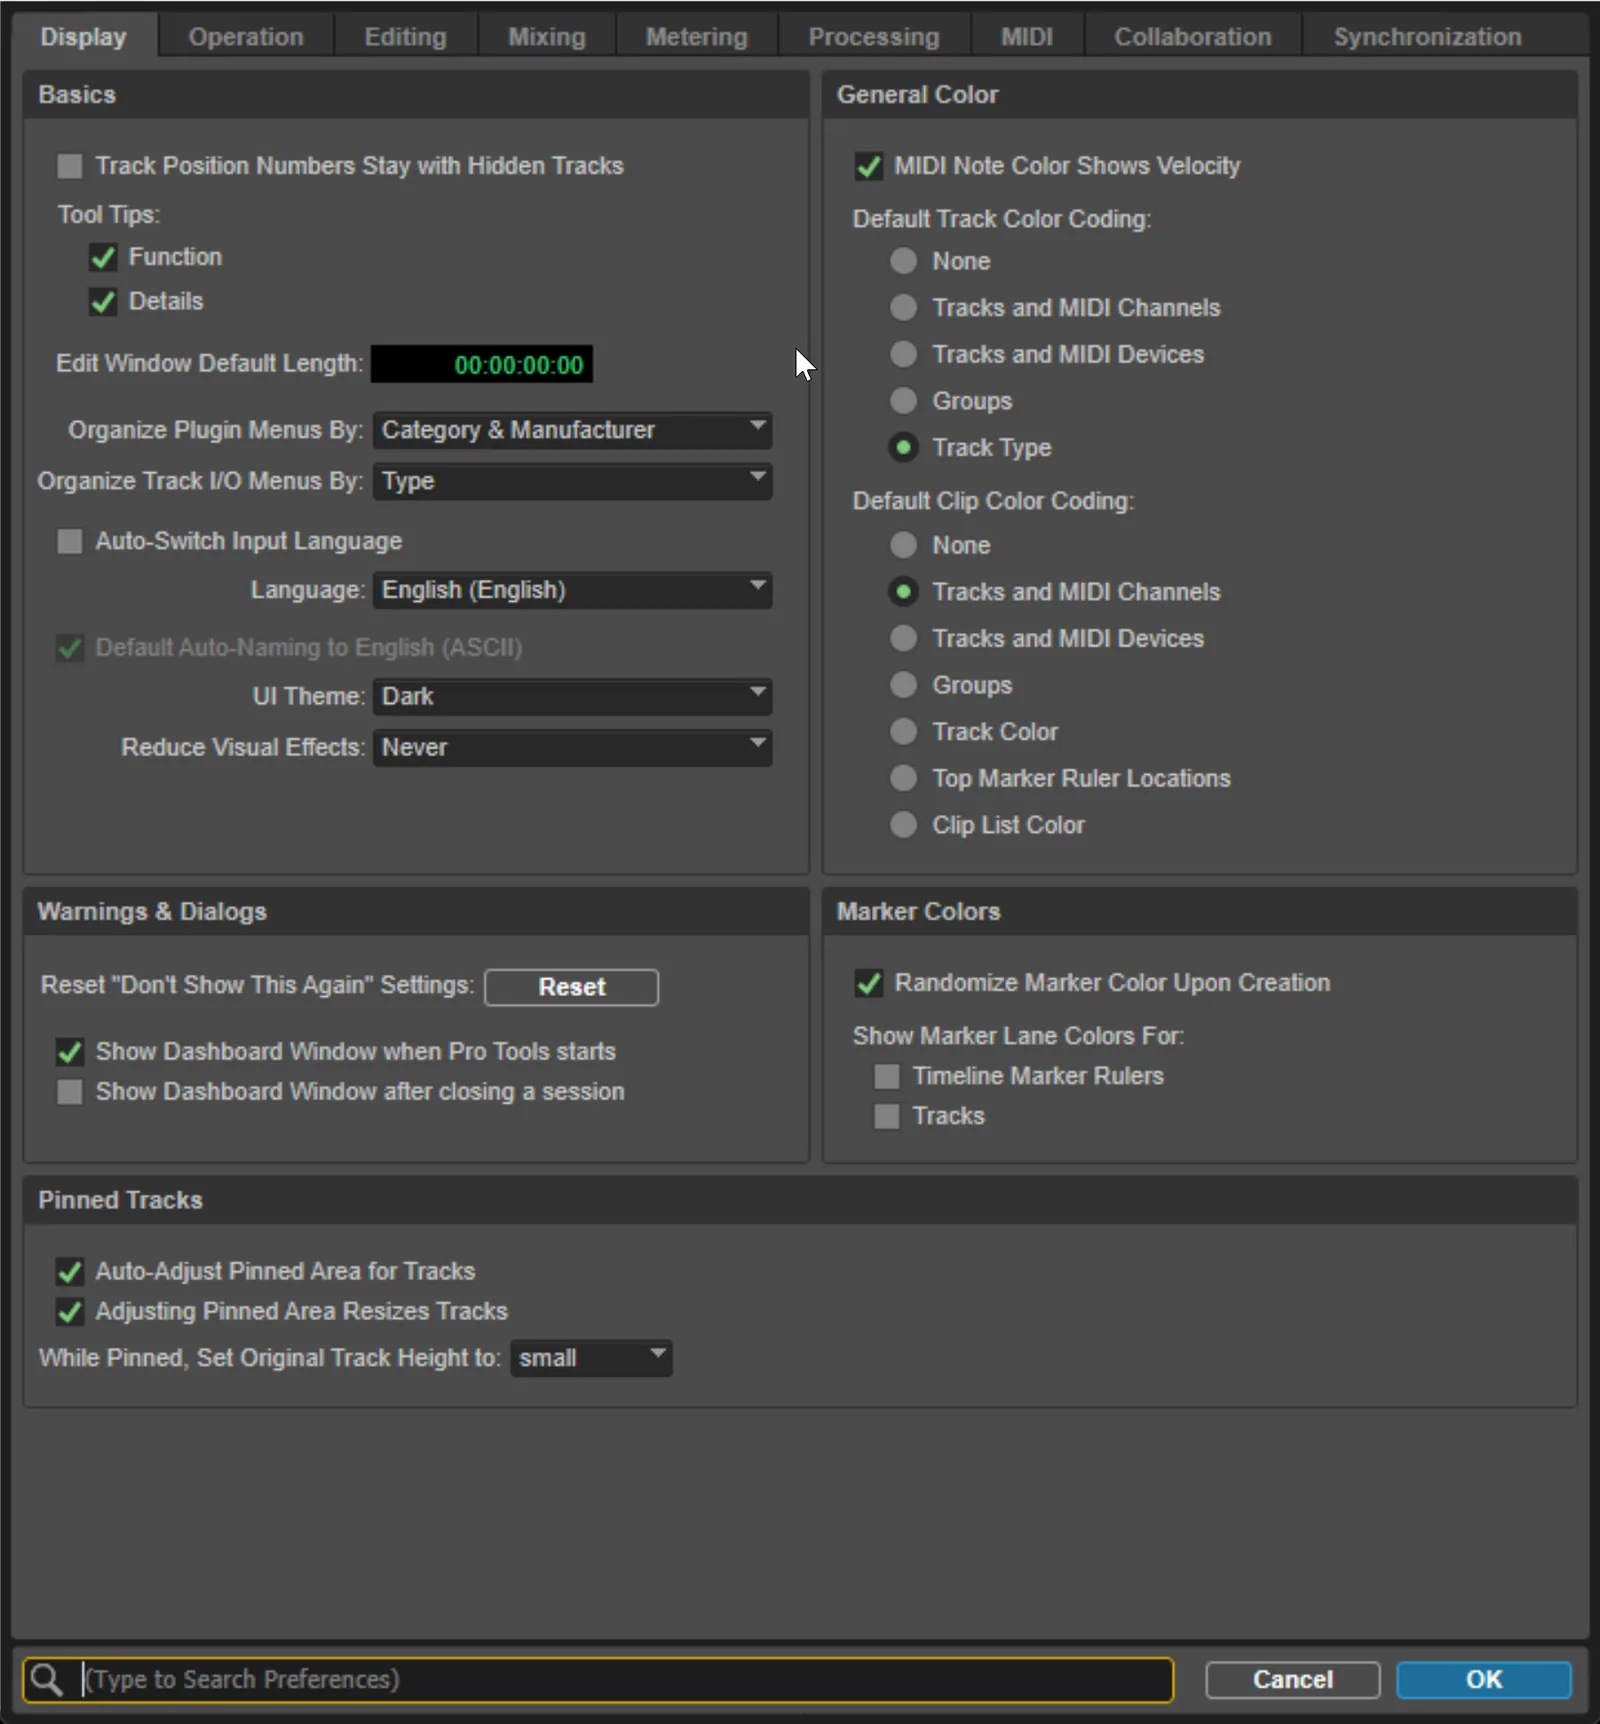
Display tab: Set “Organize Plug-in Menu By: Category and Manufacturer” for easier plugin navigation. Set Default Track Color Coding to “Track Type” and Default Clip Color Coding to “Tracks and MIDI Channels.” Color coding makes large sessions visually manageable—you can spot all your drum tracks at a glance.
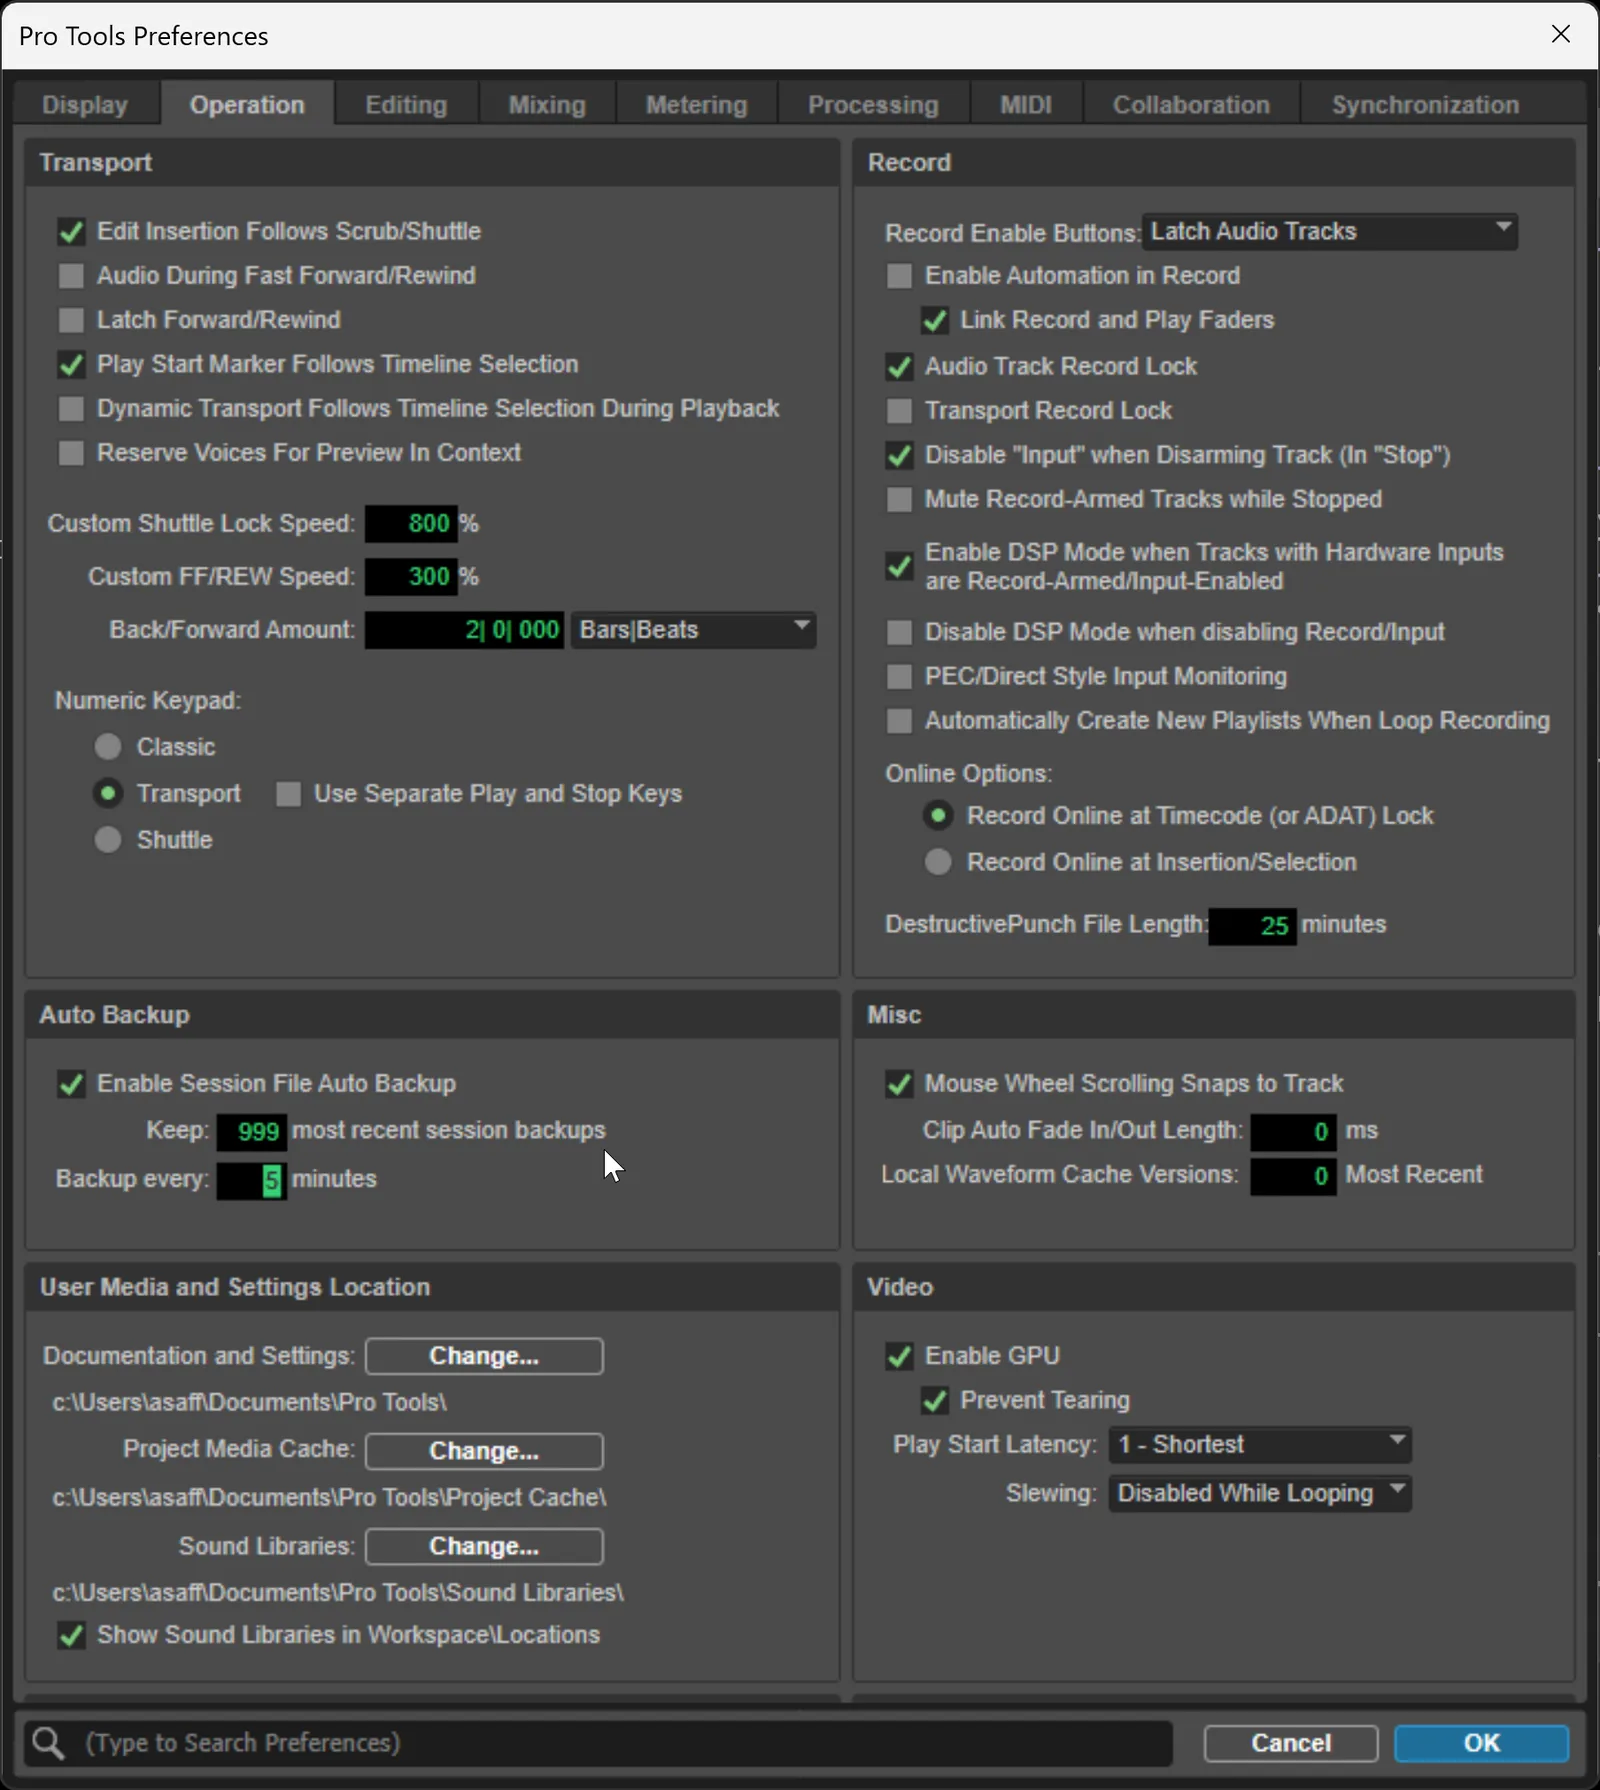
Operation tab: Enable Session File Backups. I keep the 999 most recent and back up every five minutes—the files are tiny, there is no real reason to keep fewer. This single setting has saved me from more disasters than I can count: a power flicker, a plugin crash, an accidental bus reroute that took out the whole mix—each time the answer was “open the most recent backup and pick up where I left off.”
If Pro Tools ever starts acting genuinely strange—phantom errors, broken UI, missing menus—the troubleshooting move of last resort is to trash the preferences. Quit Pro Tools, then manually delete the Pro Tools preferences and database folders.
- Mac:
/Library/Preferences/Avid/Pro Toolsand/Library/Application Support/Avid/Pro Tools/Databases - Windows:
%APPDATA% Avid Pro Tools
Pro Tools rebuilds both folders from scratch on the next launch. You will lose your custom preferences and have to redo this setup, but you will also fix nine out of ten “why is Pro Tools broken” problems instantly.
Playback Engine and Buffer Settings
suggest a correctionThe Playback Engine (Setup → Playback Engine) controls how far in advance Pro Tools calculates its processing. The key setting is the Hardware Buffer Size, and getting it wrong is one of the most common problems students face. Here is the rule:
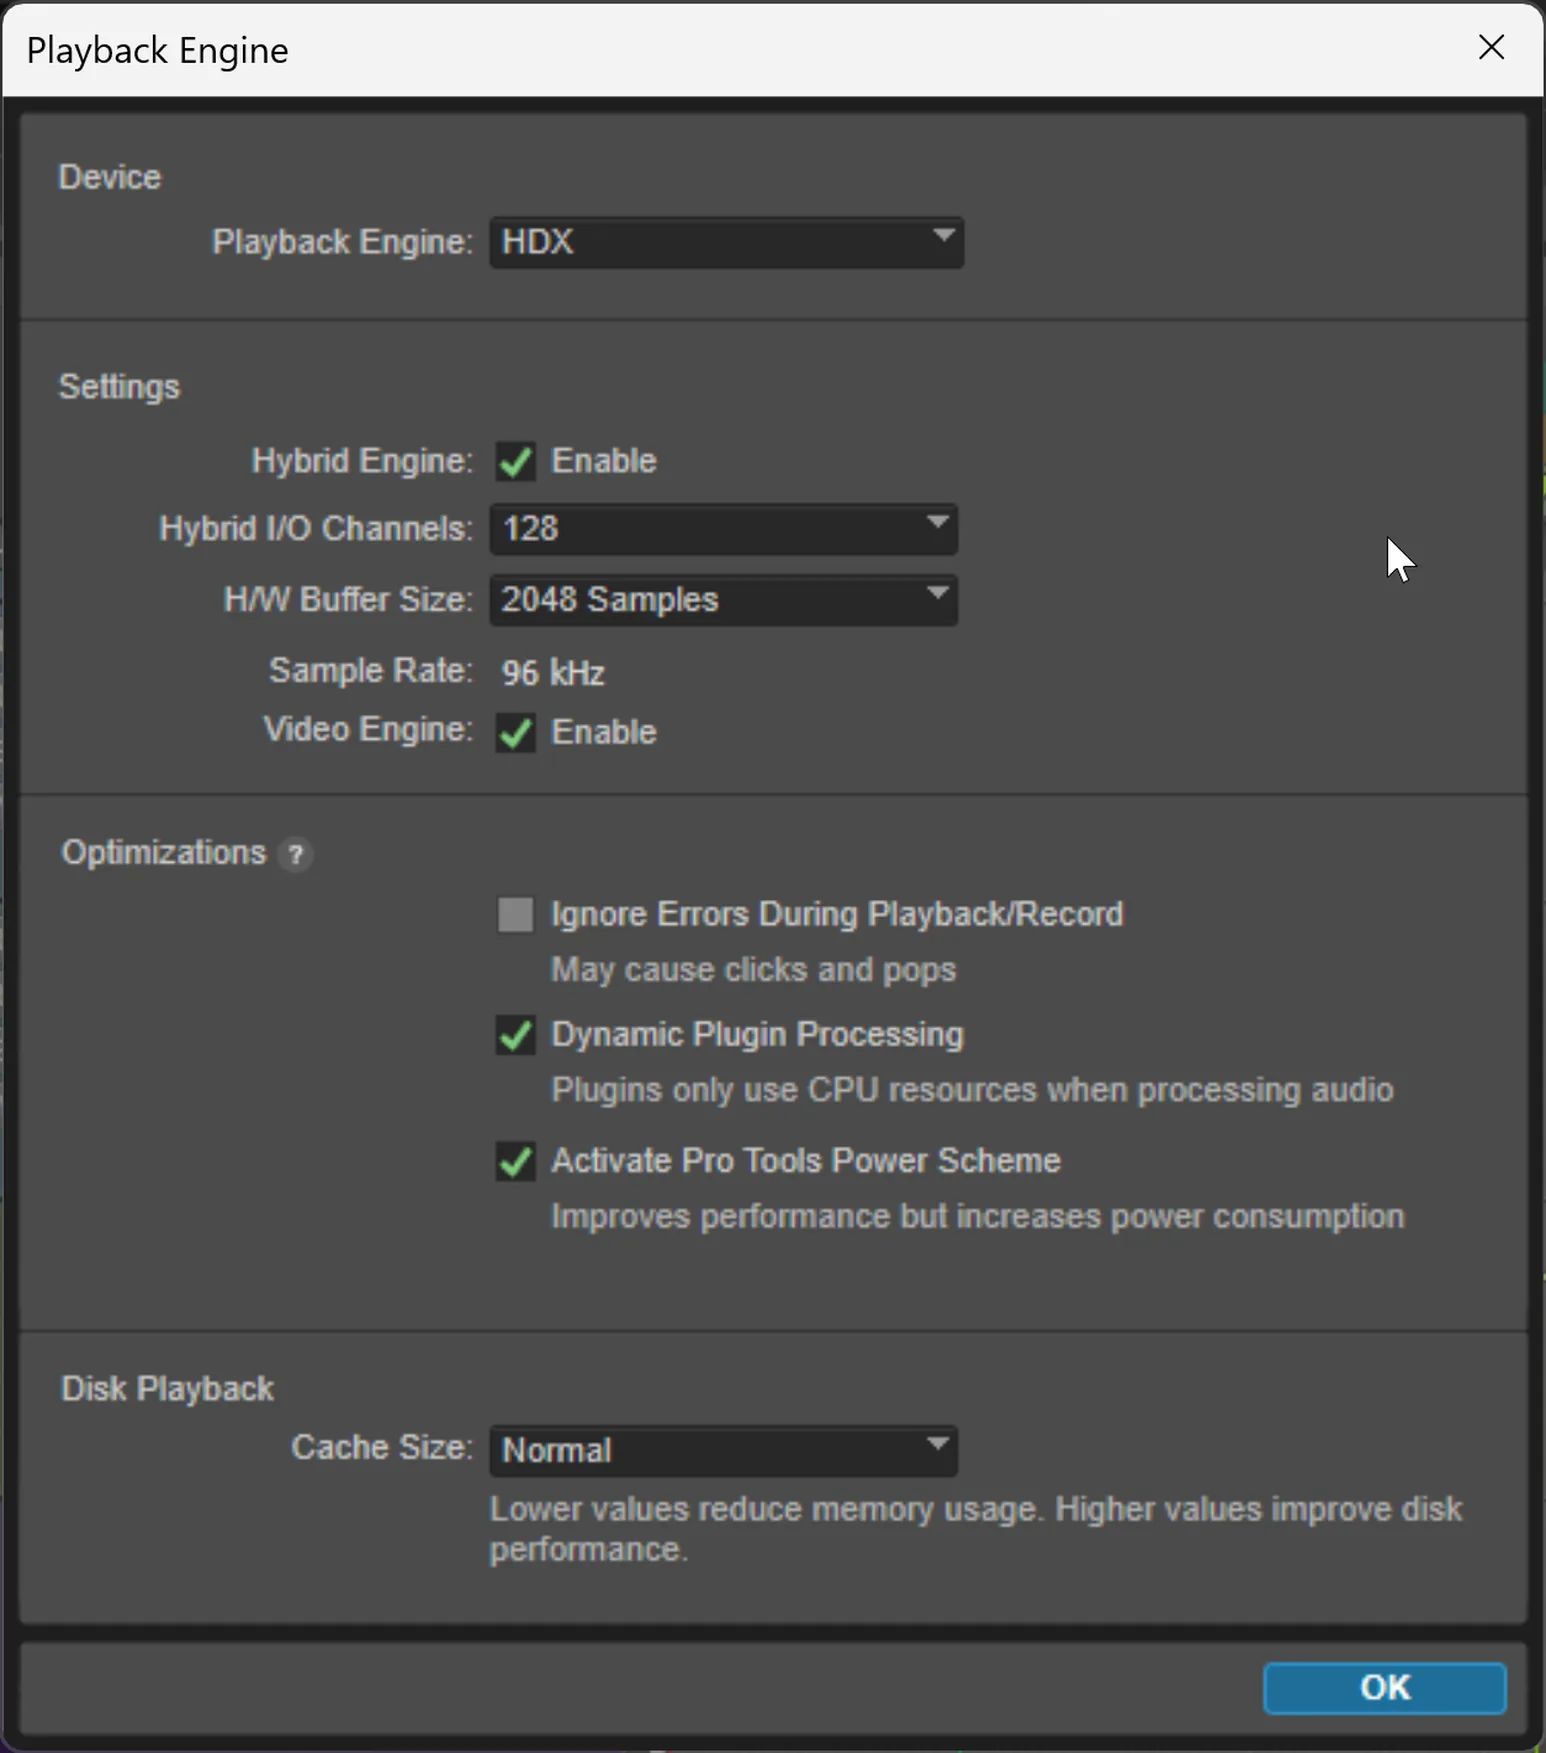
Recording: — Set to 64–128 samples for minimal latency. If the buffer is too high, the performer will hear a delay between singing into the microphone and hearing it back—making it nearly impossible to record a natural performance. You will experience this firsthand in Chapter 12.
Mixing/Mastering: — Set to 512–1024 samples (or 2048 at higher sample rates) to give the CPU maximum time for processing high plugin and track counts.
Automatic Delay Compensation (ADC) corrects timing shifts caused by CPU-intensive plugins. Always keep ADC enabled for mixing and mastering (Options → Delay Compensation). If it creates latency during recording, temporarily disable it.
Enable Dynamic Plug-in Processing in the Playback Engine for efficient multi-core CPU usage. I recommend never checking Ignore Errors During Playback/Record—while it prevents session stops, it may allow clicks and pops to enter a recording unnoticed, and a recording with hidden glitches is worse than a session that stops and tells you something went wrong. Leave the disk cache on Normal and let Pro Tools manage it—there is rarely a reason to set it by hand. (On an HDX system you can also stop fiddling with the buffer at all: leave it high and use Low Latency Monitoring to record at near-zero latency—covered in Chapter 12.)
What Else Is in Pro Tools
suggest a correctionPro Tools has more features than any single chapter can cover, and the rest of this book introduces them in context as you need them. Elastic Audio (real-time time-stretching), Playlist Comping (multi-take vocal assembly), and ARA2 integration with Melodyne and iZotope RX all live in Chapter 14 (Editing). Commit and Folder Tracks for managing CPU and large sessions are introduced in Chapter 14 (Editing).
The rest of the modern feature set—Pro Tools Sketch, Splice integration, AI Speech-to-Text, Cloud Collaboration, HEAT, Apple Silicon native operation, Clip Effects, MIDI effects plugins, Track Markers—is introduced in Chapters 12 through 22, where each one earns its keep. Skim the index when you hit a feature you have not seen yet. This book is built so the explanations show up when you actually need them, not before.
Session Management and File Organization
suggest a correction“Anyone can drop into any one session and know where everything is laid out on the console and where the Pro Tools files are set up. It's very consistent from session to session.”
—Sylvia Massy (Tape Op #63, 2008)
My first day as an assistant in a working studio, the head engineer pointed me at a hard drive and asked me to pull up Thursday's vocal session. I opened the drive and found folders named “untitled session,” “new session 2,” “mix FINAL,” “mix FINAL2,” “mix FINAL FINAL use this one,” and “asdfjkl.” Twenty minutes of digging later I found the right one. That studio was a hot mess—folders no one could navigate, no naming convention, no system—and an assistant pays for someone else's chaos. I did not get asked back, but the lesson is not that I was slow; it is that disorganization makes everyone around it slower and burns the trust of every client who has to wait. (The postscript: the artist I was there to help eventually left that studio too, and tracked me down to work together. Organization is the reputation that follows you.) The engineer who can find any session, any track, any version in thirty seconds is the engineer who keeps getting calls. This is why session management matters, and why every habit in this section is non-negotiable.
Naming conventions are where it starts. Develop a consistent system and use it every single time. A good session name includes the date, artist, and song: 2026-03-15_ArtistName_SongTitle_v1. Track names should be descriptive—“Lead Vox,” “Kick In,” “Snare Top,” “Bass DI,” “Ac Gtr L.” Never leave a track named “Audio 1.” When you come back to a session six months later—or when someone else opens it—clear names save hours. They also make file search work for you instead of against you: a quick Spotlight or File Explorer search for “LeadVox” across your archive returns every lead vocal you have ever recorded, instantly. Bad names mean searching does not work; good names mean your entire archive becomes queryable.
Session templates compound that discipline. Create Pro Tools session templates for your most common workflows. A recording template might include pre-labeled tracks (Kick, Snare, OH L/R, Bass, Gtr 1, Gtr 2, Keys, Lead Vox, BG Vox), a click track, headphone cue sends already routed, and your preferred I/O settings loaded. A mixing template might include buses for drums, bass, guitars, vocals, and effects, with your go-to plugins already instantiated. Templates save 15–30 minutes of setup on every session—and over a year, that adds up to dozens of hours you spent making music instead of clicking.
A backup strategy is just as essential as a naming convention. The 3-2-1 Rule: keep at least 3 copies of your work, on at least 2 different types of media, with at least 1 copy stored offsite (or in the cloud). Hard drives fail. It is not a question of if, but when. A single external SSD for daily backup, plus a cloud backup service like Backblaze (or a sync service like Google Drive or Dropbox), gives you the minimum professional safety net. The day a drive dies on you is the day you find out whether you took backups seriously.
Archiving completed projects is the last habit. When a project is finished, the safest approach is to use File → Save Copy In with “Include All Audio Files” checked. This creates a clean, self-contained copy of the session with only the audio that belongs to it. Include a text file with session notes: sample rate, bit depth, tempo, key, plugin list, and any recall notes for outboard gear. Some engineers prefer to consolidate the session (select all, Edit → Consolidate Clip) and then remove unused audio files from the Clip List—but be careful. Deleting unused files can break previous session saves that reference those files. Only consolidate if disk space is a serious concern and you are certain you will not need earlier versions.
Your Foundation
suggest a correction“Not letting the technology get in the way is a giant thing. The whole point is to make the tweaking process as transparent as possible when you are trying to be creative.”
—Bob Power (Tape Op #60, 2007)
Everything in this chapter—every setting, every tool, every preference—is the foundation that the next eleven chapters are built on. The session you create here is the session you will record into in Chapter 12, produce in Chapter 13, edit in Chapter 14, and mix in Chapter 18. If the foundation is sloppy—wrong sample rate, no backups, no naming convention, no understanding of edit modes—every chapter that follows will be harder than it needs to be.
I tell my students: nobody will ever compliment you on your session setup. No client will listen to the final mix and say, “Wow, the track naming was incredible.” No one sees the backup strategy, the template, the buffer setting, the color coding. But every engineer who has ever lost a session to a hard drive crash, or spent an hour searching for a file called “Audio 47,” or had a vocalist walk out because the headphone mix was unusable—every one of them will tell you that the invisible work is the most important work.
Here is what I wish someone had told me on day one: the fastest engineers are not the ones who know the most shortcuts. They are the ones who never have to think about setup. Their template loads, their tracks are named, their routing is done, their buffer is set, and they are ready to record before the artist finishes setting up in the booth. That speed comes from preparation: a template ready before the call, a sample rate set, a buffer that fits the work, backups running quietly. It comes from this chapter.
When I think back to that first sixteen-track room, the biggest difference between then and now is not the track count or the plugin quality. It is that I finally understand how to set up a session properly before I start working. That understanding—the boring, unglamorous, nobody-sees-it foundation work—is what separates a professional from an amateur. Master these fundamentals, and the creative work that follows will flow. Chapter 12 begins the moment you press record.
Think of it like an airline cockpit: the experienced pilot is not the one with the fastest reflexes, but the one who has never had to think about a switch because every switch has been checked twice before takeoff. Be that engineer at the start of every session. The freedom you build through preparation is what lets the creative work surprise you later.
Review Questions
Work these before moving on — every question is answerable from this chapter. Written answers live in the instructor Answer Key, available to course adopters.
- What does non-destructive editing mean, and why is it the foundation of modern audio production?
- What are the four current tiers of Pro Tools, and what are the key differences between them?
- What is the difference between AAX Native, AAX DSP, and AudioSuite plugins, and when would you reach for each?
- What are the subfolders created inside a new Pro Tools session, and what does each contain?
- Yes or No: Can a session be transferred to another studio with just the Pro Tools session file alone? Explain.
- If you open a Pro Tools session and every track shows a sky-blue italicized file name, what likely happened, and how do you fix it?
- List and describe the four edit modes in Pro Tools. Which one is dangerous in a music session, and why?
- What is the Smart Tool, and why is it the most-used tool in professional studios?
- What is Tab to Transient, and how does it speed up editing?
- If a performer hears a delay between singing into the microphone and hearing it back, walk through your fix.
- What is the difference between the Mix Window and the Edit Window, and how do you switch between them?
- What sample rate and bit depth would you choose for a music production session, and why?
- What is ADC (Automatic Delay Compensation), and why is it important for mixing?
- What is the recommended buffer size for recording? For mixing? Why the difference?
- Name three DAWs other than Pro Tools and briefly describe what each is known for.
- Describe a professional naming convention for Pro Tools sessions and tracks. Why does it matter for file search across your archive?
- What is the 3-2-1 backup rule? Apply it to a studio scenario.
- What steps should you take when archiving a completed Pro Tools project?
- If Pro Tools is acting strange—phantom errors, broken UI, missing menus—what is the troubleshooting move of last resort?
Studio Exercise: Build a Session Template
The session template you build in this exercise becomes the foundation that every chapter from here forward sits on. You will record into it in Chapter 12, produce in it in Chapter 13, edit in it in Chapter 14, and mix in it in Chapter 18. Build it once, build it well, and the next eleven chapters will move twice as fast.
Part A: Configure the session. Open Pro Tools and create a new blank session. Set the audio file type to WAV, the sample rate to 96 kHz, the bit depth to 32-bit float, and the I/O at default Stereo Mix. Save it to your dedicated audio drive. Then open Setup → Playback Engine and set the Hardware Buffer Size to 64–128 samples for tracking. Open Setup → Preferences and turn on Session File Backups (999 most recent, every 5 minutes), set “Organize Plug-in Menu By: Category and Manufacturer,” and set Track Color Coding to “Track Type.”
Part B: Build the standard track set. Create the following tracks, named exactly as listed: Kick In, Kick Out, Snare Top, Snare Bot, HH, Tom 1, Tom 2, OH L, OH R, Room L, Room R, Bass DI, Bass Amp, Gtr 1, Gtr 2, Keys, Lead Vox, BG Vox 1, BG Vox 2. Color-code each group (drums one color, bass another, guitars another, etc.). Group related tracks using Track Groups (Cmd+G / Ctrl+G)—or, if you are comfortable with Folder Tracks, wrap each instrument family into a folder. Create a stereo Aux Track called Verb Send and a stereo Aux Track called Delay Send. Route every track's relevant send to those aux returns (sends and Aux routing are covered fully in Chapter 12—if this feels opaque, create the Aux tracks now and wire the sends after that chapter). Create a Master Fader on the main output. Producer/beatmaker alternative: if you work in hip-hop, R&B, or electronic music rather than tracking live bands, build this set instead: Beat/Drums, 808/Bass, Melody, Lead Vox, BG Vox, Ad-libs, FX. The point of the exercise—named tracks, color groups, routed sends, a saved template—is identical; only the track list changes to fit your workflow. (On the free Pro Tools Intro, which caps at eight audio tracks, build this seven-track set rather than the nineteen-track live-band template above, then expand once you move up to Artist or Studio.)
Part C: Save it as a template. File → Save As Template. Name it Tracking_Template_v1. Document what is in it—tracks, folders, sends, buses, buffer setting—in a text file alongside the template. Submit: an Edit Window screenshot of the full track set, the .ptxt template, and the documentation file.
Common pitfalls. Three things students miss: (1) Track order matters as much as names—drums at the top, vocals at the bottom, in the order you would mix them. (2) Save the template before the temptation to add “just one more thing”—a clean, minimal template adapts to every session. (3) Test it by creating a new session and confirming everything loads: tracks, routing, sends, colors. A misrouted bus or missing send caught now saves an hour later.
Submission. Combine the screenshot, the .ptxt file, and the documentation text into a single zipped folder named TrackingTemplate_LastName.zip. Build it well—it is the foundation for everything that follows.